Calendars
Use the Calendar Manager panel to define working and non-working times for the project. You can apply a calendar to an entire project, to resources in the resource definitions, or to activities for future development.
Instructions
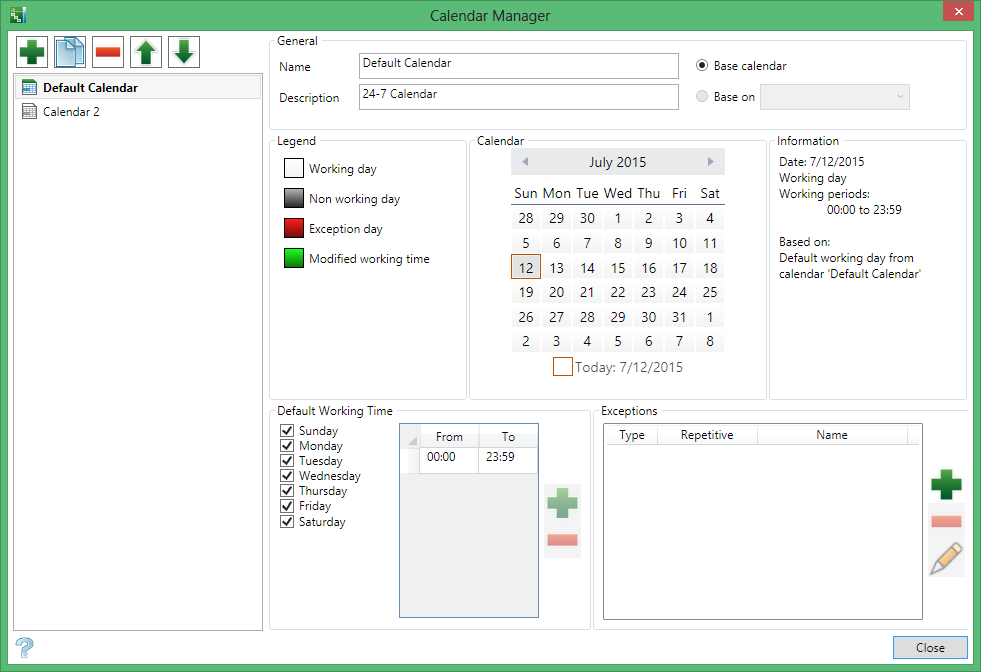
On the Setup tab, in the Settings group, click Calendars to display the Calendar Manager panel.
General Workflow
-
Click the green + button to add a new calendar, or click a calendar name to edit an existing calendar.
-
Select Base on to call existing calendar settings as a starting point.
-
Define working days and times in Default Working Time.
-
Configure days with no production in Exceptions.
Calendars
Adding and Defining a New Calendar
Click Add ![]() to add a new entry, or press the INSERT key on your keyboard.
to add a new entry, or press the INSERT key on your keyboard.
Modifying a New Calendar
Select an entry and modify the displayed information as needed.
Copying a Calendar
Select an entry and click Copy ![]() to create a copy of the selected entry or press Ctrl+ C.
to create a copy of the selected entry or press Ctrl+ C.
The name of the new calendar will be the name of the copied calendar appended by the word copy. For example, if the original calendar name is Holiday, the new calendar created from the Copy function will be Holiday copy.
Removing a Calendar
Select an entry and click Remove ![]() to remove the selected entry or press Delete. The entry can only be removed if it is not being used in the project.
to remove the selected entry or press Delete. The entry can only be removed if it is not being used in the project.
Moving a Calendar Up or Down in the List
Select an entry and click Up ![]() or Down
or Down ![]() to move the entry up or down in the list, or press Ctrl + Up arrow or Ctrl + Down arrow.
to move the entry up or down in the list, or press Ctrl + Up arrow or Ctrl + Down arrow.
Calendar Specifications
Name
Enter a name for the calendar.
Description
Enter a description for the calendar.
Base calendar
Select this option if the calendar is not based on another calendar.
Base on
Select this option if the calendar is based on another calendar, and select the base calendar from the drop-down list. Any information from the chosen base calendar will be included on the new calendar.
Calendar, Legend, and Information
These sections display the information for dates on the selected calendar. Days with a non-working time exception have a red background, days with modified (non-default) working time have a green background, normal working days have a light grey background, and non-working days have a dark grey background. Information about the selected day is displayed in the Information section.
Default Working Time
Use this section to set the default working days and times for the week. Select the check boxes next to each default working day. Clear the check boxes next to any default non-working days. Enter the default start and end times in the From and To columns using a four-digit 24-hour notation. For example, enter 06:00 for 6:00 a.m. and 13:00 for 1:00 p.m.
Exceptions
Use this section to define any exceptions to the default working week.
Click Add ![]() to add a new exception.
to add a new exception.
Highlight an entry and click Remove ![]() to remove the exception from the list.
to remove the exception from the list.
Highlight an entry and click Modify ![]() to modify an existing exception.
to modify an existing exception.
If you click Remove, the exception will be removed from the list. If you click Add or Modify, the Exception panel displays.
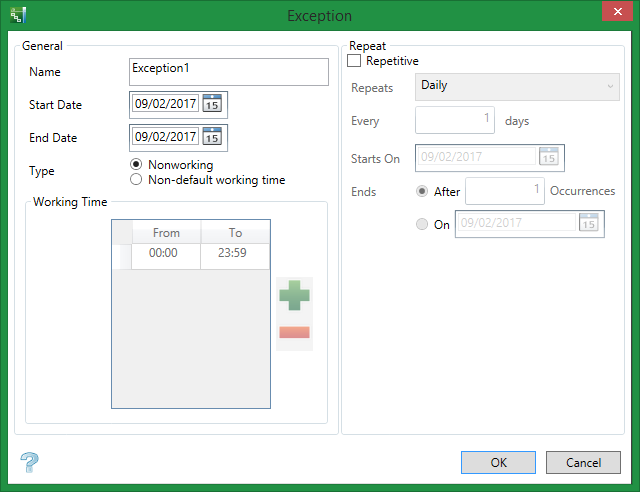
General
Name
Enter a name for the exception.
Date
Enter the date of the exception in mm/dd/yyyy format or click the calendar ![]() icon to select a date.
icon to select a date.
Type
Select Nonworking for regular non-working time or select Non-default working time to specify that the exception is working time that is outside of the default schedule. If you select Non-default working time, specify the time range in the Working Time section.
Working Time
Enter the time range in the From and To columns using a four-digit 24-hour notation if you selected Non-default working time in the Type section. For example, enter 06:00 for 6:00 a.m. and 13:00 for 1:00 p.m.
Repeat
Repetitive
Select the Repetitive check box if the exception is recurring. If selected, specify how often and when the event repeats. To change a reoccurring exception to a one-time exception, clear the Repetitive check box.
Repeats
Select Daily, Weekly, Monthly, or Yearly from the drop-down list to specify how regularly the exception repeats.
Every... days/weeks/months/years
Enter a number to indicate the frequency of the exception. For example, if the exception occurs every two weeks, in the Repeats drop-down list, select Weekly, and then in the Every box, enter 2.
Starts on
Enter the date of the first occurrence of the exception in mm/dd/yyyy format or click the calendar icon to select a date.
Ends
Select After... Occurrences to specify a finite number of occurrences or On to specify a date for the last occurrence of the exception. If you select After... Occurrences, enter the number of occurrences in the box. If you select On, enter the date of the last occurrence in mm/dd/yyyy format or click the calendar icon to select a date.
Apply a Calendar to the Entire Project
You can apply a calendar to the entire project by selecting the name of the calendar from the Calendar drop-down list on the Project Options panel.
Create a default calendar with standard holidays and work times. Create other calendars from this default template.
When a new calendar is created based on an existing calendar, it is not possible to convert non-work times or days present on the existing calendar to working times or days on the new calendar.
To create an exception for consecutive days, select several days on the Calendar and click the green + button in the Exceptions area. Additionally, select an individual day and click the green +. In the Exception panel, assign a start and end date for the exception days, or make the exception days reoccurring.

