Create/Modify Locate
Use this option to define conditions for locating loaded drillholes. If a hole meets the specified conditions, then it is then highlighted with a coloured square at the hole's collar.
Instructions
On the Geology menu, point to Drilling Utilities, then click Create/Modify Locate.
Note: If you have not open a drillhole database and loaded the drillholes onto the screen, you will be prompted to do so before the panel displays.
Follow these steps:
-
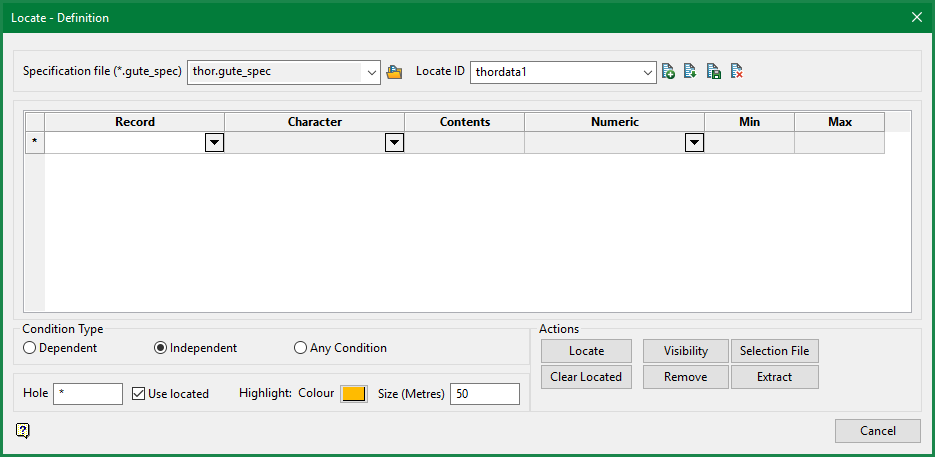
Select the Specification file ( *.gute_spec) that you want to use.
-
Enter or select the name of the Locate ID identifier that you want to view or modify. The list contains all of the definition identifiers stored in the specification file. To create a new ID, enter the identifier name.
-
Select the Record from the first column of the grid. This corresponds to the tables making up the drillhole database. This field is mandatory.
-
Select the Character and define its Contents in the second and third columns. These are for alpha fields and their values.
Note: These fields are only mandatory if you are searching by character-based criteria such as rock type, geology, DHID, etc.
-
Select a Numeric field, Then enter the Min and Max values to define their range.
Note: This field is only mandatory if you are searching by numeric-based criteria such as assay value, LECO, fuel value, etc.
Note: All entries are case-sensitive. "Au" is not the same as "au" or "AU".
-
Select a Condition Type.
Dependent
All of the conditions are satisfied by a single interval per hole. Conditions are checked in an order and by the record type.
Independent
All of the conditions are satisfied by one or more intervals per hole.
Any Condition
At least one condition is satisfied per hole.
-
Select the criteria for highlighting the selected drillholes. The result of the search will be shown as highlighted squares around the collars of the drillholes.
Hole
Enter the name of the drillholes to highlight. Multi-character (*) and single character (%) wildcards are allowed.
Use located
Select this check box to restrict the database search to holes located from previous searches. The search will be limited to the located holes - thus reducing the search time. The search will not be restricted to a previously defined interval, but will include all intervals in the previously located holes.
Highlight colour The colour of the highlighted squares around the collars of the drillholes. Size Adjusts the Size of the square. The default size is 50m from centre to the edge, making the squares 100 x 100 sq. metres. -
When you have completed your search criteria, click
 to initiate the search.
Important: Make sure the FROM and TO fields for the tables you plan to use are defined. If you have not established these definitions, you will be able to start the process, however, an error message will appear when you click the Locate button.
Other Actions after drillholes have been located
Clear Located Clears the selection results to allow another search. Visibility Render the selected drillholes invisible, or the unselected drillholes invisible. Remove Remove the selected drillholes, or remove the unselected drillholes. Selection File Create a selection file of the selected drillholes. Extract You can export the drillhole data to a database or CSV file.
Note: While exporting to CSV, if the first character of a text field other than key field is a double quote character and provided that it is the only double quote character in the text, the starting double quote will be removed to avoid formatting issues in CSV file.
-
After you have completed all your searches, click Cancel to exit the function.

