Rename
Use this option to rename selected existing triangulations with specified naming settings.
Instructions
On the Model menu, point to Triangle Files, then click Rename....
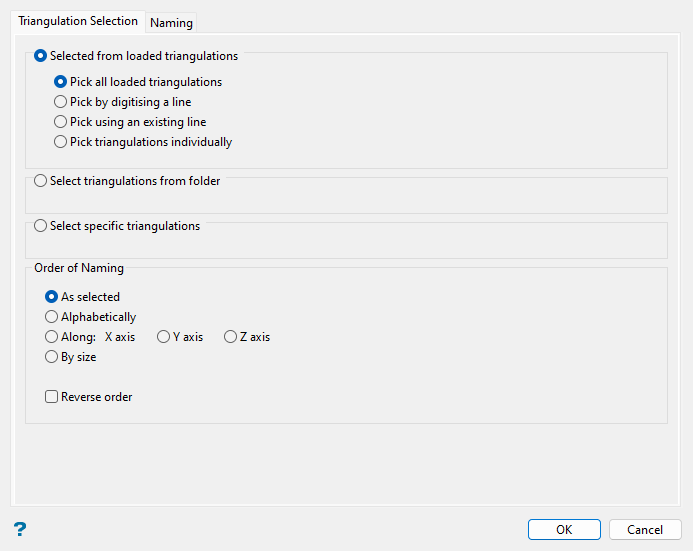
Triangulation Selection tab
Use this tab to nominate the method in which to select triangulations to rename.
Follow these steps:
-
Choose from the following methods to define how the triangulations to rename will be selected:
-
Selected from loaded triangulations: Select this method to choose from the set of triangulations currently loaded into the Vulcan workspace via the following options:
-
Pick all loaded triangulations: Selects all currently loaded triangulations (including hidden triangulations).
-
Pick by digitising a line: Selects loaded triangulations that intersect a line that you will be prompted to digitise after completing the panel.
-
Pick using an existing line: Selects loaded triangulations that intersect an existing line that you will be prompted to pick after completing the panel.
-
Pick triangulations individually: Selects specific triangulations from the screen that you will be prompted to pick after completing the panel.
-
-
Select triangulations from folder: Select this method to choose triangulations in a nominated folder, with the option to filter the selected triangulations by a specific pattern. Select from the Folder drop-down list, which contains all folders in your current working directory, or click Browse... to select a folder in another location.
You can then filter the triangulations by specifying a pattern for selected triangulations file names to match in the Wildcard field. Use
*for a multi-character and?for a single-character wildcard. -
Select specific triangulations: Select this option to choose one or more triangulations from one or more different folders. Select the desired triangulation file(s) from the displayed file list, which shows all available files in the current working directory. You can select files from a different location by clicking Browse..., or use the
 buttons to go to the last folder visited, go up one level, or change the way details are viewed in the panel, respectively.
To highlight multiple list items at once, use the left mouse option in combination with the Shiftkey (this is for items that are adjacent in the list; for non-adjacent items, use the Ctrlkey and the left mouse option).
TipTo filter file names using wildcard characters, type in a pattern in the Wildcard field using
*for a multi-character and?for a single-character wildcard.Move the items to the selection list on the right side of the panel.
- Click the
 button to move the highlighted items to the selection list on the right.
 - Click the
 button to remove the highlighted items from the selection list on the right.
 - Click the
 button to move all items to the selection list on the right.
 - Click the
 button to remove all items from the selection list on the right.
- Click the
-
-
Specify the order in which the selected triangulations will be renamed with the following options in the Order of Naming section. These settings are relevant if you are using a naming sequence, as specified in the Naming tab.
-
As selected: The triangulations remain in the order they were selected.
-
Alphabetically: The triangulations are ordered A through Z.
-
Along X/Y/Z axis: The triangulations are ordered by their lowest coordinate on the given axis (or highest if the order is reversed, see below).
-
By size: The triangulations are ordered by file size.
-
-
Select the Reverse order checkbox to reverse the defined order of the selected triangulations before renaming.
Naming tab
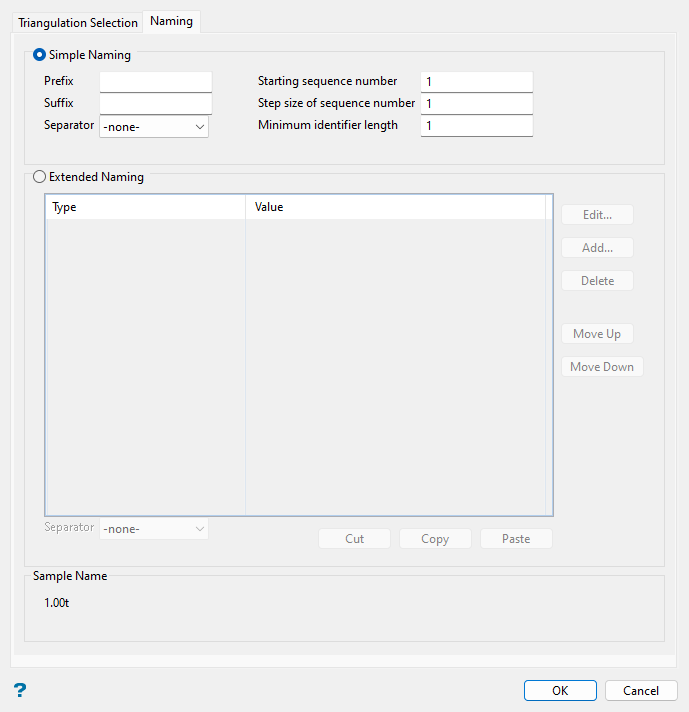
Use this tab to specify how the nominated triangulations will be renamed.
Follow these steps:
-
Select between Simple Naming or Extended Naming and set the available parameters:
-
Simple Naming: If you select this method of naming, the names of the nominated triangulations will be overwritten with a numbered set, as specified in this section. You have the option to define a naming Prefix and/or Suffix, as well as a Separator to include between the selected naming elements.
You will also need to define values for the following fields:
-
Starting sequence number: Enter the starting sequence number for the renamed triangulations. The numbered triangulations will start at this number and increase by the defined step size.
-
Step size of sequence number: Enter the size of the step increment for sequence numbers.
-
Minimum identifier length: Enter the minimum number of digits required for the sequence number. This number must be an integer that is greater than or equal to one.
ExampleBelow is an example of how four sample triangulations would be renamed based on the following options:
-
Prefix:
pre -
Suffix:
suf -
Separator:
_(underscore) -
Starting sequence number:
1 -
Step size of sequence number:
3 -
Minimum identifier length:
2
List of resulting triangulation names:
pre_01_suf.00t,pre_04_suf.00t,pre_07suf.00t, andpre_10suf.00t. -
-
Extended Naming: If you select this method of naming, you will have more options for name elements to include than the Simple Naming method. To create a new name element to include in the grid, click Add.... The following dialog displays for you to define the name element.
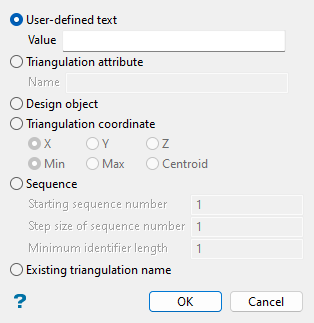
Select which of the available name elements you would like to include, then select OK to add to the name element to the grid or select Cancel to return to the panel without saving changes.
-
User-defined text: Select this option to enter text in the Value field that will be included exactly as entered in the triangulation naming.
-
Triangulation attribute: Select this option to enter a desired triangulation attribute in the Name field to be included in the naming. The attribute will only be included in the triangulation naming if present for the selected triangulation(s).
-
Design object: Selecting this option expands the dialog to display the following available object properties to include in the triangulation naming: Object name, Object layer, Object feature, Object group, and Object attribute. If you select Object attribute, you will also need to populate the Template name and Field Name fields.
Note: You will be prompted to select from object(s) loaded on the screen to include in the triangulation naming with this option after clicking OK in the main panel.
-
Triangulation coordinate: Select this option to choose the X, Y, or Z triangulation coordinate to include in the naming, based on either the Min, Max, or Centroid location.
-
Sequence: Select this option to number the triangulations based on the following sequence parameters:
-
Starting sequence number: Enter the starting sequence number for the renamed triangulations.
-
Step size of sequence number: Enter the size of the step increment for sequence numbers.
-
Minimum identifier length: Enter the minimum number of digits required for the sequence number. This number must be an integer that is greater than or equal to one.
-
-
Existing triangulation name: Select this option to include the original triangulation's name as a name element.
To add more name elements after the currently selected name element in the grid, click Add... again. You can modify a selected name element present in the grid by clicking Edit..., or click Delete to remove the name element from the grid completely.
To reorder the name elements, select one from the list and click Move Up or Move Down, or use the Cut, Copy, and Paste options to duplicate existing name elements in the list in a selected location and then edit as desired.
Use the Separator drop-down list to insert a delimiting character between name elements.
Note: If characters such as \ / : " ? * | < > are to be included in the triangulation file name through any of the selected Extended Naming name elements, they will be replaced automatically with the nominated Separator.
-
-
-
Review the Sample Name section at the bottom of the panel to preview the format of the triangulation naming and make any desired changes in the panel before clicking OK.
-
Click OK to complete the panel and rename the nominated triangulations as specified.
A confirmation panel will be displayed with a list of the original triangulation names and the new names based on the panel inputs. You will have the option to accept the new names as shown in this confirmation panel (Confirm Rename) or to return to the panel to modify the renaming parameters (Reselect).

