Traverse
Reduce a closed traverse
The Traverse option to reduce a closed traverse that has been picked up and stored in a GRE4, GIF10, GEODAT or LEICA reduction file.
Note: Files from Survey_GRE4.gif10/LEICA instruments in both the GSI8 and GSI16 formats are supported.
The closing station is checked for planimetric misclose and, if in a defined misclose ratio, then the traverse can be adjusted using least squares. The resultant adjusted stations can be saved to the station library. All this can be performed with or without UTM corrections being applied.
If you do rounds of traverse readings at each instrument station, then the readings will be averaged for the initial misclose check.
Instructions
- Select Survey menu
- Select Surveying submenu
- Select Traverse option
The following panel displays.
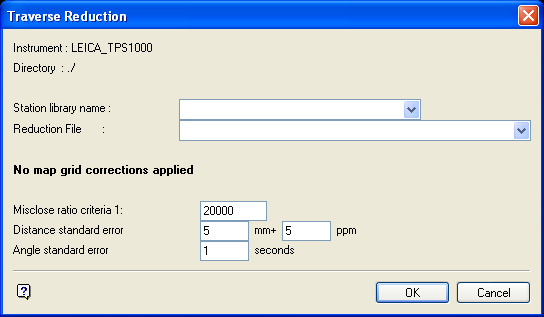
Traverse Reduction panel
Station library name
Enter, or select from the drop-down list, the name of the library in which to store the traverse station's coordinates.
Reduction File
Enter, or select from the drop-down list, the name of the reduction file that contains the closed traverse. The drop-down list only displays the reduction files for the selected data recorder.
| Instrument | Reduction File |
| GEODAT |
<filename>.geodat_in |
| Survey_GRE4.gif10 | <filename>.wild_in <filename>.gsi |
| LEICA | <filename>.leica_in <filename>.gsi |
Misclose ratio criteria 1
Enter the ratio criteria. If the traverse is in the specified misclose ratio, then it will be flagged (marked) as passed.
Distance standard error
The distance standard error is entered in millimetres and parts per million. It is used as a weighting factor for the distance measurements in the optional least-squares adjustment of the traverse.
Angle standard error
The angle standard error is entered in seconds of arc. It is used as a weighting factor for the angular measurements in the optional least-squares adjustment of the traverse.
Note: The application of map grid corrections is set through the Apply projection corrections during reduction option (found on the Survey Total Station Settings panel). Refer to the Set Up option for more information.
Select OK.
The traverse from the reduction file is then reduced, and a report of the unadjusted coordinates of the traverse displays. You will then be asked whether or not to continue, that is, perform a least squares adjustment.
Continue with least squares adjustment
Select this option to adjust the traverse using least squares. This will take the raw data and your standard error panel entries and build an observations file that is input to the Least Squares Adjustment program. It will then automatically run the adjustment program. See Appendix B for information on the least-squares adjustment method.
View adjustment report
Select this check box to display the detailed report generated by the least-squares network adjustment program. Do not check this check box if you only want to view the adjusted coordinates.
Try again later
Select this option if you do not want to continue, that is, you don't want to perform a least squares adjustment.
Select OK.
If you chose to continue, then the least-squares adjustment will be carried out. Once the adjustment is finished, the adjusted traverse report displays. You will then be asked whether or not to save the traverse station coordinates to the station library. If the station already exists, then you will be asked whether or not to overwrite the station.

