Set Up
Set Survey Station
The Set Up option to set the instrument that you want to use for all recorder operations, including reduction and resection.
Note: The available instruments must be defined in the perif.setup file that is stored in the directory pointed to by the $ENVIS_RESO environment variable. Refer to the Peripheral Devices section (under the System Administration documentation) for more details on the perif.setup file.
Instructions
- Select Survey menu
- Select Surveying submenu
- Select Set Up option
The following panel displays.
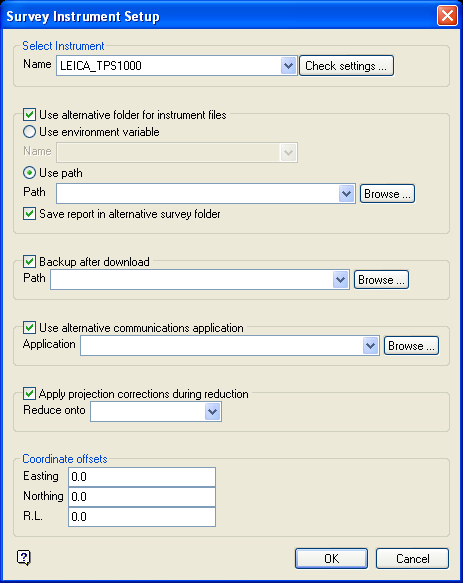
Survey Instrument panel
Select Instrument
Select the name of the instrument that will be used to collect the readings. Use the Check settings button to check or modify the existing instrument settings. Once selected, the Instrument Communication panel displays.

This panel to view and/or adjust the communication settings, that is, port number, baud rate, character bits, stop bits and parity, for the chosen survey instrument. Changes will be saved to the perif.setup file.
Use alternative folder for instrument files
Select this check box to use the necessary instrument files, that is, the upload and download files, from an alternate survey directory. The location of the alternate directory can be identified through using the SURVEY environment variable or through specifying the folder location (that is, using a path).
When using the Use environment variable option, the available drop-down list contains all of the environment variables that start with SURVEY. For example, SURVEY_UPLOAD may point to a directory containing uploaded files; and SURVEY_DOWNLOAD may point to a directory containing downloaded files. SURVEY environment variables could also be set up to point to different directories for each instrument. If a directory is not specified, then the current working directory will be used instead.
Note: The directory to which the environment variable points needs to end with a forward slash (/). For example, C:/Survey_dataset/.
When using the Use path option, the directory path can either be manually entered or specified through using the Browse button. Up to 256 alphanumeric characters can be entered when specifying the full path name.
Check the Save report in alternate survey directory check box to save the reduction report in the alternate survey directory.
Back up after download
Select this check box to backup the downloaded files and store them in a nominated directory. The file extension of these backup copies will be extended with _backup. By default, the resulting file will be stored in the current working directory. Use the Browse button to select a different file location.
Use alternate communications application
Select this check box to use an alternate communications application. The chosen application can then be optionally run in place of the standard instrument interface when using the Upload or Download options. The application can either be selected from the drop-down list or through using the Browse button.
Apply projection corrections during reduction
Select this check box to apply a line scale factor and arc-chord bearing corrections to observed distances and angles during the reduction process. This is to correct observed data for a reduction on a UTM projection. If this check box is checked, then you must select either AMG (Australian Map Grid), ISG (Integrated Survey Grid), MGA (Map Grid of Australia) or ARC60 as the coordinate system.
Coordinate Offsets
When creating an upload file (through the Create option) these values will be subtracted from the X, Y and Z coordinates. These values, however, will be added to the X, Y and Z coordinates when you are reading the coordinate file (through the Coordinates option).
Select OK.
The Survey Data Information panel is then displayed for verification purposes. The parameters, such as instrument and survey directory, are stored in the <proj>envis.defaults file. This means that the next time this panel displays the information is retained.
It is also possible, by selecting ASCII as your instrument, to create an ASCII upload file. This file is created through the Create option.

