Save View Settings
Use this option to save grid properties and/or effects settings to a lava script.
You can activate certain effects and display a grid by running a lava script. You can also choose to add the script to the project specification file (.dg1) start up parameters. Thus ensuring certain effects are activated and a grid displayed when Vulcan starts.
Before using this option:
- Specify the grid properties through using either the Analyse > Grid > Apply option or the
 Grid Properties button (on the Graphics toolbar). The following grid properties information is saved in the Lava script:
-
Which grid lines to display.
-
Grid origin.
-
Grid step sizes, that is, the X, Y and Z grid sizes.
-
Which axes to annotate.
-
Brightness of the grid.
-
Colour of the grid.
-
Snapping preference, that is, whether to snap to all grid lines or only to visible grid lines.
-
Whether to label all or major grid lines.
-
Whether to display the labels in the screen plane or the grid plane.
-
Font size of labels.
- Toggle the effects on the Effects toolbar on or off to be included in the Lava script.
It is possible to save settings for the following effects:
|
Icon |
Tooltip |
Description |
|
|
Toggle Annotations |
Toggles annotations, such as the axis displayed when in either of the rotation modes, on/off. You can also use Shift + A to toggle the annotations. |
|
|
Display Refresh Timer |
Adds a refresh counter to the top of the screen. This is particularly useful for seeing how much work Vulcan is doing and how long it takes to refresh. You can also use O to switch the display of the counter On/Off. Note: The counter excludes time taken for translucent triangulations and buffer-swapping. |
|
|
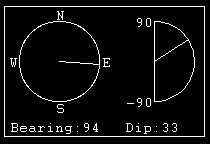
Draw Direction Dials |
Toggles the display of dials that show the bearing and dip of the current view. These dials will be updated dynamically as you change the view.
The dip direction dial on the right hand side (displayed in the semi-circle) indicates a dip of 33 degrees above the horizontal. As Vulcan is a truly 3D modelling package, it offers the ability to rotate the view in any direction, therefore the ability to describe inclinations both above and below the horizontal is required. This is indicated by the labels to the left of the Dip direction dial, with positive '90' indicating an inclination straight up, and the negative value, '-90' indicating an inclination straight down. Note: As the bearing is undefined when in plan view, the bearing dial displays as inactive and the bearing indicator is not displayed in the bearing dial. |
|
|
Enable Dynamic Displays |
Switches dynamic displays and operations On/Off, for example daylight simulation. You can also use Shift+ C to switch this feature On/Off. Note: This option is CPU intensive and can be disabled. |
|
|
Draw Object Extents |
Draws boundary boxes around each visible graphics object. You can also use E to switch this feature On/Off. |
|
|
Anti-alias |
Blends the pixels and lines, resulting in smoother drawn objects. |
|
|
Draw End-on Lines As Points |
Draws small points whenever a line perpendicular to the view plane contains points that cannot be seen. Note: This option is CPU intensive and may slow down other operations. |
|
|
Draw layers on top of underlays |
Draws the layers on top of the underlays using the ordering method set through the Graphics : Effects section of the Tools > Preferences option. You can also use Shift+ Z to switch this feature On/Off. |
|
|
Enable Daylight Simulation |
Switches daylight simulation On/Off. When On, the hardware light is programmatically moved around the view, for example like the sun circling around the Earth. When at a low angle, the light turns a darker shade of red to simulate dawn > dusk. You can also use Shift + D to switch this feature On/Off. Note: In order to use Enable Daylight Simulation, the Smooth Shading check box must be selected in Triangulation properties, and the Surface Definition Angle must be set to an angle of 0.0. |

Instructions
On the View menu, click Save View Settings.
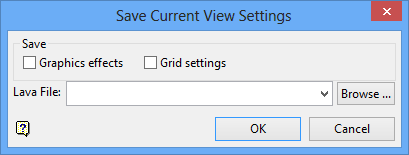
Graphics Effects
Select this check box to save the effects.
Grid Settings
Select this check box to save the grid properties.
Lava File
Specify the name of the Lava file.
Click OK.
The Lava file is then saved.
You can then use the File > Lava option to run the script. You can also specify, in the project file (.dg1), to run this script as Vulcan starts. Thus ensuring that your preferred effects are activated and, if applicable, a grid displayed. You can do this by:
-
Navigate to the project file in the Vulcan Explorer (project files are stored under the Specifications > DG1 Files folder).
-
Right-click on the project file and select Edit from the displayed context menu
-
Select the Startup tab.
-
Specify your script in the Lava Script field.
-
Select File > Save.
-
Exit the Design Parameters Editor.

