Select
The Select group of the Query ribbon contains tools to highlight holes in the view window based on certain criteria.

 Holes by Properties
The Holes by Properties tool selects holes based on criteria you define.
To filter holes by specific properties, follow these steps:
-
Select the desired holes in the view window.
-
On the Query ribbon, in the Select group, select
Holes by Properties. The Select Holes by Properties panel will appear.
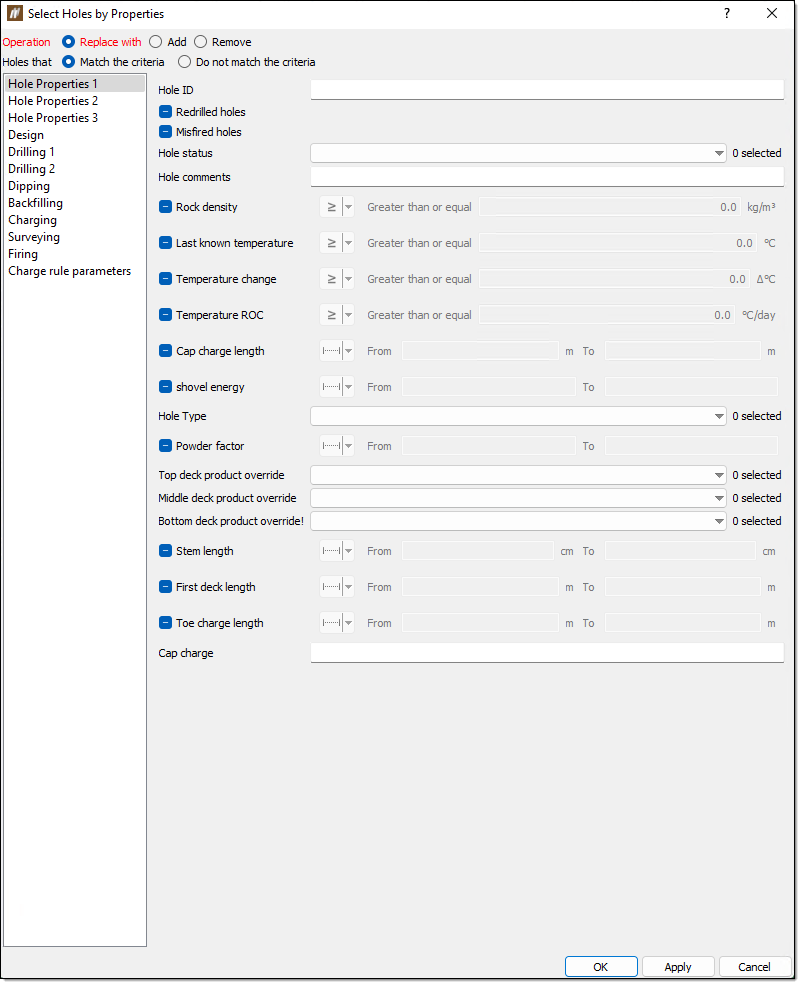
-
Enter the appropriate values into the search fields and drop-downs to narrow down your search. Additional search menu tabs can be found in the left side bar.
 Expand for tips on using the search filters
-
You can exclude data by selecting the Do not match the criteria option.
-
All the text fields support the following basic name matching:
-
You can suffix your search with an asterisk (*), which signifies that a name can be zero or more characters in length.
-
You can suffix your search with a question mark (?), which signifies the name is a single character.
-
-
All of the checkboxes have the following three states:
 — Do not search this criteria
 — Search this criteria with the entered values
 — Search for instances of this criteria that are undefined (do not have values entered)
-
-
Select OK or Apply. BlastLogic will highlight the holes that match the selected criteria in the view window.
 Holes by Polygon
The Holes by Polygon tool selects holes that fall within a polygon area you define.
To select holes that fall within a polygon area, follow these steps:
-
Open the desired blast in the view window.
-
On the Query ribbon, from the Select group, select
Holes by Polygon.The Select Holes by Polygon panel will appear.
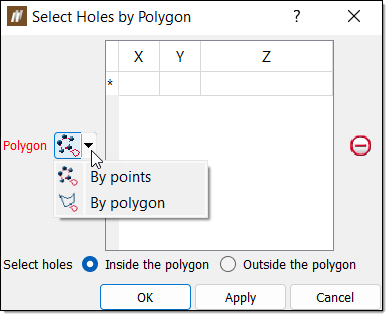
-
Define a polygon. Select one of the following options from the Polygon drop-down:
-
By points. Select the desired points in the view window. BlastLogic adds these points to the coordinate table.
-
By polygon. You must first create a polygon (cad) object which BlastLogic can use to filter the holes. To create a polygon, refer to the Polygon section of the draw group page. You can then specify the location of this polygon in the Polygon field of the Select Holes by Polygon panel.

-
Select a filtering radio button. You can select holes by either of the following criteria:
-
Inside the polygon
-
Outside the polygon
-
-
Click OK. BlastLogic selects the holes based on the hole design collars.
 Holes by Line
The Holes by Line tool selects holes that fall within a vicinity to a line you define.
To select holes by line, follow these steps:
-
Open the desired blast in the view window.
-
On the Query ribbon, in the Select group, select
Holes by Line.The Select Holes by Line panel will appear.
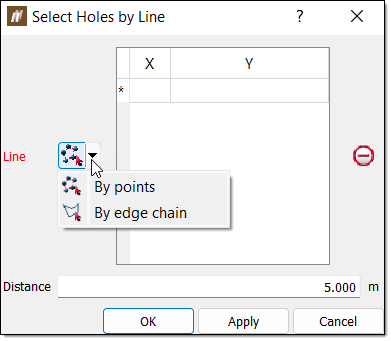
-
Define a line. Select one of the following options from the Line drop-down:
-
By points. This option involves drawing a line in the window to specify the desired region. Click the desired points in the view window to form the line. BlastLogic joins a line between points selected consecutively and adds these points to the search criteria table.
-
By edge chain. This option involves using an existing line to specify the desired region. You can either drag the line from the cad container in the data explorer to the Line field using the middle mouse button or enter the location using the following format /cad/<line name>. To create a line, refer to the Line section of the draw page.

-
Enter a maximum line vicinity into the Distance field. BlastLogic will not select holes beyond this distance from the line.
-
Click OK or Apply.
 Holes by Status
The Holes by Status tool selects holes based on their current status.
To select holes by status, follow these steps:
-
Open the desired blast in the view window.
-
On the Query ribbon, in the Select group, select the
Holes by Status drop-down menu. -
Select a status type from the drop-down. You can select from the following statuses:
- Unpublished
- Designed
- Drilled
- Dipped
- Backfilled
- Charged
- Partially charged
- Fired
- Abandoned
BlastLogic will highlight the holes in the view window which match the type you select.
 Holes by Row
The Holes by Row tool selects all holes that belong to the same row as the currently selected holes.
To select holes by row, follow these steps:
-
Select one or more holes in the view window.
-
On the Query ribbon, in the Select group, select
Holes by Row. BlastLogic highlights the holes which exist in the same row as the holes you selected in step 1.
 Holes by Echelon
The Holes by Echelon tool selects all holes that belong to the same echelon (column) as the currently selected holes.
To select holes by echelon, follow these steps:
-
Select one or more holes in the view window.
-
On the Query ribbon, in the Select group, select
Holes by Echelon. BlastLogic highlights the holes which exist in the same echelon as the holes you selected in step 1.
 Holes by Proximity to Neighbours
The Holes by Proximity to Neighbours tool selects holes that are within a certain radius to their neighbouring holes.
To select holes by proximity to their neighbours, follow these steps:
-
Open the desired blast in a view window.
-
On the Query ribbon, in the Select group, select
Holes by Proximity to Neighbours. The Select Holes by Proximity to Neighbours panel will appear. By default, BlastLogic sets the proximity radius to 5.000 metres, as seen in the Radius field. In this case, BlastLogic will highlight all of the holes that exist within a five metre radius of each other.
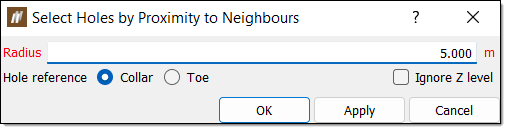
-
Configure the selection. You can define the following fields:
-
Hole reference. Select either the Collar or Toe options to set the reference point of the proximity calculations.
-
Ignore Z level. Select this checkbox to include only the X and Y components of the collar or toe in the distance between the holes measurements.
-
-
Click OK or Apply.
