Edit Charge Rule
The ![]() Edit Charge Rule tool allows you to edit charge rules and add charge products to multiple holes. When editing a charge rule, it is important to note whether the charge rule is published or unpublished. You can make the following edits based on each type:
Edit Charge Rule tool allows you to edit charge rules and add charge products to multiple holes. When editing a charge rule, it is important to note whether the charge rule is published or unpublished. You can make the following edits based on each type:
-
For a published charge rule, you can only edit specific properties such as the Name and Description fields. BlastLogic only allows these changes to preserve the rule. If you wish to edit a published charge rule, you can clone it, which creates a duplicate version. To do this, see the Cloning an existing charge rule section above.
-
For an unpublished charge rule, you can edit any of the tabs or fields.
To edit a charge rule, follow these steps:
-
Select the charge rule you wish to edit from the charge rules container, in the data explorer.
-
On the Charging ribbon, in the Design group, select
 Edit Charge Rule. Alternatively, right-click on the charge rule in the data explorer and select Edit Charge Rule Defaults... from the context menu.
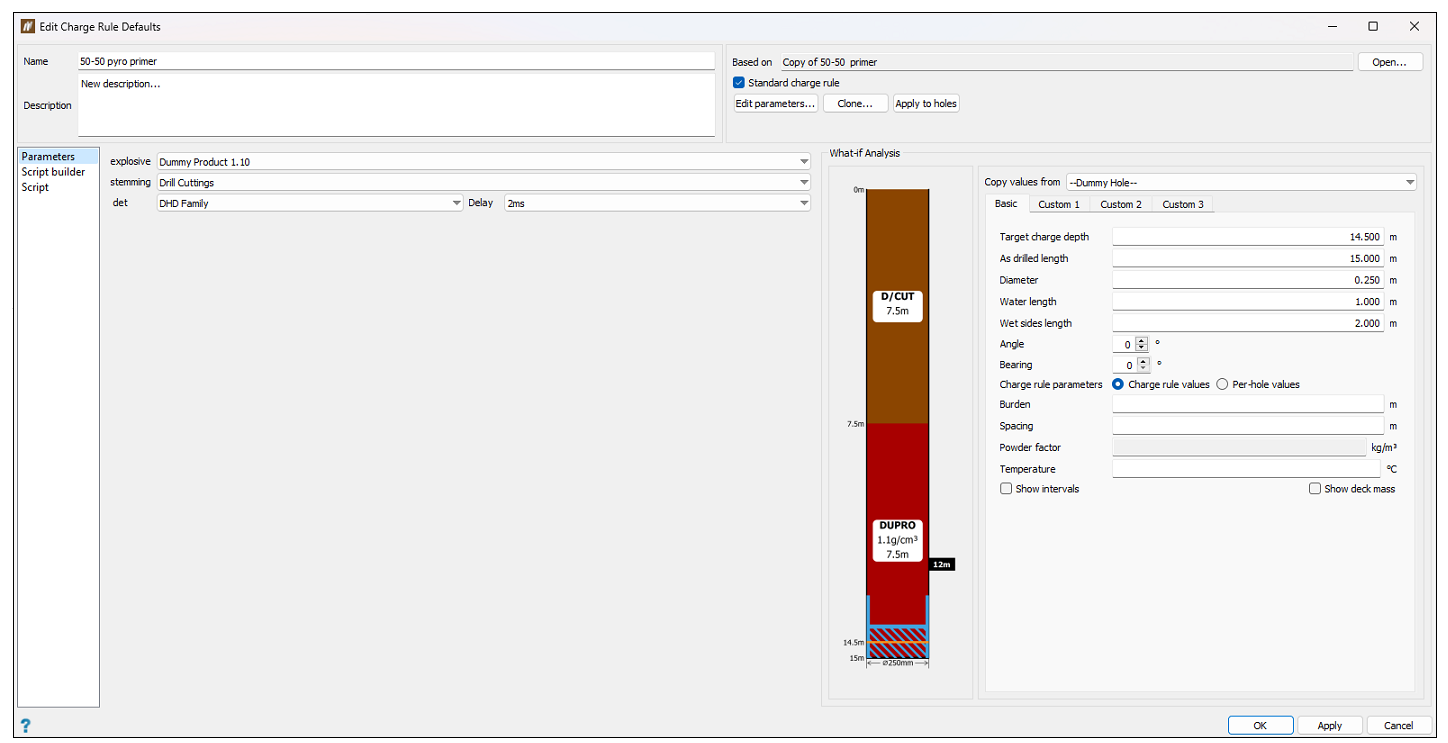
The Edit Charge Rule Defaults panel will appear.
-
Edit the charge rule. BlastLogic provides you with the following four tabs which you can edit:
Parameters
The Parameters tab allows you to set blast products as general parameters. This is important as setting these products as parameters allows you to access them in the charge rule script via the
paramsobjects.To edit the charge rule parameters, follow these steps:
-
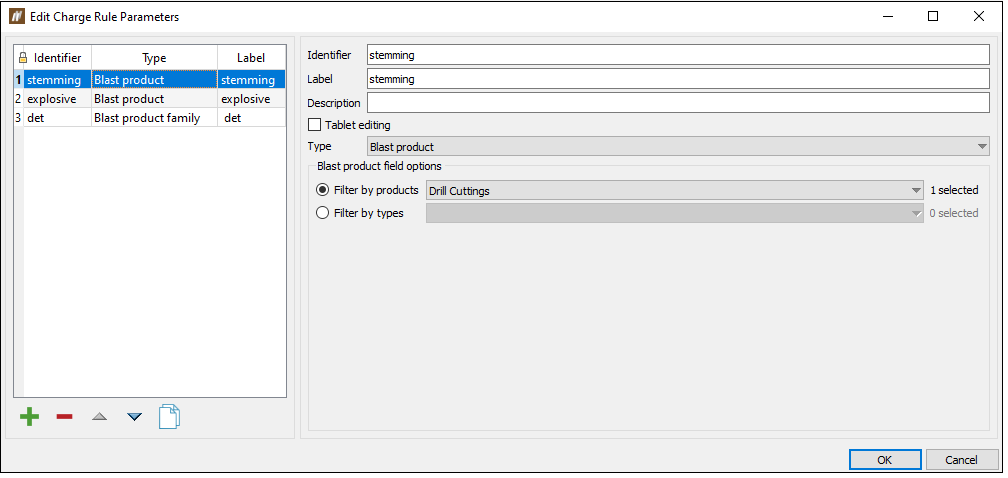
Select Edit parameters... from the Edit Charge Rule Defaults panel. The Edit Charge Rule Parameters panel will appear.
-
Make the desired changes to the parameters by adding parameters, removing parameters or editing the parameter properties.
 Expand for detailed instructions on editing this tab.
Use the following options to make the desired edits to the charge rule parameters:
-
To add a new parameter, select
 .
. -
To remove a parameter, select the parameter and click
 .
. -
To clone a parameter, select the parameter and click
 .
. -
To reorder the parameters, select the parameter you wish to move and click the
 and
and  arrows.
-
To edit a parameter, follow these steps:
-
Select the parameter in the left-hand side table.
-
Edit the information in the Identifier, Label and Description fields as desired.
-
Select or clear the Tablet editing checkbox to allow or prevent modifications being made to the charge rule on the tablet.
-
Select the property type using the Type drop-down. There are nine types to choose from in BlastLogic:
-
Blast product. This type contains information on blast products which you can use to fill holes.
-
Blast product family. These types contain information on a group of blast products. This group is known as a blast product family and typically contains a set of one product with varying densities.
- Boolean. You can turn these types on or off via a checkbox.
-
Float. These types must have a range set as greater than a given value, less than a given value, in between two values, or all values. You must also define the dimension and units of float types.
-
Interval label. These types contain the interval labels you wish to include in the rule.
-
Load table. These types add load tables to the rule. Load tables allow you to set load designs in tabular form.
-
Select. These fields display a table, in which you can enter each possible value for the field. These values will be shown in a drop-down list for the field and you can only select one value at a time.
-
Multi-select. These fields are the same as select fields, except you can select multiple values from the drop-down list.
-
String. These types can be either a single line or a multiple line string. Single line strings can have one or more hints to store commonly entered values.
-
-
Edit any additional options. You can also edit the following fields, depending on the selected type:
-
Blast product field options
Set the product(s) by filtering using the Filter by products or Filter by types radio buttons and drop-downs.
-
Blast product family field options
Set the product family by filtering using the Filter by families or Filter by types radio buttons and drop-downs. To filter by families, enter the desired family and delay using the Family and Delay columns and drop-downs.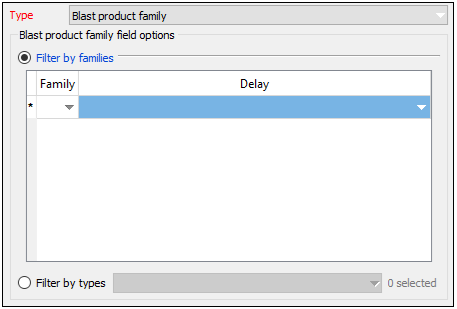
-
Float field options
Range, dimension, and unit can be defined when Float type is selected. To set the range of the parameter, select one of four range definitions (Range, Less than or equal, Greater than or equal, or All finite values), and enter the desired values. To set the Dimension and Unit, use the corresponding drop-downs.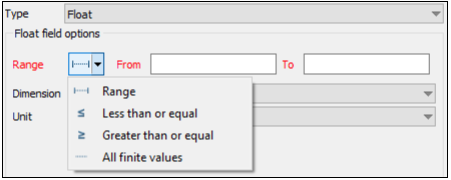
-
Interval label field options
Set the label for the interval using the Interval label choices drop-down.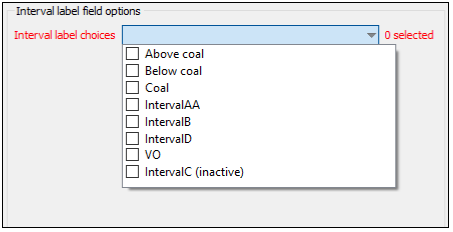
-
Multi-select and Select field options
The label associated with a particular value can be assigned when Multi-select or Select type is chosen.
-
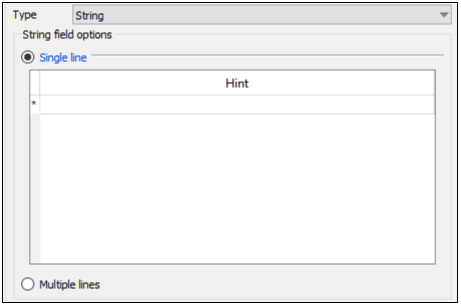
String field options
You can set commonly entered values in the Hint column. Optionally, select the Multiple lines radio button for a multiple line string. You cannot define hints for this option.
-
-
-
-
Click OK to save the edits. BlastLogic will update the Preview section and the Parameters tab of the Edit Charge Rule panel.
Load table
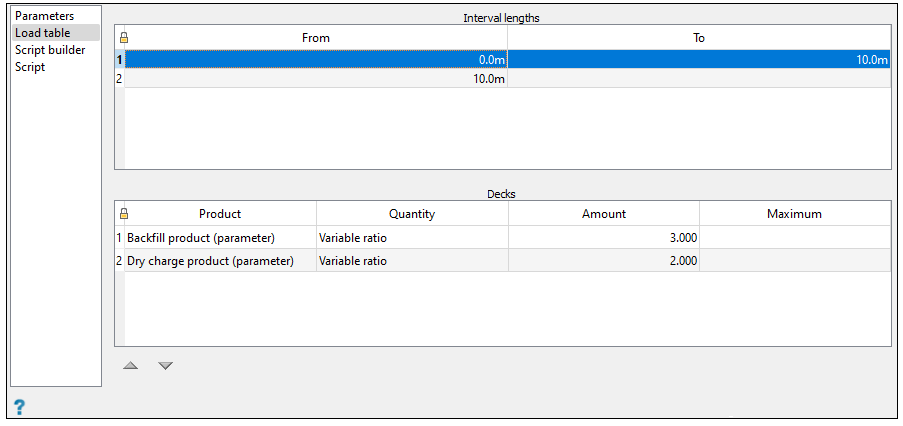
The Load table tab allows you to create load tables which let you fill holes based on their charge depths.
 Note:
Note:This tab will only appear if you have defined a load table parameter in the Parameters tab. To add a load table, select Edit parameters... and click
 to add a new parameter. Enter the appropriate information into the parameter fields and select Load table from the Type drop-down. Click OK to save the parameter.
To edit a load table, follow these steps:
-
Select the Load table tab. This label may vary as BlastLogic names this tab after the name you provided in the Label field when creating the parameter. The load table information will appear in the panel.
-
Make the desired edits to the load table by altering the interval lengths or associated decks.
 Expand for detailed instructions on editing this tab.
There are two tables in the load tables tab: the Interval lengths table and the Decks table. Each row in the Interval lengths table defines a range of hole lengths via the From and To columns. Each row also has an associated list of decks that are applied to the hole if the length of the hole falls within range. You can define these decks in the Decks table.
Note:This tab will only appear if you have defined a load table parameter in the Parameters tab. To add a load table, select Edit parameters... and click
 to add a new parameter. Enter the appropriate information into the parameter fields and select Load table from the Type drop-down. Click OK to save the parameter.
Follow these steps to make the desired edits to the Load table tab:
-
Edit the desired length intervals in the Interval lengths table. You can define the interval boundaries using the From and To columns. The last row of this table always has a blank To value as BlastLogic applies it to all the remaining holes with a length greater than or equal to the From value of that row.
-
Edit the decks for each interval by selecting the interval and adding the desired information into the Decks table. This table contains the following fill method headings:
-
Product: The type of product you wish to add.
-
Quantity: The quantity of the product you wish to add.
-
Amount: The amount of the product you wish to add.
-
Maximum: The maximum length of the deck you wish to use.
There are six different ways to specify the size of a deck, as provided in the Quantity column of the Decks table:
-
Fixed length. The deck is always a specified length in the hole, with the length given in metres. The sum of all fixed length decks must not exceed the minimum length specified in the Interval lengths table.
-
Fixed volume. The deck always takes up a specified volume in the hole. BlastLogic calculates the length of this deck based on the diameter of the hole when you apply the charge rule. The volume is specified in cubic metres.
-
Fixed mass. The deck will always be a specified mass, given in kilograms. BlastLogic automatically calculates the length of the deck based on the density of the chosen blast product and the diameter of the hole when you apply the charge rule. This option is not available for products with an undefined density.
-
Length above water. The top of this deck will extend to the specified distance above the wet part of the hole, given in metres. By default, the length above water decks will use the wet-sides measurement of the hole as the reference water level. However, a charge rule script can choose to calculate its own value to use as this water level.
The Length above water decks also contain the following properties:
-
You cannot place Length above water decks on top of variable length decks.
-
If the hole is dry, then BlastLogic will exclude this deck from the resulting charge plan.
-
BlastLogic will reduce the length of the deck if either of the following occur:
-
There is insufficient space remaining in the hole.
-
The blast product is explosive and the target explosive mass has been reached.
-
-
-
Target powder factor. The deck will always be specified by meeting a target powder factor, determined by the products density and the current hole diameter. This value is on a per deck basis, independent of any other explosive deck. This option is only applicable for explosive decks with a valid density.
-
Variable ratio. The ratio of the deck to be filled with the specified product. Ratio values for non-explosive decks are considered ratios of length, whereas ratio values for explosive decks are considered ratios of mass.
Note: Variable length decks can optionally use the Maximum column. This column defines the maximum length of a given deck. The remainder of the hole should be covered by other deck options as specified above, including at least one variable length deck with no maximum.
-
-
-
Review the Preview section to check the edits.
Script builder
The Script builder tab provides a user-friendly interface to define the conditions under which to fill holes. It was created for customers who do not want to use the Scripting tab to create charge rules. The script is generated based on the options selected by clicking the Build button at the bottom of the window on the left-hand side.
Note: Building an auto-generated script will overwrite anything currently contained in the script.Directly above the Build button in the bottom right-hand corner is the Debug option. This allows you to print debug statements to the report window, through the use of a Boolean charge rule parameter.
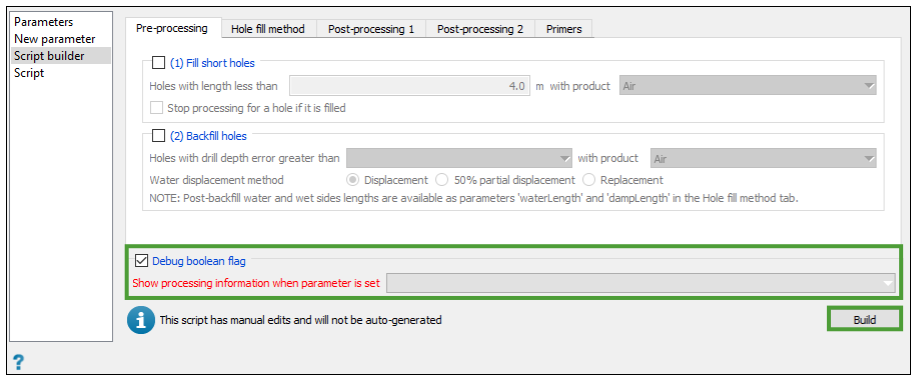
There are five subtabs which belong to this section: Pre-processing, Hole fill method, Post-processing 1, Post processing 2, and Primers.
Pre-processing
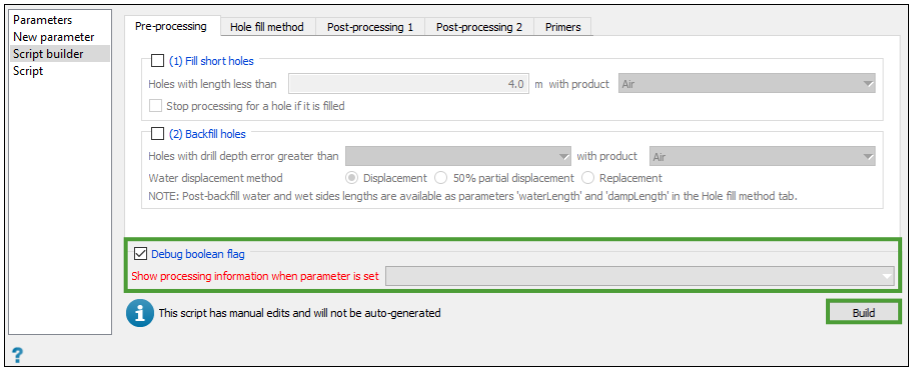
The Pre-processing subtab contains two conditions: the maximum depth at which a hole should be filled with a user-defined product (1. Fill short holes) and the minimum depth error at which to backfill holes with a user-defined product (2. Backfill holes).
The depth error is defined as:

The products available in the drop-down list are Air, Drill Cuttings, and any Blast Product charge rule parameter defined on the Parameters tab.
The Water displacement method defines how the water level in the hole should be recalculated, as a result of any backfill. Depending on the option, this will give you a new water level to use in future calculations.
-
Displacement. Any length of backfill completely displaces any length of water in the hole, that is a water length of 2 m before backfill will result in a water length of 2 m after backfill.
-
50% partial displacement. The length of backfill will displace 50% of the same length of water, that is a water length of 1 m before 1 m of backfill results in a final water length of 0.5 m after backfill.
-
Replacement. The length of backfill completely replaces the same length of water, that is a water length of 1 m before 0.5 m of backfill results in a final water length of 0.5 m after backfill.
Hole filled method
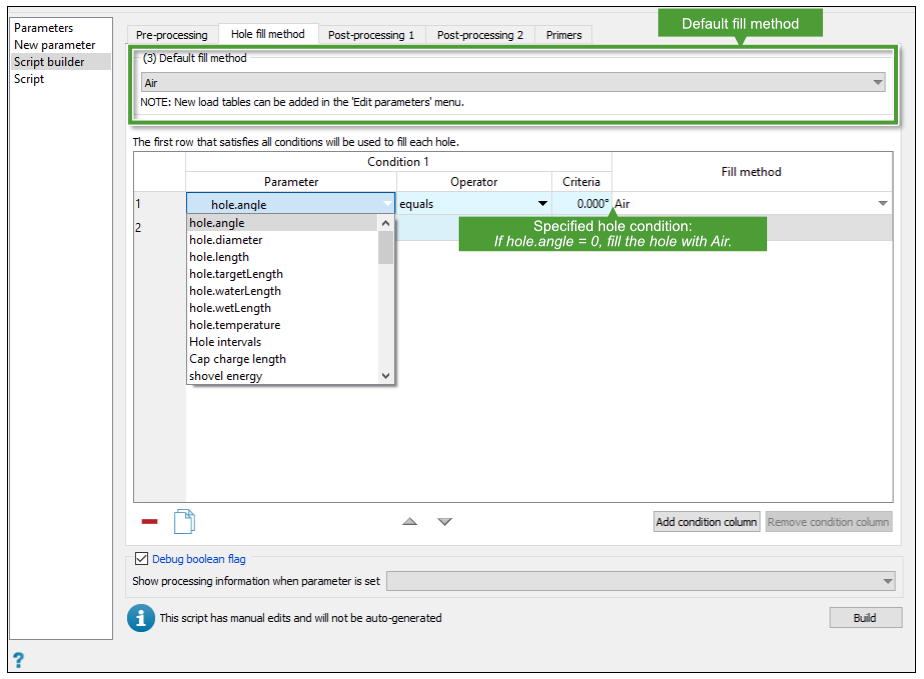
The Hole filled method subtab is used to define a set of conditions: a default condition and other specified conditions.
The default fill method is the only mandatory option for generating scripts. It defines according to which method a hole should be filled. The options available in the drop-down list are Air, Drill Cuttings or any Load table charge rule parameter.
A specified condition consists of three components: a parameter (which could be a standard parameter such as angle, diameter or length, a hole property set in the Hole Properties panel (Home > Setup >
 Site) or a charge parameter set in the Parameters tab), an operator and a fill method. The fill method is applied, when the said condition is true. In the event where a hole does not satisfy any of the specified conditions, the default condition will be used.
Post-processing 1
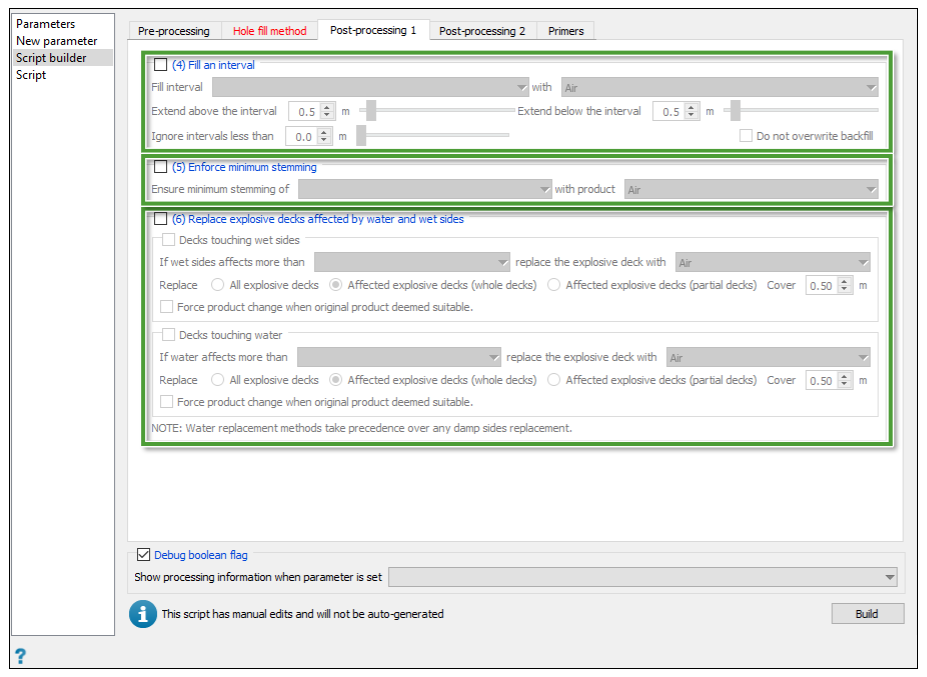
The Post-processing 1 subtab is used to address intervals added to affected holes as well as water and wet sides. It contains three main options: 4) Fill an interval, 5) Enforce minimum stemming and 6) Replace explosive decks affected by water and wet sides.
Fill an interval
Enabling this option will fill a given interval with the selected product. In addition, above and below the interval can also be filled to the desired length. The intervals available to select are any Interval label charge rule parameter defined on the Parameters tab. The products available in the drop-down list are Air, Drill Cuttings, any Blast Product or Load table charge rule parameter defined on the Parameters tab. The Extend above and Extend below options fill above and below the interval by the given length, with the product or load table selected. Optionally, intervals with length less than some tolerance can be ignored by specifying a value greater than 0 for the Ignore intervals less than field.
Note: This will overwrite any products currently in the interval.
Enforce minimum stemming
The Enforce minimum stemming option will replace explosive product at the top of the hole with stemming product, should the amount of explosive product be below the set minimum stemming length.
Replace explosive decks affected by water and wet sides
Enabling this option will replace water and (or) wet sides affected decks that do not have water or damp resistant products. It is recommended that the replacement product is water or damp resistant, however this is not mandatory.
The products available in the two drop-down lists are Air, Drill Cuttings, and any Blast Product charge rule parameter defined on the Parameters tab. This option can replace any or all decks, should they be touching water or wet sides. If both options are enabled, decks in water are always tested and replaced first. Only decks that do not already contain water or damp resistant products will be replaced, if the given water tolerance is exceeded.
The following methods can be used to replace decks:
- All explosive decks
If any explosive deck is affected by more water or wet sides than the given tolerance, all explosive decks in the hole are replaced. - Affected explosive decks (whole decks)
If any individual explosive deck is affected by more water or wet sides than the given tolerance, that specific explosive deck is replaced. - Affected explosive decks (partial decks)
If any individual explosive deck is affected by more water or wet sides than the given tolerance, only the portion affected by water or wet sides is replaced.
Additionally, you can supply a cover length, which will extend the fill above the water or wet sides level.
Post-processing 2
The Post-processing 2 subtab is used to combine and replace explosive and (or) inert decks based on height. It is also used to load primers according to specific conditions defined.
Replace short decks
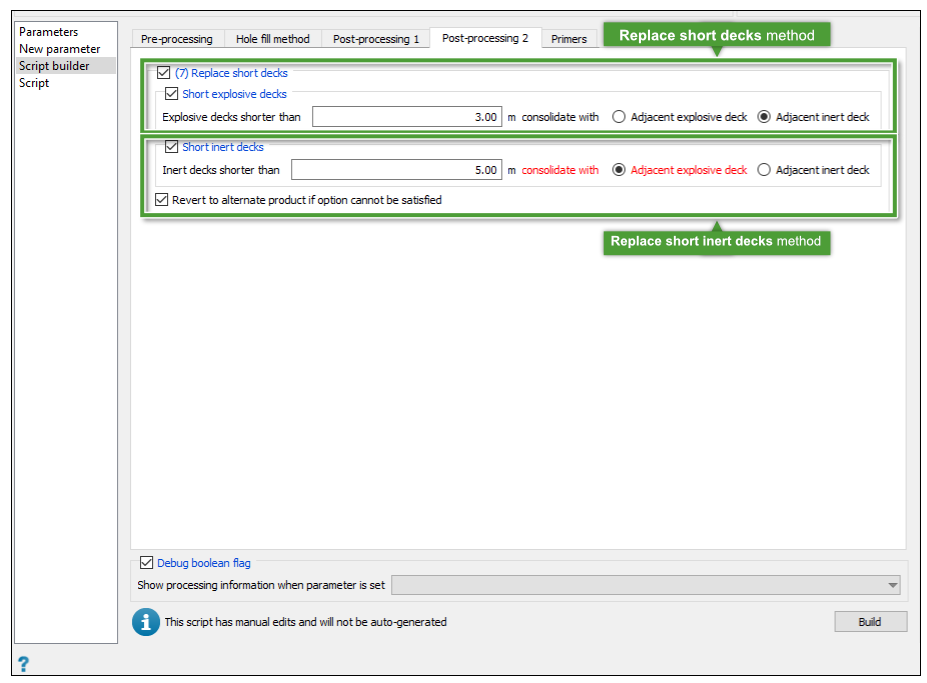
Enabling this option will remove decks shorter than the supplied tolerance, and attempt to combine with nearby decks.
Identified short decks are then consolidated with nearby decks by the following method:
-
Adjacent explosive deck
The product of the bottom adjacent deck is checked first. If it is explosive, this product is used. If the product is not explosive, the product of the top adjacent deck is checked. Again, if it is explosive, this product is used. If the product is not explosive, the function will return an error explaining it cannot replace the product using the desired option. This can be avoided by enabling the Revert option that will fallback to using an inert deck instead (see the next option). -
Adjacent inert deck
The product of the top adjacent deck is checked first. If it is inert, this product is used. If the product is not inert, the product of the bottom adjacent deck is checked. Again, if it is inert, this product is used. If the product is not inert, the function will return an error explaining it cannot replace the product using the desired option. This can be avoided by enabling the Revert option that will fallback to using an explosive deck instead (see the option above).
Replace short inert decks
Enabling this option will remove inert decks shorter than the supplied tolerance, and attempt to combine with nearby decks.
-
Adjacent explosive deck
If the inert deck is shorter than the defined length, it will be combined with the adjacent explosive deck, should this option be chosen. -
Adjacent inert deck
If the inert deck is shorter than the defined length, it will be combined with the adjacent inert deck, should this option be chosen.
Primers
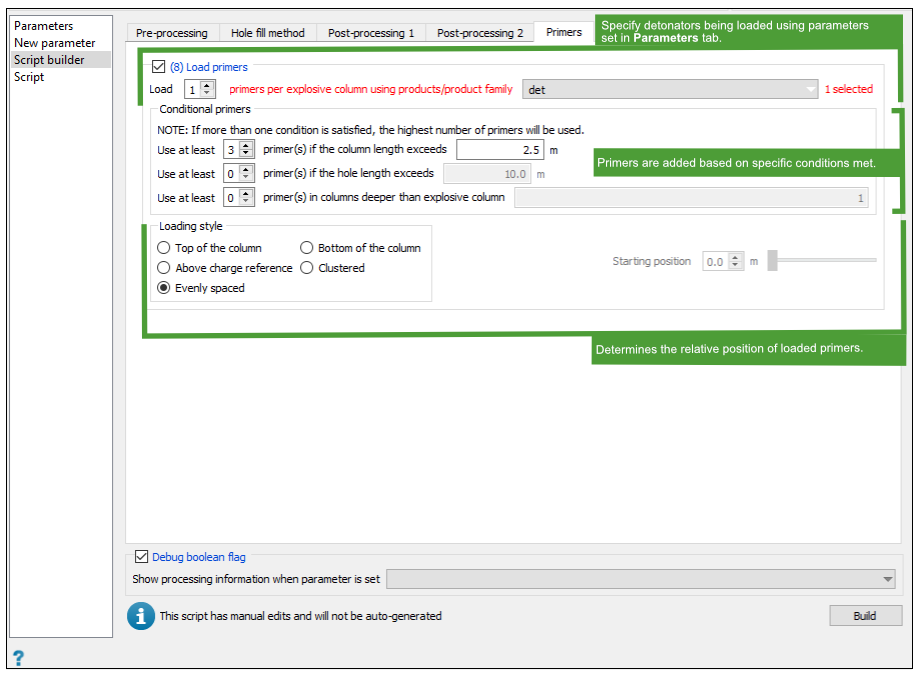
The Primers tab adds primers to selected holes in a pattern specified in one of the options.
-
Load [n] primers per explosive column using products/ product family. Adds the required number of primers to a column containing the products/ product families selected from the drop-down menu (possibility to select multiple items from explosive, stemming, and det) .
-
Conditional primers. Adds primers if certain conditions are satisfied. If more than one condition is satisfied, the highest number of primers are used.
-
Column length. If the column length exceeds y metres, at least x primers will be loaded in that explosive column.
-
Hole length. If the hole length exceeds y metres, at least x primers will be loaded in each explosive column.
-
Columns deeper than explosive column y. If the column length exceeds the length of the specified explosive column (to select the first column for example, y = 0), at least x primers will be loaded in that column.
-
-
Loading style. This option determines the relative position of loaded primers.
Script
The Script tab is designed to create complex charge rules using an external editor. These editors provide tools that support JavaScript, such as hints, and syntax highlighting.
Charge rule parameters and custom hole properties can be referenced while scripting using the Charge Rule API. Charge rule parameters are defined in the Edit charge parameters tab and set in the Parameters tab. Custom hole properties are defined in the Hole properties tab (Home > Setup >
 Site; see Hole properties).
 Editing charge rule scripts using an external editor
Two editors are currently supported for editing charge rule scripts:
-
Notepad++ (64-bit version). Notepad++ is a small and simple text editor, regularly used for its ability to recognise hundreds of file formats. Even though its usage as a code editor is not widespread, it still provides the minimum functionality required to support JavaScript editing.
-
Microsoft Visual Studio Code. A small and light weight code editor, released as a stripped down free version of Visual Studio, which is Microsoft's flagship code editor. This editor is best supported by installing the extension ESLint. This can be added inside Visual Studio Code, once it has installed.
Auto-complete
Both supported editors provide a functionality known as Auto-complete. This serves to provide helpful hints for functions and parameters to use within the associated script.
For example, typing in hole.fill provides the following information, explaining the usage of the fill function:

This shows us that the fill function takes in two parameters:
- An interval (of type Interval)
- A product (of type BlastProduct)
In addition, we can also see that the function will return an interval (of type Interval).
Microsoft Visual Studio Code is the preferred code editor, as it provides the most functionality. There is no additional work required in order for auto-complete to work as explained above. User provided charge rule parameters will also be available through the use of the params object, i.e. params.dryChargeProduct.
In Notepad++ (64-bit version), auto-complete will only provide help for hole-related functions and properties. In order to enable this functionality, the javascript.xml provided in Program Files/Maptek/BlastLogic 2020/etc/snippets must be copied to Program Files/Notepad++/plugins/APIs.
Selecting a preferred editor
Selecting a preferred editor can be performed in the Preferences (Home ribbon > Setup group >
 Preferences). If none of the supported editors are installed, only the built-in will be selectable.
Note: Selecting an external editor will disable the built-in editor, which will still be available to view, however it will be read-only.

Launching an editor and editing guidelines
Editing a charge rule script using an external editor can be done by clicking the Launch editor button, available at the top of the Script tab when editing a charge rule.
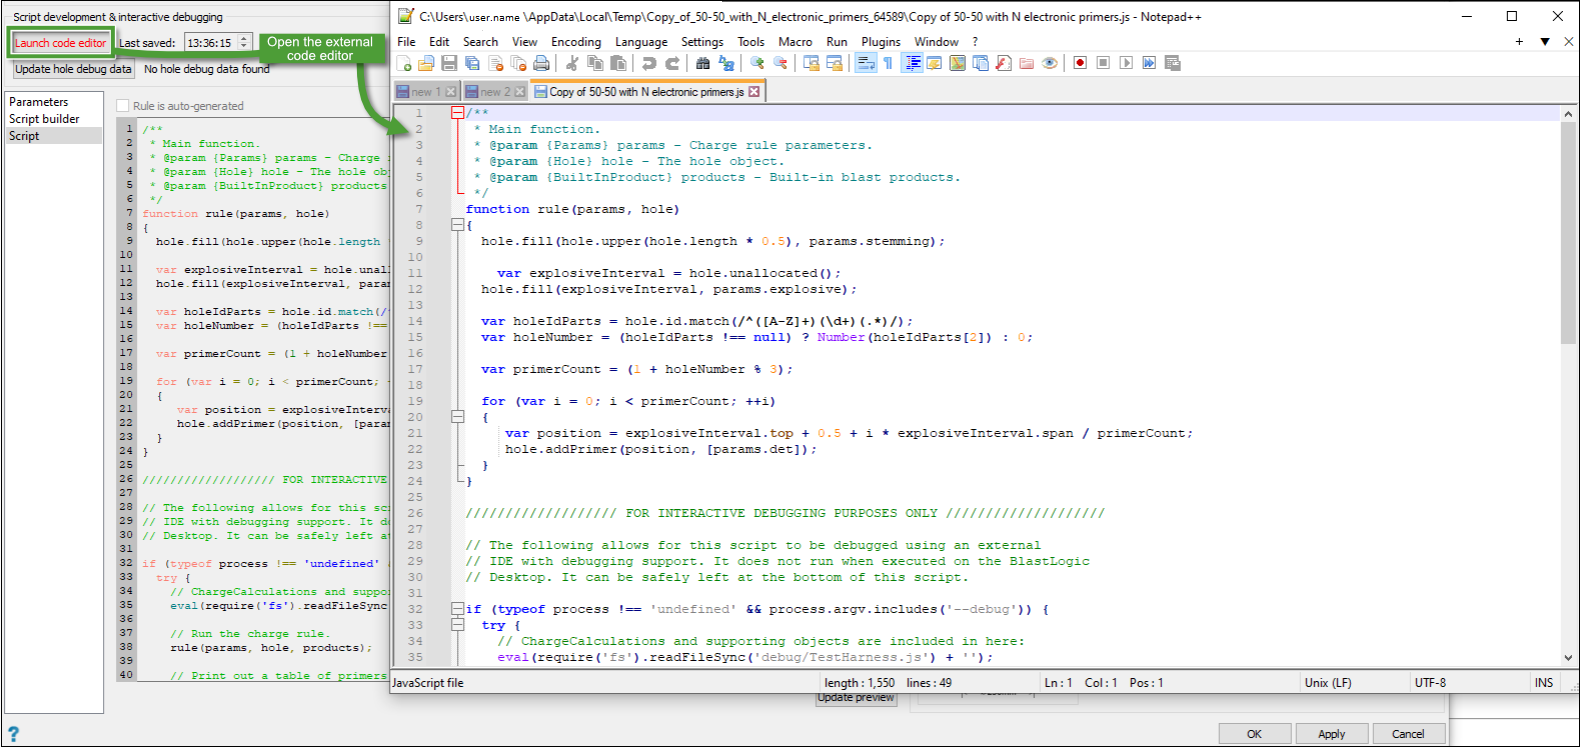
This button will be disabled if there is no external editor selected in user preferences, the rule is auto-generated, or the rule has been published.
Note: Closing the charge rule will also sever the connection between the charge rule and the external editor. This may result in the script closing in the external editor.
Note: Editing within the external editor will automatically be recognised by the charge rule every time you save the document (Ctrl + S). Frequent saving is recommended.
Editing guidelines
In order to allow the auto-complete functions to provide the best hints for your script, JavaScript functions must be commented using strict JSDoc format. This format outlines the function parameter types, and enables auto-complete to provide hints for that specific parameter type.
Functions should be commented similarly to the method shown in the image above for the Rule function. Without this information, auto-complete will not show hints during editing.
At a minimum, functional documentation should contain:
- A comment about what the function will do.
- A list of @param {<object>} <parameter_name> entries describing the parameter types and what they represent.
- (Optionally) an @returns {<object>} entry describing what type the function will return.
The supported object types are as follows:
-
Params: A parameters object, containing the user-specified charge rule parameters, for example params.dryChargeProduct.
-
Hole: A hole object, containing functions and properties relating to the specific hole.
-
BuiltInProduct: Holds a predefined list of built-in blast products, which are of type BlastProduct.
-
LoadTable: A load table, defining specific rules about how a hole is to be loaded.
-
FilteredBlastProductFamily: A filtered family of blast products, usually corresponding to down hole delays and surface delays.
-
BlastProductFamily: A family of blast products, usually corresponding to electronic detonators and detonating cord delays.
-
Deck: Contains deck properties, corresponding to a deck in the hole.
-
DeckList: A list of decks, corresponding to those loaded into specific sections of the hole.
-
Interval: An object that contains information corresponding to a top and bottom depth; this object may also have sub intervals.
-
IntervalLabel: A label given to at least one interval, usually corresponding to an interval intersecting with a hole.
-
BlastProduct: A product for use to charge a hole.
-
-
Click OK or Apply in the Edit Charge Rule panel to save the charge rule edits.
Publishing a charge rule
Publishing a charge rule to the server allows other server users to access and load the charge rule. After publishing a charge rule, the Rules and Parameters of the charge rule can no longer be modified, however the Name and Description are still editable.
You must publish a charge rule to apply it to published holes. You can see the charge plan preview without publishing the charge rule first. However, you will be prompted to publish the charge rule when saving the previewed charge plans for the holes.
To publish a charge rule to the server, follow these steps:
-
In the data explorer, in the charge rules container, right-click on the charge rule and select Publish... from the context menu. Alternatively, select the charge rule in the data explorer and on the Charge Rule context ribbon, in the Publish group, select
 Publish.
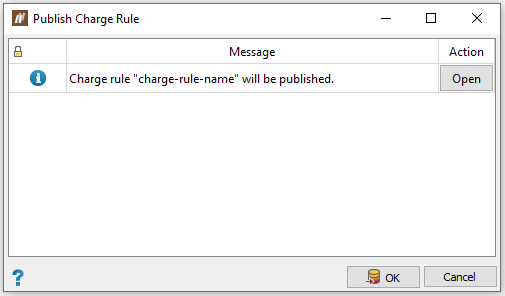
 The Publish Charge Rule panel will appear. This panel contains any errors, which you can fix by selecting the Open option to fix the error in the Action column. If no errors are present, BlastLogic will present a publishing message in the table.
-
Click OK. BlastLogic will publish the charge to the server.
Applying a charge rule
After creating and publishing a charge rule, you can apply it to a group of holes.
To apply a charge rule to a group of holes, follow these steps:
-
In the data explorer, in the charge rules container, double-click on the desired charge rule. The Edit Charge Rule Defaults panel will appear.
-
Select a set of holes in the view window or data explorer.
-
Select Apply to holes.... Alternatively, right-click on the charge rule in the data explorer and select Apply to Holes... from the context menu.
The Charge Plan Preview panel will appear.
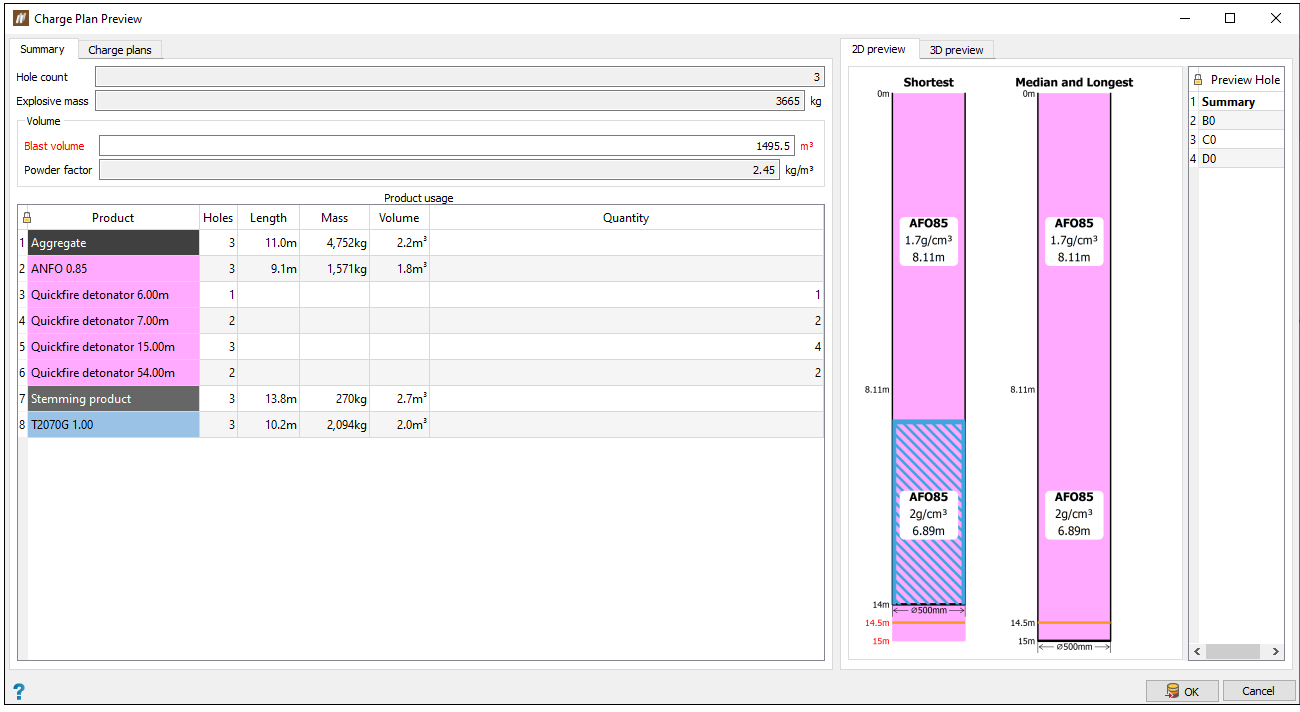
In this panel, you can also click on the Charge plans tab and 3D preview tab to view more charge plan information.
-
Review the charge rule application preview. Ensure the information in the Summary and Charge plans tabs is as desired. You can also view the hole charge plans using the 2D preview and 3D preview tabs.
-
Click OK to apply the charge plan to the holes.
