Configuring and Running a Job
You can configure the details of any job in the draft state by highlighting it in the job list and modifying its details in the details pane on the right. If a job is not in the draft state, you will be able to view the job details but not modify them.
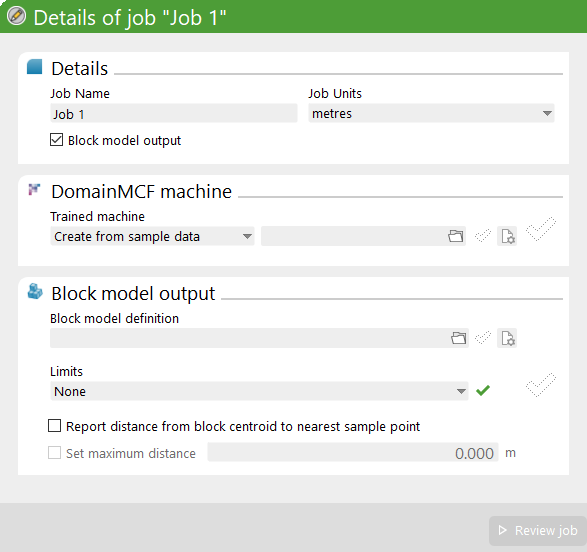
The details pane for draft jobs allows you to fill out the job details and configure it according to the type of job you wish to run. DomainMCF validates each setting as you configure it. Any detected issues will be displayed in the panel. An icon to the right of each setting indicates the validity status, as follows:
|
|
|
|
|
|
|
|
Configuring the job details

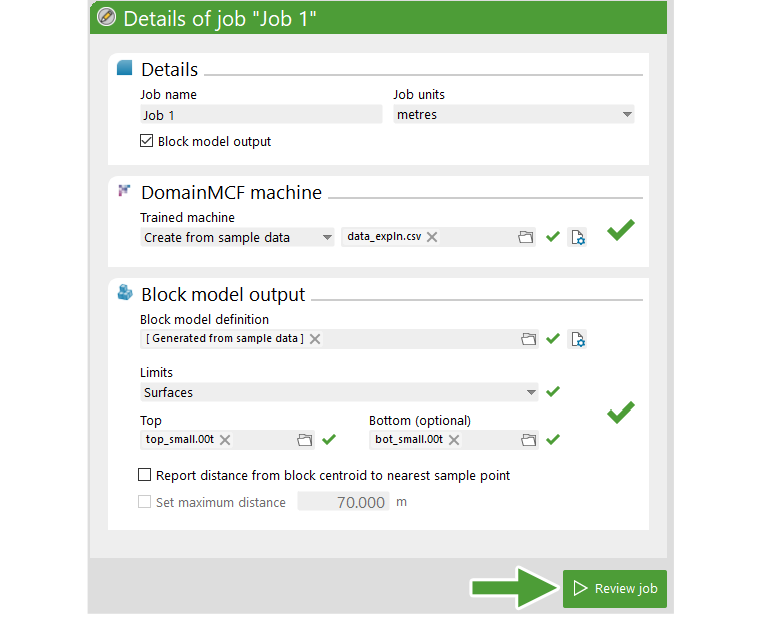
Configure the job details in the ![]() Details area as follows:
Details area as follows:
| Job name |
Give each job a unique and meaningful name. Important: The name of a job cannot be modified after it has been submitted. |
| Job units |
Set the default distance unit for the job. This determines both how input data is interpreted, and what the distance unit of the block model output will be. The following inputs use the job units to interpret distances:
|
| Block model output | Select this checkbox if you want DomainMCF to generate a block model representing the predicted domain boundaries and grade trends. You can leave this unselected if you only want to run a training job, which will produce a DomainMCF machine that you can use in a future prediction job. |
Configuring the DomainMCF machine

A DomainMCF machine is the machine learning model trained by DomainMCF from sample data and used for domain prediction. When configuring a job, you need to either tell DomainMCF to create a new DomainMCF machine, or supply an existing one. The following sections provide the details of each method:
-
Creating a new DomainMCF machine
You’ll need to create a new DomainMCF machine in the first instance where you have sample data that has not previously been trained on.
-
Using an existing DomainMCF machine
If you have previously created and downloaded a DomainMCF machine (.dmcf_machine), you can reuse it in new jobs to avoid having to perform training again.
Creating a new DomainMCF machine
To create a new DomainMCF machine, you need to supply some sample data. Sample data is usually based on drilling data. It provides the known domain values for a set of points in space. DomainMCF uses these known points to train a machine learning model, which can then be used to predict the domain at any given point within a supplied extent.
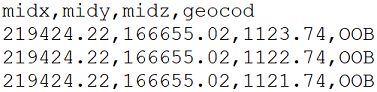
The sample data needs to be supplied from a text file containing comma-separated values (CSV). Each line within the file specifies the location of a single point as an XYZ coordinate, along with any number of domain codes. An example is shown below:
|
|
|
An example sample data CSV file. |
To configure your job to create a new DomainMCF machine, follow these steps:
-
In the
 DomainMCF machine area, in the Trained machine drop-down, make sure Create from sample data is selected.
-
In the field to the right, specify the CSV file containing your sample data. Do one of the following:
- Click the
 button to the right of the field. In the file browser that appears, select the CSV file and click Open.
 - Drag the CSV file directly from Windows File Explorer into the field.
The Import CSV Data panel appears.
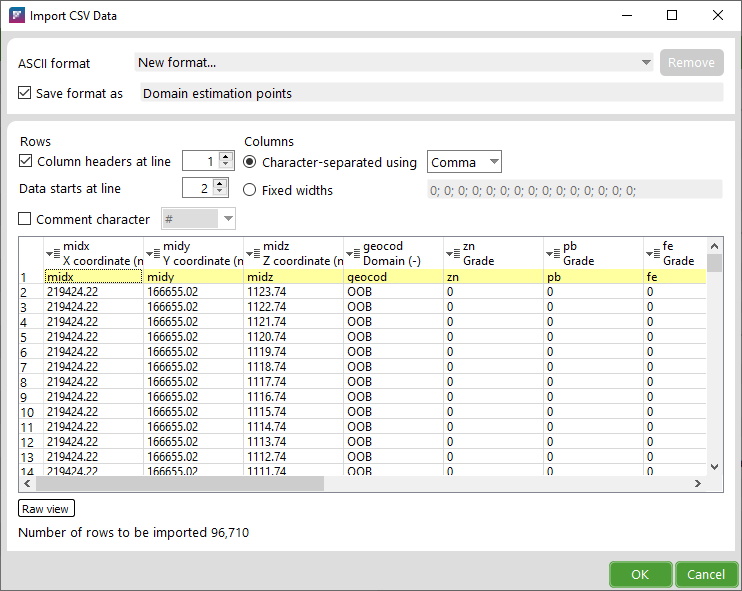
You need to specify the format of the CSV file before DomainMCF can import it. If you have previously configured a format and saved it, you can simply choose this format from the ASCII format drop-down and click OK.
Otherwise, you need to manually specify the format of the file. DomainMCF attempts to automatically analyse the file to detect the correct settings, but you may need to adjust them.
To manually configure the file format, follow these steps:
-
Ensure the row and column settings are correct, as follows:
Column headers at line The line in the file that defines column headers Data starts at line The first line where data values occur
Character-separated using The delimiter separating each data value (usually Comma)
Fixed widths A list of integers separated by semicolons specifying the column widths for fixed-width formats. This is not applicable to CSV files.
Comment character Character defining comment lines. Lines beginning with this will be ignored.
-
Ensure the columns that correspond to X, Y, and Z coordinates are correct.
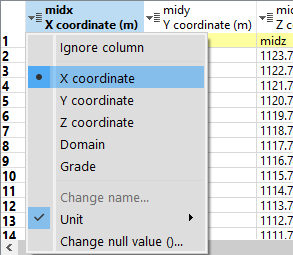
DomainMCF will automatically detect columns with the names midx, midy or midz. To manually identify a column, click the column header and select what it maps to; either X Coordinate, Y Coordinate, or Z Coordinate, as appropriate.
-
If necessary, set the distance unit relevant to the column in the same drop-down. By default the distance unit will be set to the job units.
-
-
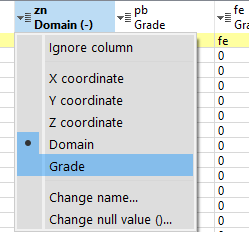
Ensure the columns that represent domain codes and grades are correct.
You need to make sure at least one column is chosen to represent domain codes. Domain codes can be either integers or text strings. Multiple domain columns are permitted. DomainMCF will automatically assign columns named geocod or domain as domain columns. All other numeric columns will be identified as representing grade.
-
To change a column’s assigned meaning, click on its header and select Domain or Grade as appropriate.
-
To ignore a column (i.e. exclude it from being imported and processed), click on its header and select Ignore column.
-
To specify a column’s null value, click on its header and select Change null value.... In the dialog that appears, make sure the Use null value checkbox is selected, then enter the null value in the field. Values in the column set to this string will be converted to null.
-
-
If you wish to save the format for future use, make sure the Save format as checkbox is selected, and enter a name for the format.
-
When you are satisfied with the format configuration, click OK. DomainMCF will import the CSV file.
- Click the
-
To adjust the configuration of the format and reimport the file, click
 to the right of the field.
Using an existing DomainMCF machine
If you have previously run a job and downloaded the results as a trained DomainMCF machine, you can use this result to run subsequent jobs for domain prediction only, skipping the training step.
To use an existing DomainMCF machine, follow these steps:
-
In the
DomainMCF machine area, in the Trained machine drop-down, make sure Import existing is selected.
-
In the field to the right, specify the trained DomainMCF machine file (.dmcf_machine). Do one of the following:
- Click the button to the right of the field. In the file browser that appears, select the DomainMCF machine file and click Open.
- Drag the DomainMCF machine file directly from Windows File Explorer into the field.
- Click the
-
Click the
 button to view details about the DomainMCF machine.
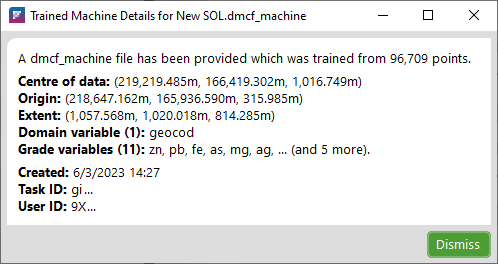
Configuring a block model output
DomainMCF can use the trained DomainMCF machine to generate a block model representing the predicted domain boundaries and grade trends.
-
To configure your job to generate a block model, make sure the Block model output checkbox is selected in the
 Details area, then configure the block model parameters as described below.
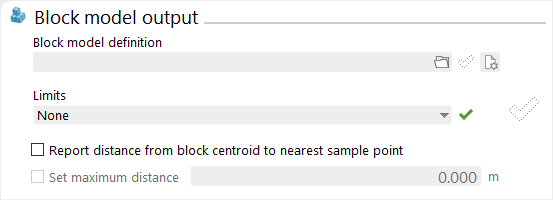
The ![]() Block model output area allows you to configure the block model output as follows:
Block model output area allows you to configure the block model output as follows:
|
Block model definition |
This contains the physical configuration of the desired block model, including its origin, extent, orientation, and block size constraints. See Block model definition below for detailed information on configuring the block model definition. |
|
Limits |
These are optional surfaces or a solid file that are used to limit the resulting block model to a specific region in space. This is useful, for example, to prevent predicting points in the sky (by supplying a surface representing the topography), or to restrict modelling to a certain subregion of the block model extent. See Block model limits below for detailed information on specifying the limits. |
|
Report distance from block centroid to nearest sample point |
If you select this checkbox, the block model will include a sample point distance attribute for each block. Note that this option can increase the time taken for the job to run. |
|
Set maximum distance |
You can select this option if the Report distance from block centroid to nearest sample point checkbox is selected. If selected, the sample point distance will be calculated up to the specified value. If not selected, an exact distance will be calculated for each predicted block. Specifying a lower value can reduce the computation time. |
Block model definition
The block model definition defines the spatial extent of the block model to be created. There are two ways to configure this definition, as follows:
-
Automatically generating a block model definition
Use this method to let DomainMCF automatically generate a block model definition for you. -
Specifying a BDF or BMF file
With this method, you specify a block model definition file (.bdf) or a block model file (.bmf) containing the block model definition.
After specifying a block model definition with either of these methods, you can choose to further edit the block model definition. See Editing a Block Model Definition below for details.
Automatically generating a block model definition
DomainMCF can generate a block model definition for you by analysing your sample data.
-
To automatically generate a block model definition, make sure you have configured the DomainMCF machine (see Configuring the DomainMCF machine). Then click the
 button next to the Block Model Definition field.
-
To view or edit the generated block model definition, click the
button next to the Block Model Definition field. See Editing a Block Model Definition below for more information.
Specifying a BDF or BMF file
A block model definition file (.bdf) contains all the parameters defining a block model. BDF files can be generated in Maptek Vulcan. Block model files (.bmf) contain a persistent representation of a block model. DomainMCF can extract the block model definition from a block model file for use in your job.
-
To use a block model definition from a BDF or BMF file, do one of the following:
- Click the button to the right of the Block Model Definition field. In the file browser that appears, select the BDF or BMF file and click Open.
- Drag the BDF or BMF file directly from Windows File Explorer into the Block Model Definition field.
- Click the
- To view or edit the block model definition, click the button next to the Block Model Definition field. See Editing a Block Model Definition below for more information.
Editing a Block Model Definition
You can edit a block model definition after importing or generating one by clicking the ![]() button next to the Block Model Definition field.
button next to the Block Model Definition field.
A panel similar to the one below will appear:
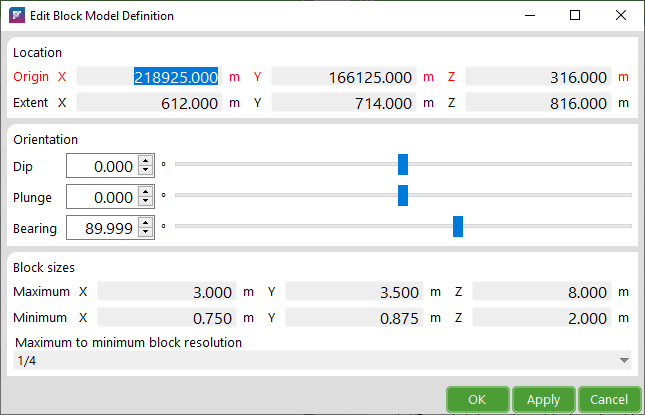
You can edit the block model definition parameters as follows:
| Location | Origin X, Y, Z |
The reference location from which the extent of the block model is defined. |
| Location | Extent X, Y, Z |
The volume of space limiting the size of the block model. |
| Orientation |
The angular measurements expressing the spatial orientation of the block model, in terms of the following:
|
| Block sizes |
Constraints on the size of individual blocks within the resulting model. The extent must be an exact multiple of the block size.
|
DomainMCF will check that the block model definition is valid. If not, an error message will display.

Click Auto-resolve to let DomainMCF fix the problem for you. A confirmation dialog with the proposed fix will be displayed before being applied.
Block model limits
Block model limits are an optional constraint that you can apply to limit the generated block model to a specific region in space. This feature can be used, for example, to prevent predicting points in the sky by supplying a surface representing the ground topography, or to restrict modelling to a certain subregion of the block model extent.
You can specify the block model limits in one of two ways, as follows:
-
Closed solid. A closed solid is a 3D surface closed such that it has an inside and an outside. If you specify a closed solid as the block model limit, the generated block model will be limited to the region within the solid.
- Top or top and bottom surface. With this approach, you must supply at least a single topographic surface representing the top of the model. The generated block model will be limited to the region below this surface. You can also optionally specify a bottom surface, in which case the generated block model will be limited to the region between the top and bottom surfaces. Topographic surfaces must be strictly 2.5D; that is, no part of the surface can overlap itself when viewed from above. DomainMCF will check the validity of any surface you supply.
To set a block model limit, select either Solid or Surfaces from the Limits drop-down, then supply the limit surfaces in the fields that appear.
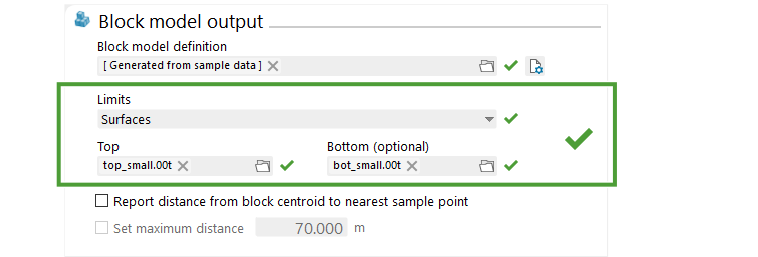
Surfaces and solids must be supplied as triangulation files (.00t). To supply a triangulation file representing a limit surface, do one of the following:
- Click the button to the right of the field. In the file browser that appears, select the file click Open.
- Drag the file onto the field from Windows File Explorer into the field.
Running a job
Once your job is configured, you can review it and then submit it for processing.
If your job has passed all validity checks, there should be a ![]() next to each item, and the Review job button will be enabled.
next to each item, and the Review job button will be enabled.
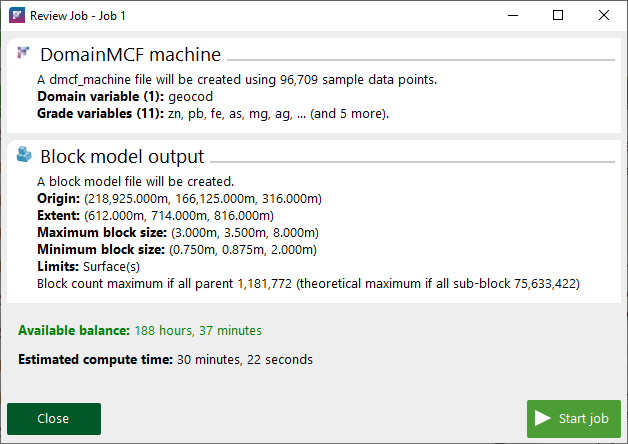
Click Review job to see a summary of the job details. This summary includes the following:
- The number of sample points to be trained on
- The domain and grade variables to be used
- The details of the block model definition
- An estimate of the job’s total compute time
-
Click Start job to submit the job for processing.
-
Click Close to go back and edit the job details.
When you click Start job, your job is uploaded to the server and then put in a queue, where it waits until a resource becomes available to process it. See Job Lifetime for more information on the states a job progresses through during its lifetime.
When processing is complete, you can download the job from the server as either a block model or a trained DomainMCF machine. See Downloading a job for more details.
