Net Present Value
Source file: origin-block-setups-objectives-npv.htm
The Net Present Value (NPV) objective is used to evaluate the financial performance of a schedule during optimisation, which generates higher values based on costs and revenue.
There are two options to set up the NPV objective:
-
This method involves coding each block with the value generated (the values for waste blocks are negative).
-
This method calculates the costs and revenues based on the input parameters.
Basic NPV Objective setup
The requirement to set up the basic NPV Objective is to code the block model with the block value generated. The block model item is then selected from the drop-down settings window for Value, along with the entry of the Discount Rate (%) to apply.
Follow these steps to define the Value variable in your setup:
-
Right-click on Maths Scripts in project explorer and select
 Add maths script.
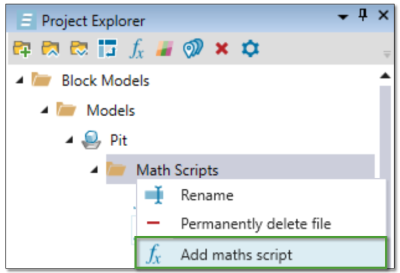
Note: The default name assigned to the newly created script is Block Maths. When there is more than one script with the same name, a consecutive number in brackets will be added to the name, e.g. Block Maths (2). Right-click on the name to change it.
-
Define your formula for the value and click
 Run Formula.

-
Switch to the
 NPV tab. Your predefined value variable will be already applied. Enter the appropriate Discount Rate (%).
If any capital is to be applied, enter the amount into each period in the Calendar > Net Present Value tab.
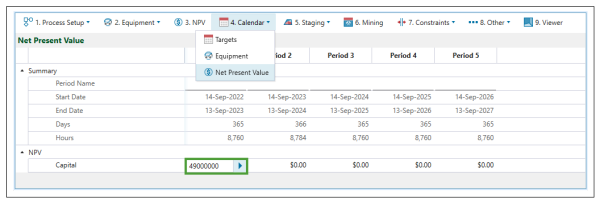
Note: If you click the
 button once, the value from the currently entered period will be copied to the next. Click this button twice to copy this value to all remaining periods.
The value will be now automatically calculated for your model.
Advanced NPV Objective Setup
If a block value isn't directly provided, a custom definition needs to be configured for the software to calculate this value for each block.
To setup the Advanced NPV Objective:
-
Switch to the
NPV tab. -
As the value attribute script has not been defined for this model, the Value drop-down list will be automatically set to Custom, and will feature the list of the available (predefined) variables.
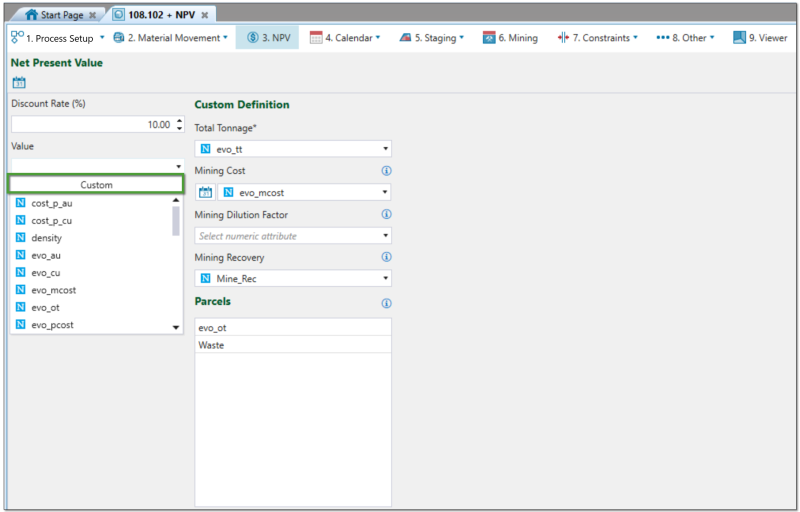
-
Select the required variables from the Total Tonnage, Mining Cost, Mining Dilution Factor, and Mining Recovery drop-down menus. The default custom definitions, based on the variables that you have initially specified for your setup, will be prefilled when you switch to this tab.
If you would like to define a value on a period on period basis, follow these steps:
-
Click on the
 button. The variable next to it will become inactive.
 -
Go to the
 Calendar > Net Present Value subtab and specify the value for each period.
-
-
Switch back to the
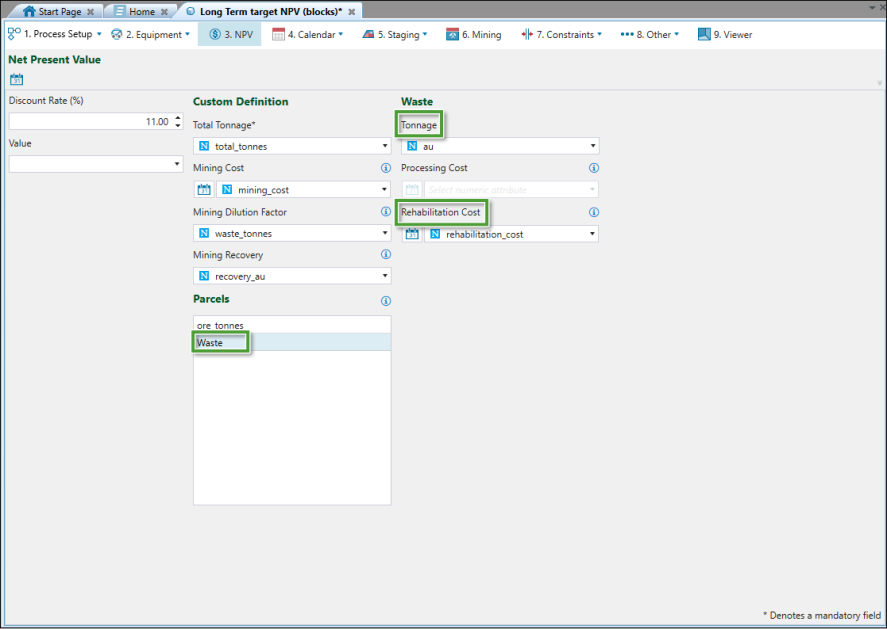
 NPV tab. From the Parcels list, select the parcel for which you would like to define the cost values.
-
Specify the Tonnage and the Processing Cost for the selected parcel.
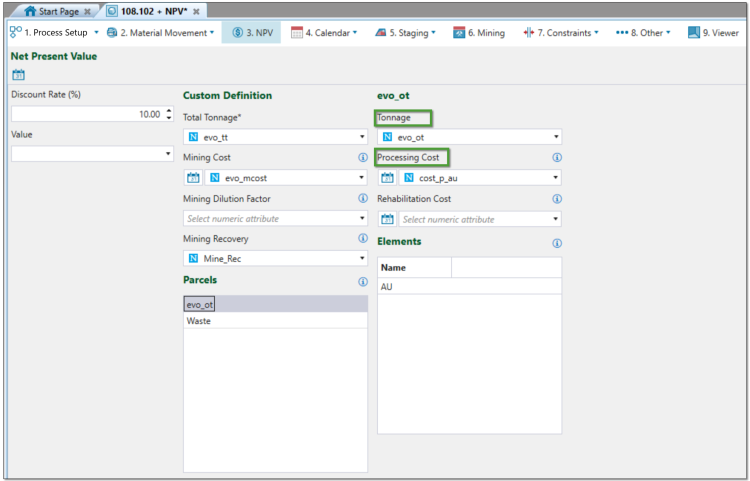
Note: The Rehabilitation Cost is associated with rehabilitating waste dumps, thus it should only be applied for the unprocessed waste materials.
Note: Only the Tonnage and Rehabilitation Cost variables need to be specified when the Waste parcel is selected.
-
Select the required element (reporting item) from the Elements list.
-
Specify the variable for the selected element.
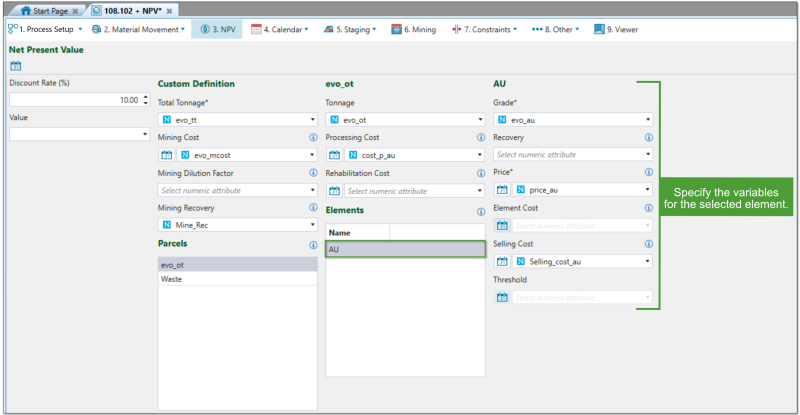
Tip: You can add and specify reporting items in the
 Process Setup >
  Parcel Reporting subtab.
-
For the variables that have not been specified in step 7., go to the
Calendar > Net Present Value subtab and specify the value for each period.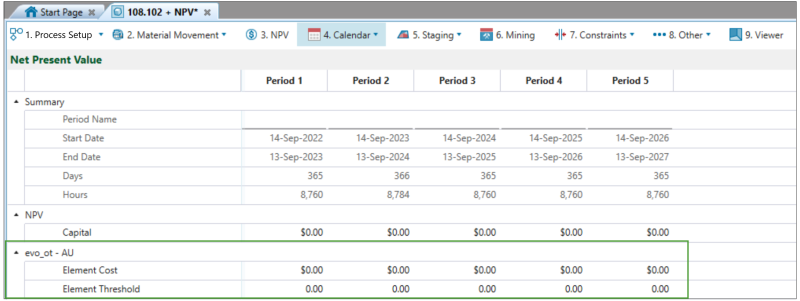
The value will be now automatically calculated for your model.
To check the value for each block:
-
Open your model in the viewer and adjust the view with
 Hands Free Mode.
 -
Change the operation mode to
 Interactive Mode and select a block.
 -
The value variable and other variables applicable to your model will be displayed in the Properties tab together with the values corresponding to the selected block:

Note: A negative number for the value variable signifies that the block is generating a loss.
You can also generate colour bands to check which areas generate profit and which do not. See Creating numeric (ranged) colour bands in Add Colour Bands for more information.
When specifying the parameters, select your model (Pit) from the Owner drop-down menu, and select the variable for the value from the Column drop-down. When specifying the lower and upper boundaries, make sure that all negative values (that is, the occurring loss), are included within one band, whereas the values above zero (that is, the generated profit) are included within the other band.

