Simple Stockpiles
Use ![]() Simple Stockpiles for mining operations that require managing numerous stockpiles on site. Simple stockpiles are cone-shaped, single-solid stockpiles that function identically to regular solid stockpiles. However, unlike complex stockpiles that require pre-existing geometry files (Vulcan triangulation files (
Simple Stockpiles for mining operations that require managing numerous stockpiles on site. Simple stockpiles are cone-shaped, single-solid stockpiles that function identically to regular solid stockpiles. However, unlike complex stockpiles that require pre-existing geometry files (Vulcan triangulation files (.00t) or AutoCAD DXF files (.dxf)), simple stockpile geometry defaults to a simple cone shape. This eliminates the need to create individual geometry files in external software and also allows you to frequently update stockpile attributes without recreating stockpile geometry.
Note: You can add simple stockpiles into setups that take solid models (Origin Solids and Epoch).
Generating simple stockpiles
The ![]() Simple Stockpiles feature allows you to create multiple stockpiles with simplified geometry in a single operation. To add simple stockpiles to your project, you must prepare the following data:
Simple Stockpiles feature allows you to create multiple stockpiles with simplified geometry in a single operation. To add simple stockpiles to your project, you must prepare the following data:
-
The required stockpile attributes (at minimum, the data for ID and Stage columns).
Note: When generating simple stockpiles, you can provide stockpile information in a comma-separated values (CSV) file (
.csv). -
Optionally, the coordinate data (that is, the X, Y, and Z positioning information).
Follow these steps to generate simple stockpiles for your project:
-
On the Evolution ribbon, go to Home > New Model group and click
 Simple Stockpiles.
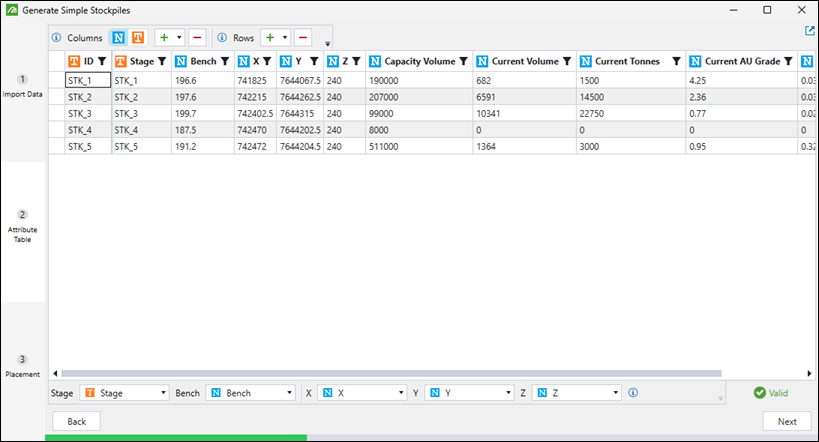
The Generate Simple Stockpiles panel will appear.

-
In the Import Data tab of the Generate Simple Stockpiles panel, select one of the following ways of importing simple stockpiles:
-
Import stockpiles from CSV. Define the attributes and position of your stockpile model by importing data from a CSV file.
Note
Each column will be imported as an attribute for the stockpile. Your CSV file must contain an ID column, which is a unique text identifier for each stockpile, and a Stage column, which is a text or numeric identifier that classifies the mining stage.
The optional columns that you can include are as follows:Bench: Bench elevation (a numeric identifier).
X, Y, Z: Coordinate positioning (numeric identifiers).
Capacity Volume: Maximum stockpile capacity (a numeric identifier).
Current Volume: Current material volume (a numeric identifier).
Current Tonnes: Current material tonnage (a numeric identifier).
Grade Attributes: Current ore grades (numeric identifiers).
Custom Attributes: Any additional attributes relevant to your operation.
Each row from the CSV file you supply will be imported as one project-level stockpile. Each project-level stockpile will be represented by a simple cone-shaped solid. Click the
 button to see an example CSV file formatting.
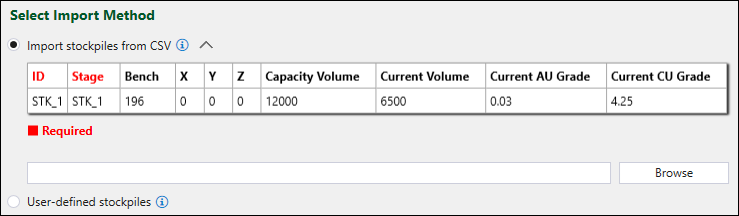
Or
-
User-defined stockpiles. Define the attributes and position of your stockpile model by creating a table with the required data in the Attribute Table tab of the Generate Simple Stockpiles panel.
Click Next or the Attribute Table tab to proceed to the subsequent step.
-
-
Depending on the import method that you have selected in the previous step, proceed as follows:
-
If you are importing stockpiles from a CSV file, confirm that the information is correct.
Note: You can edit the table to add or change stockpile data, as described in the next bullet point.
-
If you have selected User-defined stockpiles in the previous step, use the following buttons and drop-downs to create and configure the table with stockpile attributes:
Buttons Columns Note: Each column will be imported as an attribute for the stockpile. Each project-level stockpile will be represented by a simple solid.

Click the
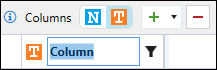
button to select the column you want to add as a numeric value.
Click the
button to select the column you want to add as a text value. (Add new columns)
-
Click
 to add a single column to the table.
 -
Click
 , set the number of columns to be added to the table and click Add.
-
After adding a column, double-click on its header to rename it.
-
Drag the column headers to rearrange the columns in your preferred order.
 (Delete selected columns)
To delete a column, click on the header of the column you no longer require and click
(Delete selected columns).Note: You can also delete a column by clicking on its header and pressing Delete.
Tip: To select multiple columns, select their headers while holding Ctrl key.
Rows Note: Each row that you create will be imported as one project-level stockpile. Each project-level stockpile will be represented by a simple solid.
(Add stockpile row / Add new rows)Click
(Add stockpile row) to add a single row to the table.Click
(Add new rows), set the number of rows to be added to the table and click Add.
Note: When you add a new row, the default row values for numeric and text columns are
0andDEFAULT, respectively. Click on each row cell to enter the required value. To change the default values, click the button in the Generate Simple Stockpile panel toolbar and enter the required value in each field.
Tip: Press Ctrl+C to copy a cell’s value and paste it into another cell with Ctrl+V.
(Delete selected rows)
To delete a row, click on the cell corresponding to the row you no longer require in the blank column on the left-hand side of the table and click
(Delete selected rows).
Note: You can also delete a row by pressing Delete instead of clicking the
(Delete selected rows) button.Tip: To select multiple columns, select their headers while holding Ctrl key.
Drop-downs: Map the added columns to Evolution stockpile attributes.
Note: Evolution automatically attempts to match common column names to attributes. If auto-matching fails, you must manually select the appropriate column from each mandatory drop-down.
Stage
Use the drop-down to specify the column corresponding to the stockpile’s Stage attribute.
Note: The Stage attribute can be either text or numeric.
Bench
Use the drop-down to specify the column corresponding to the stockpile’s Bench attribute.
X, Y, and Z
Use the X (easting), Y (northing), and Z (elevation) drop-downs to position simple stockpiles at specified coordinates.
Note: Setting the X, Y, and Z coordinates is optional. If you do not set these parameters, the stockpiles will be generated in a line (with appropriate spacing) starting at 0, 0, 0.
-
-
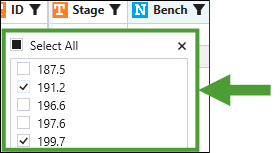
Selecting specific values. Filter the rows by selecting the checkboxes corresponding to the required values.
-
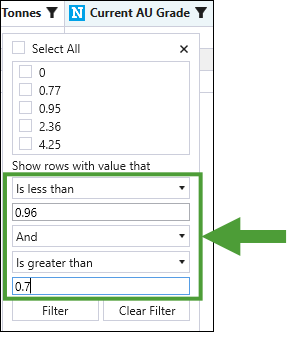
Applying a single condition. Filter the rows by entering a numeric value and applying one of the mathematical relations listed in the drop-down.

-
Applying a complex condition. Filter the rows by entering two single conditions (as shown above) and applying the And or Or logic between them.
-
Click the Clear Filter button to remove filters from the table.
-
Click
 in the Generate Simple Stockpile panel toolbar and select Filter Attributes from the drop-down.
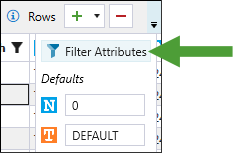
-
In the Simple Stockpiles Filter panel, drag the columns you do not wish to display into the Hidden Attributes section.
Tip
Use the following shortcuts to select multiple items at once:To select a contiguous group of items, use Shift+click.
To select a group of non-contiguous items, use Ctrl+click.
To select all items, use Ctrl+A.

-
Click Save to confirm.
Note: Evolution will automatically validate the attribute mapping in each drop-down. The
 status displayed at the bottom of the Generate Simple Stockpiles panel means that all set mappings are correct. If the mapping configuration is incorrect, Evolution will display either a warning or an
  status. Hover over the status for more information on the requirements, as follows:
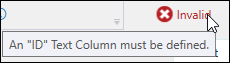
 Filtering row data
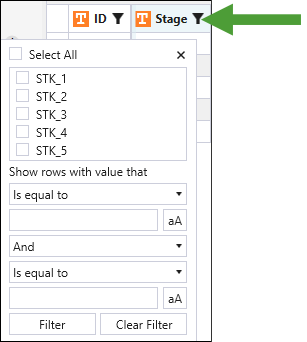
Each column header includes a button that allows you to filter your data as follows:
Column visibility
To select which columns to display in your view, follow these steps:
-
-
When you have finished configuring the table with stockpile attributes, click Next or the Placement tab to proceed to the subsequent step.
-
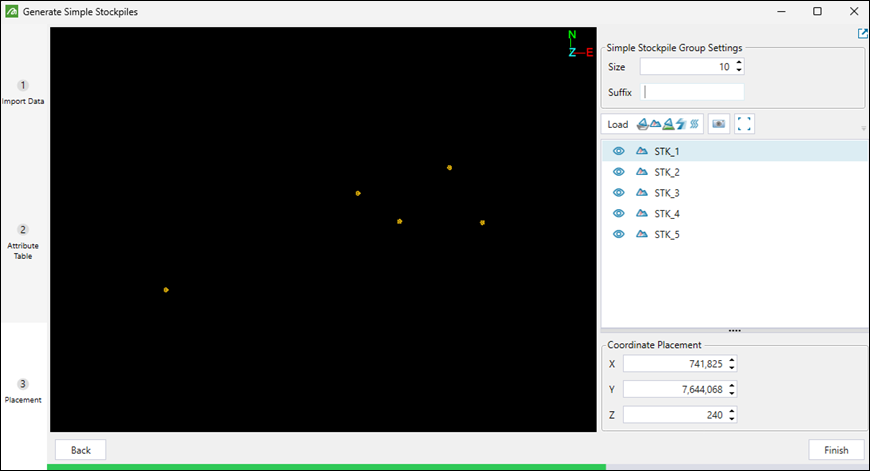
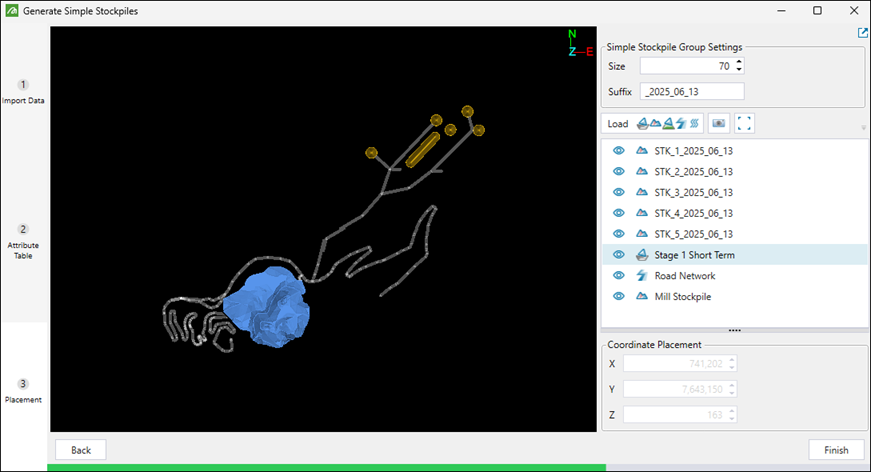
The Placement tab provides 3D visualisation and final configuration options of the stockpiles to be created (the stockpiles appear as cone-shaped objects). The settings that you apply will be reflected in the preview on the left-hand side of the panel.
Configure your simple stockpiles as follows:
Size field Use the Size field to enter the required diameter of the stockpiles. The size setting will be uniformly applied to all stockpiles in the group.
Tip: You can also click on the Size field and use the mouse wheel to set the required size.
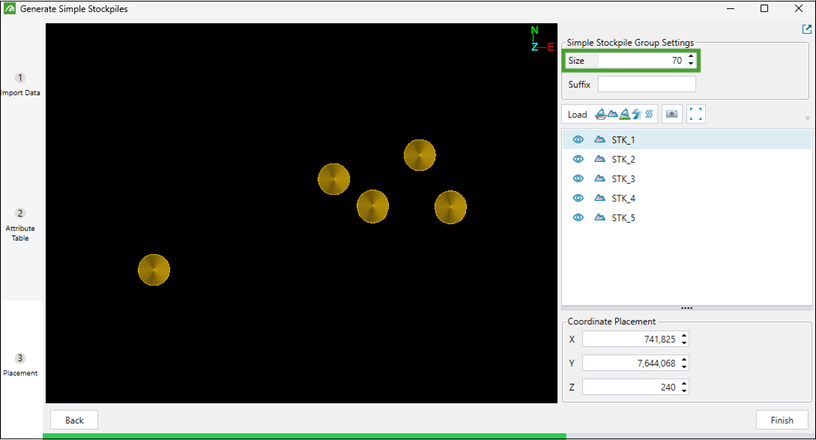
Note: The size unit follows your project coordinate system.
Suffix field If required, in the Suffix field, enter the text to be appended to all stockpile names. You can use date stamps (e.g. _2025_06_13), versioning (e.g._v2), batch identification (e.g._morning_shift), or other identification information, as required.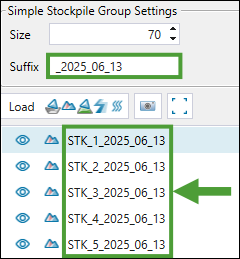
For spatial context, you can load your existing project models and items. Loading other models and items from your project can help you with the following:
-
Ensuring the new stockpiles do not conflict with your existing infrastructure.
-
Adjusting placement of stockpiles within the overall mine layout.
-
Improving connectivity to road networks and processing facilities.
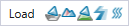
To load your project items into the simple stockpile generator, click the Load button. Next, in the Viewer Item Selection panel, drag the columns you want to view together with the simple stockpiles into the Displayed Viewer Items section. Click Save to confirm.
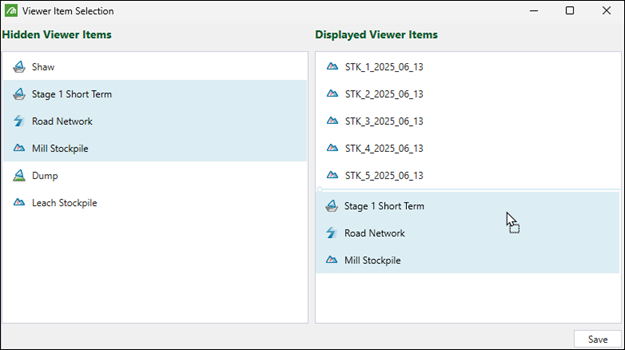 Tip
Tip
Use the following shortcuts to select multiple items at once:To select a contiguous group of items, use Shift+click.
To select a group of non-contiguous items, use Ctrl+click.
To select all items, use Ctrl+A.
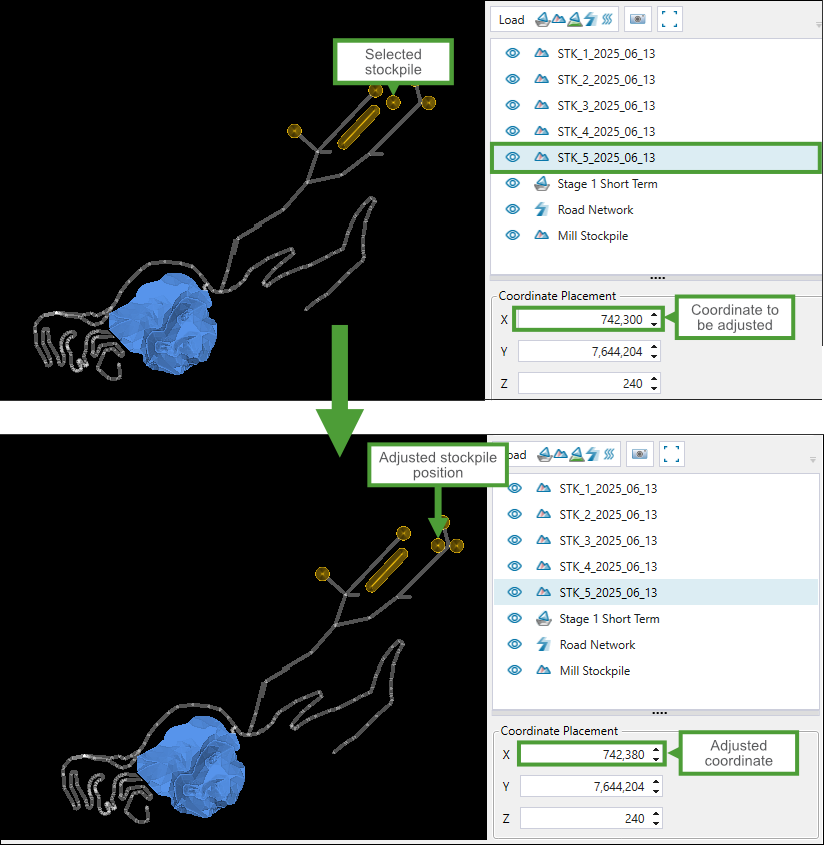
Coordinate Placement fields Use the Coordinate Placement fields to adjust the position of the selected stockpile by entering the required X (easting), Y (northing), and Z (elevation) coordinates. The changes that you make will be reflected in real-time in the preview window.
Tip: You can also click on each field and use the mouse wheel to set the required coordinates.
Note: You cannot change the position of the loaded project models and items.
Example
-
-
After making sure your stockpiles are configured as required, click Finish. The stockpiles you created will be added to the project explorer.
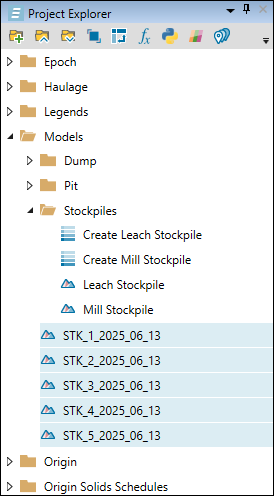
Note: Simple stockpiles operate the same way as imported stockpiles. See Importing a Solid Model for more information on importing solid stockpiles.
You can add the created stockpiles to your Origin Solids and Epoch setups. To do so, drag the required stockpiles from the project explorer onto the flowchart diagram in the
 Material Flow subtab.
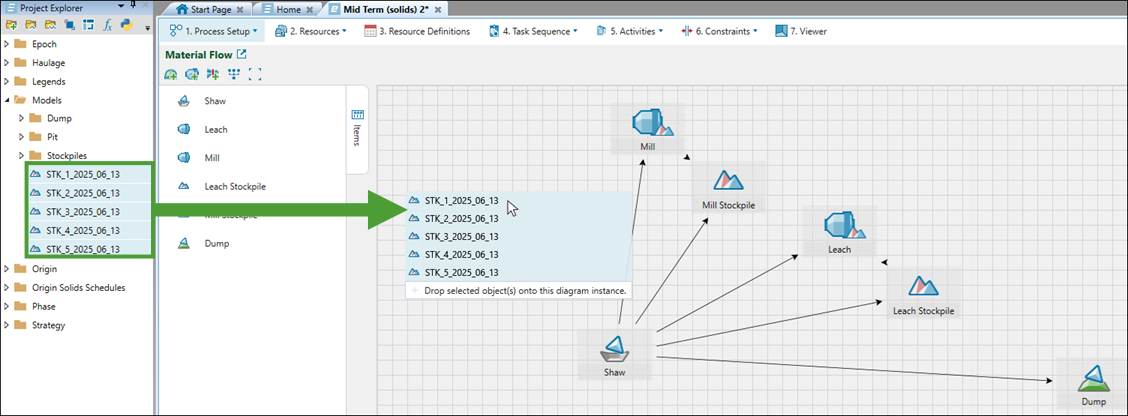
You can configure each stockpile individually. For more information, see Configuration in Origin Solids and Configuration in Epoch.
Use the following controls to customise the visibility of each model in the preview window:
|
|
Visible/Hidden
Toggle the  |
|
|
Centre Camera on Selected Item
Click to focus the preview window on the selected project model or item. |
|
|
Plan view
Centre your mine layout in the preview window. |
Updating stockpile attributes
You can update stockpile models in your project using a CSV file with the required information, formatted as shown in the image below.
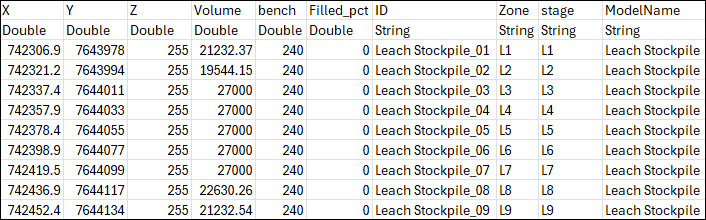
Important: If your CSV file contains type column headers, each column type should be either Double or String.
To update an existing stockpile model with the required attributes, right-click on the stockpile in the project explorer and select ![]() Import Attributes from CSV… from the context menu.
Import Attributes from CSV… from the context menu.
Tip: Press Ctrl to select multiple models at once.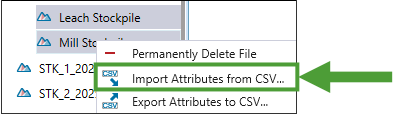
Next, select the required CSV file in the Import Attribute dialog and click Open. The selected stockpile will be updated with attributes included in the CSV file.
Tip: You can also right-click on the required stockpile and select ![]() Export Attributes to CSV… from the context menu, specify the location you want the file to be saved, and click Save. Use the saved file to update other stockpiles, as required.
Export Attributes to CSV… from the context menu, specify the location you want the file to be saved, and click Save. Use the saved file to update other stockpiles, as required.
