Colour
The following table describes the tools in the Colour section of the Home tab.
| Tool | Description |
| Uniform | Shades an entire object a uniform colour. |
| Opacity | Increases or decreases the opacity of a surface. |
| Appearance | Changes how a surface is rendered in the view. |
| Single Sided | Colours one side of a surface. |
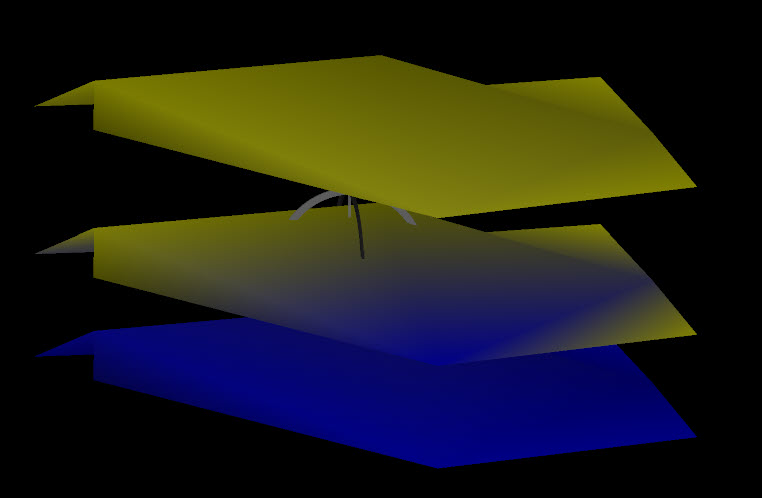
| Distance | Compares one object against a base or reference object and colours by the distance between the objects. |
| Height | Applies a colour to data based on the height of the data. |
| Attribute | Applies a colour to data based on an attribute. |
| Random | Shades an entire object a random uniform colour. |
Uniform
To apply a uniform colour to an object:
-
Select an object in the Data Explorer.
-
Go to Home > Colour > Uniform and click the arrow to open the drop-down list.
-
Choose a colour from the colour palette.
Opacity
To alter the opacity of an object:
-
Select an object in the Data Explorer.
-
Go to Home > Colour > Opacity and adjust the opacity of the object by dragging the slider.
Appearance
To change the appearance of an object:
-
Select an object in the Data Explorer.
-
Go to Home > Colour > Appearance.
-
From the drop-down list, choose one of the following values:
-
Smooth-shaded — Displays the edges of the triangulation as softened or rounded off.
-
Flat-shaded — Displays the triangulation without any visual smoothing.
-
Wireframe — Displays the triangulation without any shading.
-
Points — Displays the point primitives of the triangulation.
-
Single Sided
To colour one or both sides of a surface:
-
Select the surface in the Data Explorer.
-
Go to Home > Colour > Single Sided. This will open a new panel.
-
Select one of two options:
-
Colour surface on both sides .
-
Colour surface on front side only.
-
Distance
To colour objects based on their distance from reference objects:
-
Go to Home > Colour > Distance. This will open a new panel.

-
Populate the Base objects field with the objects to measure distance from.
-
Select Closest object to colour object points based on the closest base object to that point. Select Average to colour object points based on the average distance to every other base object.
-
Select Signed distance to separate colouring depending on whether the selected data is above or below a base surface (or Absolute distance otherwise).
-
The colour scale of the colour scheme editor may be adjusted manually by sliding the vertical edges of the coloured cells representing the colour bands. Colours may be selected from a colour palette for individual cells, or preset colour schemes may be applied to colour the entire range. Calculate range determines the distance settings for the colour scheme based on minimum and maximum separation between the base object(s) and the selected object. Right clicking on the top line of coloured cells displays further options for editing colour bands and the automated arrangement of colours. These include:
-
New — This option splits a colour band in two, adding a new colour band to the range of colours in the colour scheme editor.
-
Intervals — This option provides further numerical control over the spacing of colours.
-
Spread evenly — This option distributes the total colours evenly over the distance range.
-
Colour scheme — This option lets you select from preset arrangements of colours.
-
Copy/Paste/Undo/Redo — These options let you perform the selected operation to the colour scheme editor.
-
Height
To colour a surface based on height:
-
Select the surface in the Data Explorer.
-
Go to Home > Colour > Height.
-
Choose from the following options:
-
Cartographic — Applies a colour scheme found in many atlases. It breaks the height range into intervals from 0, 200, 500, 1000, 2000, 3000, 4000, 4000+ metres. Data with a mean sea level of 0.0 is coloured correctly. Geographic data such as DTED is automatically coloured using the Cartographic colour scheme.
-
Spectrum — Applies a colour spectrum to data, based on the height of the data.
-
Attribute
To colour a surface based on attribute:
-
Select a surface in the Data Explorer.
-
Go to Home > Colour > Attribute. This opens a new panel.
-
Set the Colour by field to an attribute to colour the surface by e.g. Z coordinate.
-
Set the Colour Scheme by setting the following fields:
-
Select scheme — Select a colour scheme to apply to the surface.
-
Equalise — Check this checkbox if you want to improve the colour distribution, giving equal numbers to all colours.
-
Reverse — Check this checkbox if you want to reverse the colour scheme.
-
-
Set the Range to colour to one of the following options:
-
Entire range— Select this option if you want to colour all values.
-
Percentile range— Select this option if you want to colour a percentage of values.
-
Defined range— Select this option if you wan to colour values within a defined range.
-
-
Check the Blend with existing colours checkbox if you want to blend the currently applied colour with existing colours. Otherwise the applied colour will override any existing colours.
-
Check the Colour beyond data range checkbox if you want to colour all data points. Otherwise, points outside the data range will be left unchanged.
Random
To apply a random uniform colour to an object:
-
Select an object in the Data Explorer.
-
Go to Home > Colour > Random. Keep clicking this button until you are happy with the colour selection.