Accessing Object Primitives
As discussed in Data and Objects, spatial objects are composed of fundamental geometrical structures called primitives. The five primitive types are points, edges, facets, cells, and blocks. The primitives that make up a spatial object can be accessed through various properties on the object. In addition, other properties exist that correspond to each primitive, such as colours or visibilities.
Accessing points
The points of any object are stored in its points property. Because most point-based objects contain multiple points, the points property is represented as a two-dimensional NumPy array. A single point is stored in an array of three elements [X, Y, Z], representing the X, Y and Z coordinates, respectively. A points array is then an array of point arrays.
A PointSet is the simplest kind of point-based spatial object.
from mapteksdk.project import Project
from mapteksdk.data import PointSet

project = Project()

with project.new("cad/points", PointSet) as new_points:
    new_points.points = [[-1, -1, 0], [1, -1, 0], [-1, 1, 0], [1, 1, 0]]
In the example above, we create a PointSet containing four points in a square shape in the XY plane.
As the Maptek Python SDK leverages the NumPy library, we can use NumPy indexing to access points as illustrated below.
from mapteksdk.project import Project
from mapteksdk.data import PointSet

project = Project()

with project.new("cad/points", PointSet) as point_set:
    point_set.points = [[-1, -1, 0], [1, -1, 0], [-1, 1, 0], [1, 1, 0]]

    print("First point: ", point_set.points[0])
    print("Last point: ", point_set.points[-1])
    print("X of point 1: ", point_set.points[1, 0])
    print("Y of point 2: ", point_set.points[2, 1])
    print("Z of point 0: ", point_set.points[0, 2])
    print("X coordinates: ", point_set.points[:, 0])
    print("Y coordinates: ", point_set.points[:, 1])
    print("Z coordinates: ", point_set.point_z)
    # point_set.points[:, 2] will also give the z coordinates.
Use the following properties and methods to manipulate the points of an object:
| Name | Description |
point_z
|
Use this property to change the z-coordinate of a point. |
point_colours
|
Use this property to change the colour of a point. The colour of each point is represented by an array containing four values [R, G, B, A] where:
|
point_visibility
|
Use this boolean property to make a point visible or invisible. |
point_selection
|
Use this property to select a group of points. |
point_count
|
Use this property to count the number of points in an object. |
remove_points(point_indices)
|
Use this method to remove a set of points from an object. This method takes an array of point indices. |
point_attributes
|
Use this method to save or return custom point attributes in an object. To set a particular point attribute, you can use the notation point_attributes[attribute_name] = data. |
save_point_attribute(attribute_name, data)
|
Use this method to save a point attribute and allocate data to it. |
There is one method that can be applied to any point-based object — the dataframe method. It returns the following values:
-
The X, Y and Z coordinates of each point
-
The R, G, B and A values of each point
-
The point visibility of each point
-
The point selection of each point
-
Point primitive attributes
Here is a code example:
from mapteksdk.project import Project
from mapteksdk.project import PointSet
project = Project() # Connect to default project
point_path = "scrapbook/my_points"
#1. Create points
with project.new(point_path, PointSet, overwrite=True) as points:
points.points = [[0, 1, 0], [0.5, 1, 0.5], [1, 1, 0],
[0, 0.5, 0.5], [0.5, 0.5, 1], [1, 0.5, 0.5],
[0, 0, 0], [0.5, 0, 0.5], [1, 0, 0]]
points:PointSet
#2. Print frame values
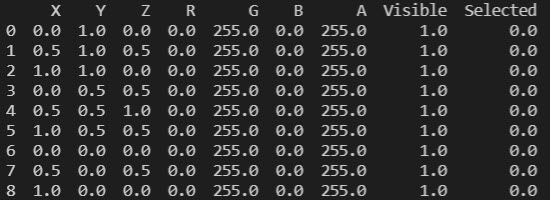
with points.dataframe(save_changes=False) as frame:
print(frame)
If you run this code, you should be able to print the following information:
While facet-based and cell-based objects are also point-based, only PointSet is purely based on point primitive types. To learn more about point sets, see the extended topic Point Sets. You can also refer to the mapteksdk.data.primitives.point_properties module in the API reference.
Accessing edges
An edge is a line segment between two points. As a result, all objects that contain edges also contain points. The Maptek Python SDK represents the edge as an array containing two items, with each item representing a point.
The edges of any object are stored in its edges property. Because most edge-based objects contain multiple edges, the edges property is represented as a NumPy array. Each element of the array represents a single edge, which in turn is an array of the two point indices defining the edge.
An EdgeNetwork is the simplest edge-based spatial object. We can use it to illustrate how to store its edges with the example below.
from mapteksdk.project import Project
from mapteksdk.data import EdgeNetwork
import numpy

project = Project()

with project.new("cad/edge_network", EdgeNetwork) as network:
  network.points = [[-1, -1, 0], [1, -1, 0], [-1, 1, 0], [1, 1, 0],
                    [-1, 1.2, 0], [1, 1.2, 0]]
  network.edges = [[0, 1], [1, 2], [2, 3], [0, 3], [4, 5]]
  for i, edge in enumerate(network.edges):
    start = network.points[edge[0]]
    end = network.points[edge[1]]
    length = numpy.linalg.norm(end - start)
    print(f"Edge {i} goes from {start} to {end} and is {length} "
          "meters long")
In the example above, we create an EdgeNetwork with six points and five edges, and then print each edge out by accessing each point from the start of an edge to the end of an edge.
Use the following properties and methods to manipulate the edges of an object:
| Name | Description |
edge_colours
|
Use this property to change the colour of an edge. The colour of each edge is represented by an array containing four values [R, G, B, A] where:
|
edge_count
|
Use this property to get the total number of edges for an edge-based object. For example, you may want to preallocate NumPy arrays to the correct length. In this case, using edge_count is advised for performance reasons with very large objects. |
edge_attributes
|
Use this method to save or return custom edge attributes in an object. To set a particular edge attribute, you can use the notation edge_attributes[attribute_name] = data. |
save_edge_attribute(attribute_name, data)
|
Use this method to save an edge attribute and allocate data to it. |
delete_edge_attribute(attribute_name)
|
Use this method to delete an edge attribute. |
Accessing facets
A facet is a primitive defined by three points. A facet in the SDK does not store the actual points, but instead references the three points by their index in the points property array. Thus a single facet is represented by an array of three point indices.
The facets of any object are stored in its facets property. Because most facet-based objects contain multiple facets, the facets property is represented as a NumPy array. Each element of the array represents a facet, which in turn is an array of the three point indices defining the facet.
A Surface is the simplest facet-based spatial object. We can use it to illustrate how to store facets with the example below.
from mapteksdk.project import Project
from mapteksdk.data import Surface

project = Project()

with project.new("surfaces/cube", Surface) as new_surface:
  new_surface.points = [[-1, -1, -1], [1, -1, -1], [1, 1, -1], [-1, 1, -1],
                        [-1, -1, 1], [1, -1, 1], [1, 1, 1], [-1, 1, 1]]
  new_surface.facets = [[0, 1, 2], [2, 0, 3], # The bottom face.
                        [4, 5, 6], [6, 4, 7], # The top face.
                        [0, 1, 5], [5, 4, 0], # The front face.
                        [1, 2, 5], [5, 6, 2], # The right face.
                        [2, 3, 7], [7, 6, 2], # The back face.
                        [0, 3, 7], [4, 7, 0]] # The left face.
Use the following properties and methods to manipulate the facets of an object:
| Name | Description |
facet_colours
|
Use this property to change the colour of a facet. The colour of each facet is represented by an array containing four values [R, G, B, A] where:
|
facet_count
|
Use this property to count the total number of facets within an object. For example, you may want to preallocate NumPy arrays to the correct length. In this case, using facet_count is advised for performance reasons with very large objects. |
remove_facets(facet_indices)
|
Use this method to remove facets from an object. Specify the facets you want to remove by using the argument facet_indices, which can be in the form of an integer or an array of integers. |
facet_attributes
|
Use this method to save or return custom facet attributes in an object. To set a particular edge attribute, you can use the notation facet_attributes[attribute_name] = data. |
save_facet_attribute(attribute_name, data)
|
Use this method to save a facet attribute and allocate data to it. |
delete_facet_attribute(attribute_name)
|
Use this method to delete a facet attribute. |
Accessing cells
A cell is a primitive containing four points. The Maptek Python SDK represents a cell as an array containing the indices of four points.
Cells are point-based objects. Therefore, the cells of any object are set and accessed using the points property. We define points for a cell to be an array of n*4 points, where n is the number of cells. Below is an example of points for a cell:
You can only access the cells of an object via the cells property. The cells property is a read-only property. Because most cell-based objects contain multiple cells, the cells property is represented as a NumPy array. Each element of the array represents a cell, which in turn is an array of the four point indices defining the cell.
A GridSurface is the simplest cell-based spatial object. We can use it to illustrate how to create cells with the example below.
from mapteksdk.project import Project
from mapteksdk.data import GridSurface
project = Project()
points = [[1.1, 1.15, 1.11], [1.98, 1.17, 1.08], [3.02, 1.13, 1.07],
          [1.08, 1.99, 1.07], [2.01, 2.03, 1.37], [3.00, 2.11, 1.33],
          [1.13, 3.08, 1.08], [2.00, 3.01, 0.99], [3.18, 3.07, 1.34]]
with project.new("surfaces/grid_surface", GridSurface(
        major_dimension_count=3, minor_dimension_count=3
        )) as new_grid:
    new_grid: GridSurface # Added to enable IntelliSense
    new_grid.points = points
    # Accessing cells requires PointStudio 2021.1 or higher,
    # SDK version 1.2 (from Extend Plugins 2021.1).
    print(new_grid.cells)
Use the following properties and methods to manipulate the cells of an object:
| Name | Description |
major_dimension_count
|
Use this property to define the number of rows of cells in a cell-based object. |
minor_dimension_count
|
Use this property to define the number of columns of cells in a cell-based object. |
cell_count
|
Use this property to return the total number of cells in an object. |
cell_point_count
|
Use this property to return the number of cell points in a cell-based object. This is usually equal to the major_dimension_count multiplied by the minor_dimension count properties, but may be less if the object contains invalid points. |
cell_visibility
|
Use this property to set the visibility of each cell. This is represented by an array of boolean values, where a False value indicates that the cell is invisible and a True value indicates that the cell is visible. |
cell_attributes
|
Use this method to save or return custom cell attributes in an object. To set a particular cell attribute, you can use the notation cell_attributes[attribute_name] = data. |
save_cell_attribute(attribute_name, data)
|
Use this method to save a cell attribute and allocate data to it. |
delete_cell_attribute(attribute_name)
|
Use this method to delete a cell attribute. |
Accessing blocks
A block is a cuboid with a size in each of the three directions and with a location defined by its centroid. The Maptek Python SDK only supports rectangular, prism-shaped blocks. Blocks are used to make more complex objects called block models. How blocks are created depends on the type of block model being created. There are three kinds of block models supported by the Maptek Python SDK, as follows:
-
Dense block models
A kind of block model where each block has the same size. The model is dense in that a block is defined at every location within the 3D grid structure over the model’s extent. Use DenseBlockModel to represent dense blocks. See Dense Block Models for more information. -
Subblocked block models
A kind of block model that allows blocks to be subdivided into subblocks, allowing for the efficient representation of finer-grainer detail within the model. Use SubblockedBlockModel to represent a block model with subblocks. See Subblocked Block Models for more information. -
Sparse blocks models
Similar to dense block models in that each block has the same size, but the model is sparse in that blocks are only defined at given locations within the 3D grid structure. Sparse block models allow for the more efficient storage of models that contain many holes or voids. Use SparseBlockModel to build a sparse block model. See Sparse Block Models for more information.
The following is a list of properties and methods that can be used to query and configure all block models, irrespective of type:
block_count
|
Use this read-only property to return the number of blocks in a model. This could be useful for when you want to perform an operation on a number of blocks. You can use this property to iterate over each block in a model. |
block_resolution
|
Use this read-only property to return the resolution of blocks in a block model. |
block_centroids
|
Use this read-only property to return the centroid of each block in a model. |
block_sizes
|
Use this read-only property to return the block sizes of each block in a model. |
block_colours
|
Use this property to set the colours of each block in a model. The colour of each block is represented by an array containing four values [R, G, B, A] where:
|
slice_count
|
Use this read-only property to return the number of slices in a block model. If the block model hasn’t rotated, the number of slices in a block model will equal the number of blocks in the z-direction. |
row_count
|
Use this read-only property to return the number of rows in a block model. If the block model hasn’t been rotated, the number of rows in a block model will equal the number of blocks in the y-direction. |
column_count
|
Use this read-only property to return the number of columns in a block model. If the block model hasn’t been rotated, the number of columns in a block model will equal the number of blocks in the x-direction. |
block_selection
|
Use this property to select blocks in a block model. The selection of each block is represented by a boolean value in an array. True means that the block is selected while False means that the block is not selected. By default, block_selection is set to False. |
block_visibility
|
Use this property to set the visibility of each block in a block model. The visibility of each block is represented by a boolean value in an array. True means that the block is visible while False means that the block is not visible. By default, block_visibility is set to True. |
block_attributes
|
Use this property to set or return the custom block attributes of a model. To set a particular block attribute, you can use the notation block_attributes[attribute_name] = data. |
origin
|
Use this property to set the origin of a block model. |
block_to_grid_index
|
Use this property to retrieve the row, column and slice that contains the centroid for each block. Each item in the array is an array in the form [row, column, slice]. |
orientation
|
Use this read-only property to retrieve the orientation of a block model. Returns a tuple of the form (dip, plunge, bearing). |
set_orientation(dip, plunge, bearing)
|
Use this method to set the orientation of a block model. This method takes three parameters: dip, plunge and bearing. |
grid_index(start, end)
|
Use this method to return all of the subblocks within a parent block. The parent block is defined by its row, count and slice. The start and end parameters are arrays of three items: [row, count, slice]. |
rotate(angle, axis)
|
Use this method to rotate a block model by the specified angle around the specified axis. |
