Markers
Marker provides a way of creating markers or signs at strategic locations in the 3D scene, with the extra capability of adding attachments that are relevant to these locations. The marker consists of a name (text), which is visible when zoomed out from the location. As you zoom in, the name fades away and a marker shape becomes visible.
Marker properties
Use the following properties to customise the look of your marker:
| Name | Description |
|
Use this property to set content of the marker text. |
|
|
Use this property to set the size of the marker text. |
|
| Use this property to set the marker colour. | |
|
Use this property to set the text colour. |
|
|
Use this property to set the shape of the marker. Choose to set the marker shape to one of the following values: |
|
| Use this property to set the location of the marker as a point [X, Y, Z]. | |
| height | Use this property to offset the marker from the location. |
Marker examples
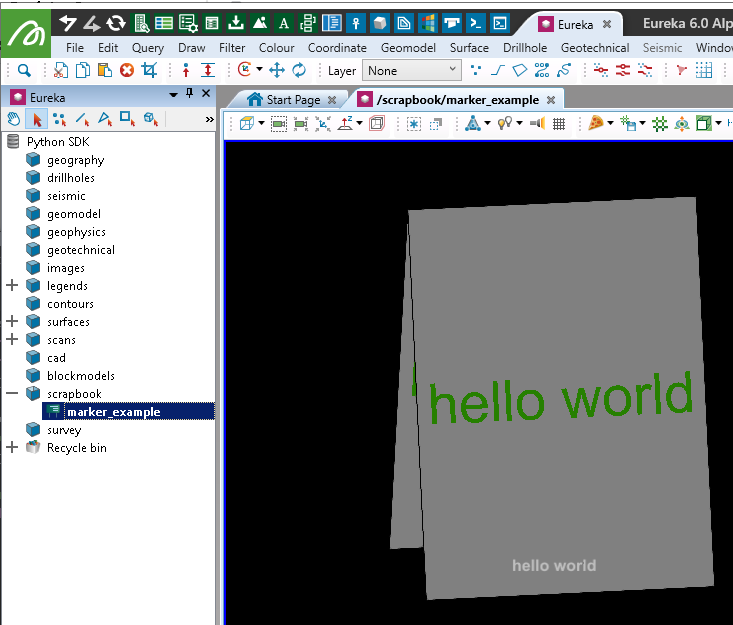
Creating a marker
from mapteksdk.project import Project
from mapteksdk.data import Marker
proj = Project() # Connect to default project

object_path = "scrapbook/marker_example"

# Create (or edit if it already exists) Marker
with proj.new_or_edit(object_path, Marker) as marker:
    marker.text = 'hello world'
    marker.location = [0, 0, 0]
    # Colours are R,G,B,A, where A is Alpha (255 = opaque)
    marker.text_colour = [38, 128, 0, 255] # Light Green
    marker.text_size = 200
    marker.marker_colour = [128, 128, 128, 255] # Grey
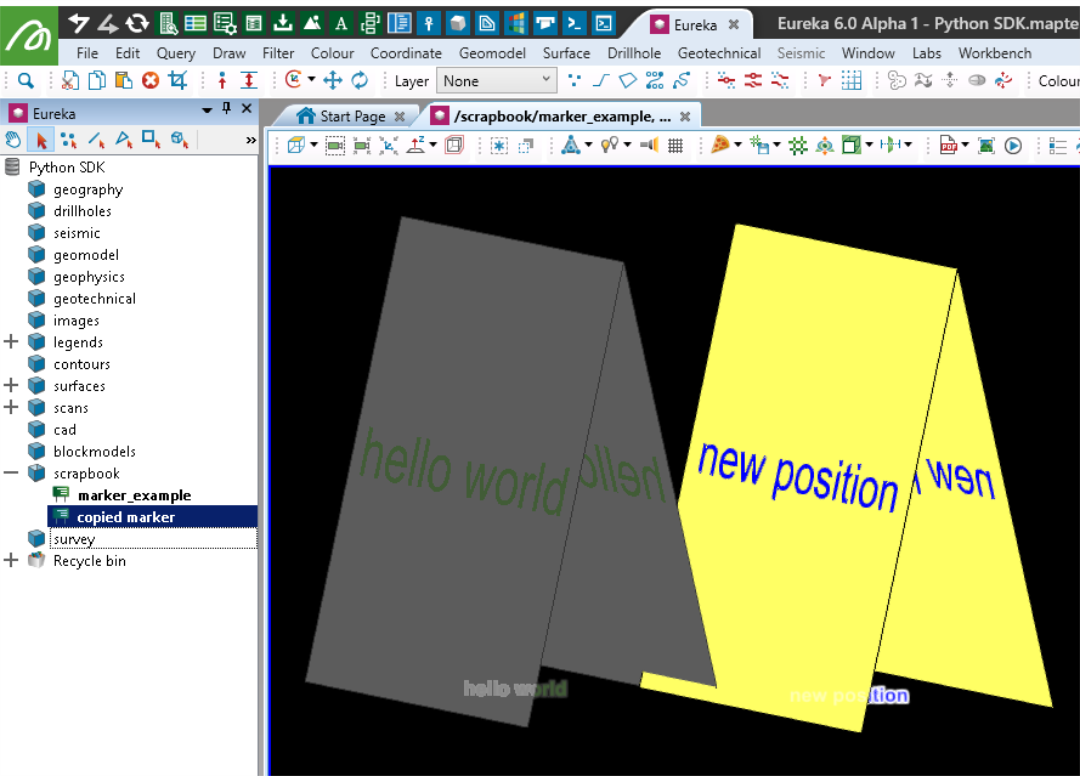
Editing colour and position
This example will copy the Marker created above, translate it and change its colours.
from mapteksdk.project import Project
from mapteksdk.data import Marker
proj = Project() # Connect to default project

old_path = "scrapbook/marker_example"
new_path = "scrapbook/copied marker"
old_marker = proj.find_object(old_path)
if old_marker and old_marker.is_a(Marker):
    # Copy the old marker to the new path
    new_marker = proj.copy_object(old_marker, new_path, overwrite=True)

    # Modify marker position and colours
    with proj.edit(new_marker) as marker:
        marker.text = 'new position'
        marker.location = [100, 100, 0]
        # Colours are R,G,B,A, where A is Alpha (255 = opaque)
        marker.text_colour = [0, 0, 255, 255] # Blue
        marker.marker_colour = [255, 255, 100, 255] # Yellow
else:
    print("Couldn't find an Marker at {}".format(old_path))
Setting the shape of a marker
You can set the shape of a marker using the Marker.shape class.
from mapteksdk.project import Project
from mapteksdk.data import Marker
proj = Project() # Connect to default project

object_path = "scrapbook/marker_with_symbol"

# Create Marker (or edit if it already exists)
with proj.new_or_edit(object_path, Marker) as marker:
    marker.text = 'diamond marker'
    marker.location = [0, 0, 0]
    # Colours are R,G,B,A, where A is Alpha (255 = opaque)
    marker.text_colour = [38, 128, 0, 255] # Light Green
    marker.text_size = 200
    marker.marker_colour = [128, 128, 128, 255] # Grey

    marker.shape = Marker.Shape.DIAMOND
    # Set Marker shape/symbol. Options:
    # Marker.Shape.DIAMOND (diamond shape)
    # Marker.Shape.CUBE (cube shape)
    # Marker.Shape.VERTICAL_SIGN (vertical billboard)
    # Marker.Shape.A_FRAME_SIGN (Default)
    # Marker.Shape.THREE_SIDED_SIGN (solid triangulay prism)
    # Marker.Shape.HORIZONTAL_SIGN (billboard on X/Y plane)
    # Marker.Shape.ZEBRA_SCALE (striped scale bar)
    # Marker.Shape.CHECKERED_SCALE (checkered scale bar)
    # Marker.Shape.U_SCALE (u-shaped scale bar)
    # Marker.Shape.PRONE_HUMAN (horizontal human shaped marker)
    # Marker.Shape.UPRIGHT_HUMAN (vertical human shaped marker)
    # Marker.Shape.COMPASS_ROSE (compass rose)
    # Marker.Shape.CUSTOM (used for setting your own shape with Marker.custom_shape_object())

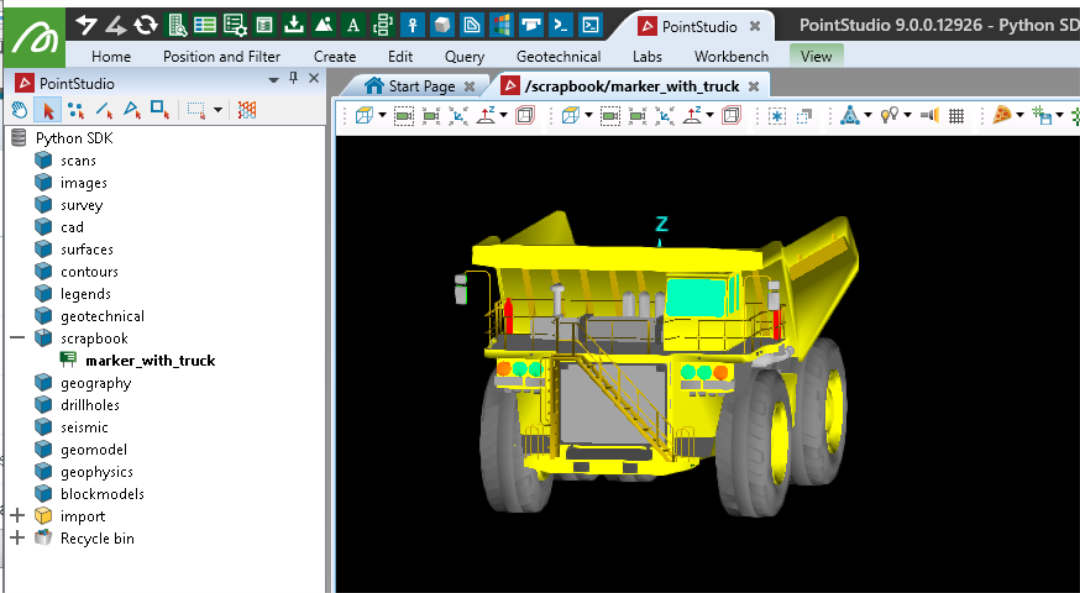
Assigning a surface as a marker shape
You can assign a surface to a Marker shape property. This is useful where several markers are required that have the same object represented visually.
Note: The following example imports a Maptek object file containing a single surface to apply to the marker. It can be downloaded here: PythonSDK_SampleData_Truck.maptekobj.
More comprehensive examples for importing Maptek object files (.maptekobj) are provided in Built-In Input/Output
Important: When assigning a surface to a marker, its 3D position will be offset relative to the marker location. Surfaces used for markers should be centred around or have reference point at 0, 0, 0 to be correctly displayed relative to the marker's arbitrary position.
from mapteksdk.project import Project
from mapteksdk.data import io, Surface, Marker
proj = Project() # Connect to default project

# Use the path you have saved the example maptekobj file:
maptekobj_path = "F:\\Python SDK Help\\data\\PythonSDK_SampleData_Truck.maptekobj"
# Import the maptekobj, providing an ObjectID as a result
imported_data = io.import_maptekobj(maptekobj_path)

# Assuming the maptekobj contains only one object and it is a surface,
# it doesn't need to be stored with a path to assign it to the marker.
if imported_data.is_a(Surface):
    # Create a new marker and assign the surface as its shape
    with proj.new("scrapbook/marker_with_truck", Marker, overwrite=True) as marker:
        marker.location = [0,0,0]
        marker.size = 2
        marker.custom_shape_object = imported_data

else:
    print("Imported object was expected to be a Surface but was not a Surface")
Rotating and translating a marker
This example builds on the last one to draw a simple track to move the translate and rotate the Marker around.
Note: This example directly manipulates the geometry within the custom object in the marker. If rotating Markers with standard shapes and not custom geometry, you can use Marker.rotate_2d(), Marker.rotate(), Marker.set_rotation_2d() and Marker.set_rotation().
from mapteksdk.project import Project
from mapteksdk.data import io, Surface, Marker
from mapteksdk.data.units import Axis
import time
import numpy as np
from scipy.spatial.transform import Rotation

def rotation_matrix_from_vectors(vec1, vec2):
    """ Find the rotation matrix that aligns vec1 to vec2
    vec1 3d source vector
    vec2 3d destination vector
    return: A transform matrix (3x3) which when applied to vec1, aligns it with vec2.
    https://stackoverflow.com/a/59204638/11841607
    """
    a, b = (vec1 / np.linalg.norm(vec1)).reshape(3), (vec2 / np.linalg.norm(vec2)).reshape(3)
    v = np.cross(a, b)
    c = np.dot(a, b)
    s = np.linalg.norm(v)
    kmat = np.array([[0, -v[2], v[1]], [v[2], 0, -v[0]], [-v[1], v[0], 0]])
    rotation_matrix = np.eye(3) + kmat + kmat.dot(kmat) * ((1 - c) / (s ** 2))
    return rotation_matrix

if __name__ == "__main__":
    proj = Project() # Connect to default project

    # Use the path you have saved the example maptekobj file:
    maptekobj_path = "F:\\Python SDK Help\\data\\RotateMoveMarker.maptekobj"

    # Import the maptekobj which is known to contain a container with objects used in this script
    imported_data = io.import_maptekobj(maptekobj_path)
    name = imported_data.name
    proj.rename_object(imported_data, "/{}".format(name), overwrite=True)

    input("Open the imported objects (in: /{}) in a view window and press any key to continue..".format(name))

    with proj.read("{}/follow_points".format(name)) as line:
        # Note: The Marker object supports .rotate_2d(), .rotate(), .set_rotation_2d(), .set_rotation()
        # however these are compatible with standard marker shapes. When using custom marker shapes
        # like this example, we can modify the underlying surface directly.
        # Unlike a usual rotation we do not need to adjust the origin while rotating as it will
        # always be relative to the marker location.

        # Place at first position on the line to follow
        with proj.edit("{}/marker_with_truck".format(name)) as marker:
            marker.location = line.points[0]
            with proj.edit(marker.custom_shape_object) as truck:
                min_ex = truck.extent.minimum
                # Lift the geometry to sit on the surface as its origin is the centroid
                if min_ex[2] < 0:
                    truck.points += [0, 0, -min_ex[2]]
                # Align the truck with the first line segment using an edge of its
                # geometry bounding box
                max_ex = truck.extent.maximum
                v1 = np.asarray((min_ex[0], max_ex[1], 0)) - np.asarray((min_ex[0], min_ex[1], 0))
                v2 = line.points[1] - line.points[0]
                rot = rotation_matrix_from_vectors(v1, v2)
                r = Rotation.from_matrix(rot)
                # Apply the rotation to the points
                truck.points = r.apply(truck.points)

        # Move and rotate for each segment along the line
        for i in range(1, line.point_count - 1):
            with proj.edit("{}/marker_with_truck".format(name)) as marker:
                # Shift the marker to the next position
                marker.location = line.points[i]
                v1 = line.points[i] - line.points[i - 1]
                v2 = line.points[i + 1] - line.points[i]
                rot = rotation_matrix_from_vectors(v1, v2)
                r = Rotation.from_matrix(rot)
                with proj.edit(marker.custom_shape_object) as truck:
                    # Apply the rotation to the points
                    truck.points = r.apply(truck.points)
            # Pause for a moment to see the change
            time.sleep(0.1)
Setting marker heights
The Marker.height property allows for markers to be displayed above the marked location. This is useful if placing the marker at the marked location would obscure the location. The following script demonstrates creating several markers with differing heights:
from mapteksdk.project import Project
from mapteksdk.data import Marker
from mapteksdk.operations import open_new_view

if __name__ == "__main__":
    with Project() as project:
        markers = []
        for i, height in enumerate((0, 1.0, 1.5, -1.5)):
            with project.new(f"cad/marker_height_examples/{height}", Marker
                    ) as marker:
                marker.shape = Marker.Shape.THREE_SIDED_SIGN
                marker.height = height
                marker.location = [i * 1.5, 0, 0]
                marker.text = f"{height}"
                marker.size = 1.0
            markers.append(marker.id)

        open_new_view(markers)
The above script creates a marker with heights of 0, 1.0, 1.5, -1.5. The created markers are shown below:
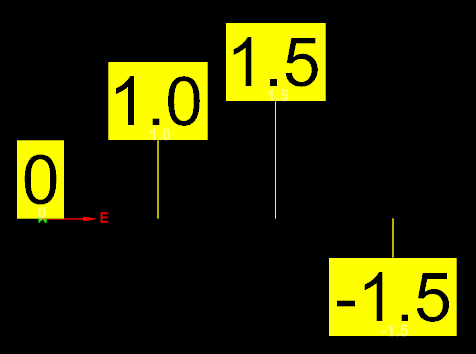
-
A height of 0 (the default) places the marker at the marked location.
-
A height of
1.0places the marker 1.0 m above the marked location. -
A height of -1.5 places the marker 1.5 m below the marked location.
-
If the marker shape is set to Marker.Shape.THREE_SIDED_SIGN, then a stick is displayed. This connects the marker to the location it marks. Height is supported for all marker shapes, however most do not support the stick.
