Rasters
Suppose you want to colour your object and colouring the points or facets doesn’t provide the detail of colouring required. You can map raster data such as a photo or a scan onto a 3D model.
What is a raster?
A raster is a matrix where each cell (called a pixel) represents a piece of information or data. That information indicates what colour each cell will be. For example, consider the following simple image:
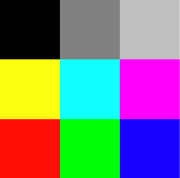
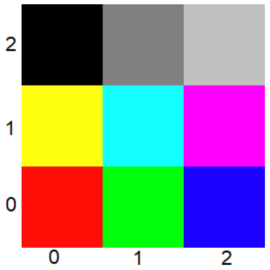
The image above consists of a total of nine pixels arranged into three rows and three columns. The Maptek Python SDK (and connected applications) would store this raster flattened as shown in the image below.

The bottom row is stored first, followed by the row above it and so on for the entire image. This means that pixels[0] would return red, pixels[1] would return green and pixels[8] would return light grey.
The colours themselves are stored using a RGBA (Red Green Blue Alpha) colour scheme. A single colour is represented as four numbers between 0 and 255. These numbers have the following meaning:
-
R represents the redness of the colour, with 0 indicating no red and 255 indicating maximum red.
-
G represents the greenness of the colour, with 0 indicating no green and 255 indicating maximum green.
-
B represents the blueness of the colour, with 0 indicating no blue and 255 indicating maximum blue.
-
A represents the alpha of the colour, with 0 indicating the colour is completely transparent and 255 indicating that the colour is not transparent.
The pixels in the above image are representing in the following way:
| Colour | Red | Green | Blue | Alpha |
| Red | 255 | 0 | 0 | 255 |
| Green | 0 | 255 | 0 | 255 |
| Blue | 0 | 0 | 255 | 255 |
| Yellow | 255 | 255 | 0 | 255 |
| Cyan | 0 | 255 | 255 | 255 |
| Magenta | 255 | 0 | 255 | 255 |
| Black | 0 | 0 | 0 | 255 |
| Dark Grey | 128 | 128 | 128 | 255 |
| Light Grey | 192 | 192 | 192 | 255 |
The table above directly corresponds to how the pixels of the image are stored by the Python SDK (and the connected application). For an image with N pixels, the image is stored as a NumPy array of 8 bit unsigned integers of shape (N, 4). In the example below, we create a raster of the image in the image above and use a RasterRegistrationTwoPoint object to associate that raster with a surface (See Using a raster as a texture for a surface for more details on the registration).
from mapteksdk.project import Project
from mapteksdk.data import Surface, Raster, RasterRegistrationTwoPoint

project = Project()

with project.new(f"surfaces/simple-raster", Surface) as new_surface:
  new_surface.points = [[0, 0, 0], [0, 10, 0], [0, 20, 0], [10, 20, 0],
                        [20, 20, 0], [20, 10, 0], [20, 0, 0], [10, 0, 0],
                        [10, 10, 0]]
  new_surface.facets = [[0, 1, 7], [1, 2, 3], [3, 4, 5], [5, 6, 7],
                        [1, 7, 8], [1, 3, 8], [3, 5, 8], [5, 7, 8]]
  # If a raster is associated with an object, it does not need a path.
  with project.new(None, Raster(width=3, height=3)) as raster:
    raster.pixels = [
      [255, 0, 0, 255], [0, 255, 0, 255], [0, 0, 255, 255],
      [255, 255, 0, 255], [0, 255, 255, 255], [255, 0, 255, 255],
      [0, 0, 0, 255], [128, 128, 128, 255], [192, 192, 192, 255]
    ]
    registration = RasterRegistrationTwoPoint(
      image_points=[[0, 0], [raster.width, raster.height]],
      world_points=[[0, 0, 0], [20, 20, 0]],
      orientation=[0, 0, 1]
    )
    new_surface.associate_raster(raster, registration)
If you run the above code, you should create an object that looks like the one below.
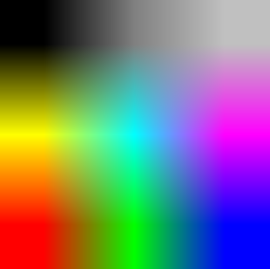
Note that the pixels assigned to the raster match the table above. Unlike in the previous image, the colours are interpolated between the pixels of the image rather than having sharp borders.
To more closely represent the original image without any interpolation, it is necessary to use more pixels. For example, if instead of using 3x3 pixels the script were to use 255x255 pixels arranged into nine 85x85 squares then the image would look more similar to the original. The resulting raster would contain 65,025 pixels. This is on the small end for images — a photograph taken on a phone can give images that are 3120x4160 or 12,979,200 pixels. However, manually typing out that many colour values would be a long, tedious, error prone and unproductive process. Because the image follows a relatively simple pattern, it can be generated in code with little effort as shown below.
from mapteksdk.project import Project
from mapteksdk.data import Surface, Raster, RasterRegistrationTwoPoint

project = Project()

with project.new(f"surfaces/sharp_squares", Surface) as new_surface:
  new_surface.points = [[0, 0, 0], [0, 10, 0], [0, 20, 0], [10, 20, 0],
                        [20, 20, 0], [20, 10, 0], [20, 0, 0], [10, 0, 0],
                        [10, 10, 0]]
  new_surface.facets = [[0, 1, 7], [1, 2, 3], [3, 4, 5], [5, 6, 7],
                        [1, 7, 8], [1, 3, 8], [3, 5, 8], [5, 7, 8]]
  with project.new(None, Raster(width=255, height=255)) as raster:
    raster.pixels_2d[0:85, 0:85] = [255, 0, 0, 255]
    raster.pixels_2d[0:85, 85:170] = [0, 255, 0, 255]
    raster.pixels_2d[0:85, 170:255] = [0, 0, 255, 255]
    raster.pixels_2d[85:170, 0:85] = [255, 255, 0, 255]
    raster.pixels_2d[85:170, 85:170] = [0, 255, 255, 255]
    raster.pixels_2d[85:170, 170:255] = [255, 0, 255, 255]
    raster.pixels_2d[170:255, 0:85] = [0, 0, 0, 255]
    raster.pixels_2d[170:255, 85:170] = [128, 128, 128, 255]
    raster.pixels_2d[170:255, 170:255] = [192, 192, 192, 255]
    registration = RasterRegistrationTwoPoint(
      image_points=[[0, 0], [raster.width, raster.height]],
      world_points=[[0, 0, 0], [20, 20, 0]],
      orientation=[0, 0, 1])
    new_surface.associate_raster(raster, registration)
Instead of accessing the pixels property directly, the above example uses the pixels_2d property. This allows for the pixels to be accessed based on the rows and columns of the image rather than the index. For example:
-
pixels_2d[0, 0]refers to the pixel in the bottom left hand corner of the image (0th row, 0th column) -
pixels_2d[width - 1, height - 1]refers to the pixel in the top right hand corner of the image (width - 1th row and height - 1th column) -
pixels_2d[x, y]refers to the pixel in the xth row and yth column of the image.
The above example takes this a step further and uses slicing to refer to pixels in square subsections of the image. For example, consider the following line:

The above line indicates that the pixels in rows 0 to 85 and columns 85 to 170 should all be assigned to the colour green. Similar code is used to assign each of the nine blocks of colour to the image, resulting in a surface that looks like this:
Using a raster as a texture for a surface
The previous examples in this section placed the raster on a flat square surface. However, rasters are usually not associated with flat square surfaces. This section covers the various registration algorithms that are available for registering a raster to an object.
Two-point raster registration
The RasterRegistrationTwoPoint class represents the simplest registration algorithm supported by the Maptek Python SDK. This class uses two image points, two world points and an orientation to project the raster onto the surface.
The image_points are two-dimensional image coordinates. An image point at location [row, col] indicates the pixel in the specified row and column — the indexing is the same as the pixels_2d property described above. The image point [0, 0] corresponds to the bottom left hand corner of the image and an image point of [width - 1, height - 1] corresponds to the top right hand corner. Unlike the pixels_2d property, an image point can have a negative value, or a value exceeding the width or height of an image. For example, the image point [-1, -1] indicates the location of a pixel located one row and one column below the bottom left-hand corner of the image. Similarly, an image point of [width, height] represents where the pixel one row and one column above the top right hand corner of the image would be.
The points in world_points specify the location on the surface that matches the location of the image point with the corresponding index. For example, given an image point of [1, 2] and a world point of [-1, 0, 0] this indicates that the pixel in the first row and second column should be placed on the surface at the point [-1, 0, 0]. The two point registration object accepts two world_points and two image_points, which makes two such pairs of points.
Two point pairs are not sufficient to uniquely determine how to project the raster onto a surface. With only two points, an infinite number of registrations are possible. To ensure that only one is possible more information is required. In the case of two point registration, the additional information comes from the orientation. The orientation is a direction vector that specifies which direction the raster is projected onto the surface. For example, an orientation of [1, 0, 0] indicates that the raster is projected onto the surface from the direction of the X axis. Whereas, an orientation of [0, 0, 1] indicates the raster is projected onto the surface from above. The orientation can be negative or contain multiple non-zero components to allow for more complicated projections onto the surface. In the following example, we use three separate rasters with different orientations and world points to put coloured stripes on the faces of a cube.
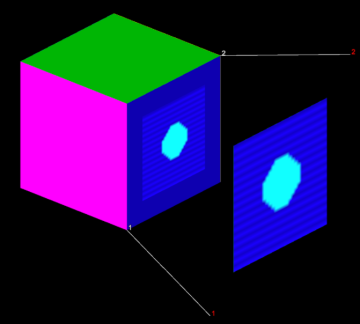
The following image demonstrates a simple case where the image points (labelled in red) are in the corners of the image and the world points (labelled in white) are at the corresponding edges of a cube. The orientation is set to [0, 1, 0] so that the image is projected onto the surface from the y direction and is parallel with the faces of the cube the raster is intended to appear on.
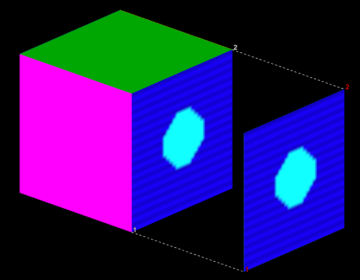
The image registration shown below is similar to that shown in the image above. It uses the same world points and orientation but the image points are inside the image.
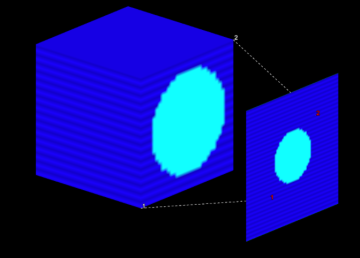
By placing the image points inside the raster, the raster appears larger on the surface. The image points are mapped to the same world points, resulting in ‘zooming in’ on the raster so that the pixels at the specified image points are placed at the matching world point. Because the entire raster does not fit on the single face of the cube it extends onto the other faces of the cube.
It is also possible to place the image points outside of the image rather than inside it. For example, the image point [-1, -1] indicates the location where a pixel one row and one column below the bottom left hand corner of the image would be if it existed. Similarly, an image point of [width, height] represents where the pixel one row and one column above the top right hand corner of the image would be. The following image demonstrates the use of image points (displayed in red) significantly outside of the image.
Placing the image points outside of the image has the opposite effect of placing them inside of the image. It causes the raster to become smaller when projected on the surface. This means that the raster no longer takes up all of the available area on the face of the cube.
The above examples only vary the image points. However the registration can also be changed by varying the world points and the orientation. The next example uses three separate rasters with different orientations and world points to put coloured stripes on all six faces of a cube.
from mapteksdk.project import Project
from mapteksdk.data import Surface, Raster, RasterRegistrationTwoPoint
from mapteksdk.pointstudio.operations import open_new_view

project = Project()

points = [[-1, -1, -1], [1, -1, -1], [1, 1, -1], [-1, 1, -1],
          [-1, -1, 1], [1, -1, 1], [1, 1, 1], [-1, 1, 1]]
facets = [[0, 1, 2], [2, 0, 3],
          [4, 5, 6], [6, 4, 7],
          [0, 1, 5], [5, 4, 0],
          [1, 2, 5], [5, 6, 2],
          [2, 3, 7], [7, 6, 2],
          [0, 3, 7], [4, 7, 0]]

# The same image points are used for all three rasters.
image_points = [[0, 0], [32, 32]]

# Each raster uses different orientations and world points.
orientations = ([0, 0, 1], # From the Z direction.
                [0, 1, 0], # From the Y direction.
                [1, 0, 0],) # From the X direction.
# Use 0.99 to leave a small gap between rasters.
world_points = (([-0.99, -0.99, 0.99], [0.99, 0.99, 0.99]),
                ([-0.99, -0.99, -0.99], [0.99, -0.99, 0.99]),
                ([-0.99, 0.99, -0.99], [-0.99, -0.99, 0.99]))

with project.new("surfaces/stripy_cube", Surface,
                 overwrite=True) as surface:
  surface.points = points
  surface.facets = facets
  # Set all facets to be white.
  surface.facet_colours[:, :3] = 255
  # Create the rasters and register them to the surface.
  with project.new(None, Raster(width=32, height=32)) as raster:
    raster.pixels_2d[::2] = [255, 255, 255, 255]
    raster.pixels_2d[1::2] = [0, 0, 200, 255]
    registration = RasterRegistrationTwoPoint(world_points=world_points[0],
                                              image_points=image_points,
                                              orientation=orientations[0])
    surface.associate_raster(raster, registration)
  with project.new(None, Raster(width=32, height=32)) as raster:
    raster.pixels_2d[::2] = [255, 255, 255, 255]
    raster.pixels_2d[1::2] = [0, 200, 0, 255]
    registration = RasterRegistrationTwoPoint(world_points=world_points[1],
                                              image_points=image_points,
                                              orientation=orientations[1])
    surface.associate_raster(raster, registration)
  with project.new(None, Raster(width=32, height=32)) as raster:
    raster.pixels_2d[::2] = [255, 255, 255, 255]
    raster.pixels_2d[1::2] = [200, 0, 0, 255]
    registration = RasterRegistrationTwoPoint(world_points=world_points[2],
                                              image_points=image_points,
                                              orientation=orientations[2])
    surface.associate_raster(raster, registration)

open_new_view(surface, wait=True)
When a raster is associated with a surface via the Maptek Python SDK, the raster appears on both sides of the surface. This means that even though the above script only uses three rasters, all six sides of the cube are textured. If you run the above example, you should generate an object that looks likes this:

Multi-point raster registration
The RasterRegistrationMultiPoint class represents a similar registration algorithm to the two-point algorithm, however rather than use an orientation it instead requires the user to specify eight world–image point pairs. This allows for more complicated registrations than are possible with the two point algorithm. Though the minimum required point pairs for this algorithm is eight, generally more than eight points are required for good results.
Unsupported raster registration
When reading the registration of a raster you may encounter a RasterRegistrationUnsupported object. This indicates the registration algorithm used in the application is not supported by the Maptek Python SDK.
Editing existing rasters
Once a raster has been associated with an object, it is possible to edit the raster. Generally rasters are contained by other objects and do not have their own path in the data explorer, which means that they cannot be directly opened via Project.read() or Project.edit() .
The rasters property returns a dictionary containing all rasters on an object. The key to the dictionary is the raster index. The raster index for a raster is an integer between 0 and 255 where rasters with higher indices will appear on top of rasters with lower indices. Note that raster indices need not be consecutive — a raster can have rasters with indices 1, 5 and 100.
The example below demonstrates using the rasters property to iterate over all rasters on the picked object and inverts the colours of the rasters.
import numpy

from mapteksdk.project import Project
from mapteksdk.pointstudio.operations import object_pick

project = Project()

oid = object_pick(label="Pick an object to invert the colour of its rasters.")
with project.read(oid) as read_object:
    for raster in read_object.rasters.values():
        with project.edit(raster) as edit_raster:
            numpy.bitwise_xor(edit_raster.pixels[:, :3], 255, out=edit_raster.pixels[:, :3])
If you run this code and select the object created from the previous example, you should generate an object that looks like this:
Creating a raster from an image file
When creating a raster, it is possible to pre-populate it with the pixels read from an image file on your computer via the image argument. The following example uses the built-in tkinter library to open a file dialog allowing the user to select a PNG or JPG file, which is then imported and rastered onto a square surface.
import os
from tkinter import filedialog

from mapteksdk.project import Project
from mapteksdk.data import Raster, Surface, RasterRegistrationTwoPoint
from mapteksdk.operations import open_new_view

def get_image_path() -> str:
  return filedialog.askopenfilename(
    title="Pick an image",
    filetypes=[("image files", (".png", ".jpg"))]
  )

if __name__ == "__main__":
  with Project() as project:
    image_path = get_image_path()
    image_name = os.path.basename(image_path)

    with project.new(f"surfaces/{image_name}", Surface) as canvas:
      canvas.points = [[0, 0, 0], [1, 0, 0], [0, 1, 0], [1, 1, 0]]
      canvas.facets = [[0, 1, 3], [0, 2, 3]]

      with project.new(None, Raster(image=image_path)) as raster:
        raster.title = image_name
        registration = RasterRegistrationTwoPoint(
          image_points=[[0, 0], [raster.width, raster.height]],
          world_points=[canvas.points[0], canvas.points[-1]],
          orientation=[0, 0, 1]
        )

        canvas.associate_raster(raster, registration)

    open_new_view([canvas])
The following animation shows using this script to import one of the images used on this page:
Note that:
-
The image argument uses the Pillow library to read the image. It thus supports any format supported by that library.
-
Images are typically stored in Projects as JPEG or PNG. Thus passing a file of a different format will cause the image to be converted to one of these formats (typically PNG because it supports alpha).
-
The image argument can either be the path to an image file or a PIL.Image.Image object.
Interoperability with Pillow
The Python library Pillow is a third party library for image manipulation. As of version 1.4 of the Python SDK, it is installed with the Python SDK. It can be used to import or generate images, which can then be used to define the pixels of a raster. This is shown in the example below where Pillow is used to generate a raster of a Mandelbrot set, which is applied to the selected object.
import numpy
from PIL import Image
from PIL import ImageOps

from mapteksdk.project import Project
from mapteksdk.data import Raster, RasterRegistrationTwoPoint
from mapteksdk.operations import object_pick, coordinate_pick

if __name__ == "__main__":
  project = Project()

  # Pick the object to associate the raster to.
  oid = object_pick(label="Pick an object to apply a mandelbrot set to.")

  # Pick three coordinates. The first two are used for the two point registration,
  # the third allows for the orientation for the raster to be calculated.
  bottom = coordinate_pick(label="Pick a point corresponding to the "
                                "bottom left hand corner for the raster.")

  top = coordinate_pick(label="Pick a point corresponding to the "
                              "top right hand corner for the raster.")

  extra = coordinate_pick(label="Pick a point on the same plane as the "
                                "other two points.")

  with project.edit(oid) as new_surface:
    # Use pillow to generate the mandelbrot set.
    # The image has 1024 by 1024 pixels.
    # And displays the mandelbrot set from [-1.5, -1] to [0,5, 1]
    # with a quality of 50 iterations.
    image = Image.effect_mandelbrot((1024, 1024), (-1.5, -1, 0.5, 1), 50)

    # The mandelbrot set created above is in greyscale. Use pillow to colourise
    # the image to make it easier to see.
    # This maps low iteration counts to blue, mid iterations to red,
    # and high iteration counts to orange.
    # 0, 0, 0 = Black
    # 255, 0, 0 = Red
    # 255, 165, 0 = Orange
    image = ImageOps.colorize(image, (0, 0, 0), (255, 0, 0), (255, 165, 0))
    image = image.convert("RGBA")

    with project.new(None, Raster(image=image)) as new_raster:
      new_raster.title = "colouredMandelbrot"

      registration = RasterRegistrationTwoPoint(
        image_points=[[0, 0], [new_raster.width, new_raster.height]],
        world_points=[bottom, top],
        # Calculate a vector perpendicular to the plane containing
        # the three points the user selected. Use this as the orientation.
        orientation=numpy.cross(top - bottom, extra - bottom)
      )
      new_surface.associate_raster(new_raster, registration)
Here is an example of Mandelbrot set applied as a raster to a cube:
It is also possible to transform a raster to a Pillow image. This can be used to make use of Pillow’s various image operation functions. The example below uses Pillow to mirror the pixels of an image.
import numpy as np
from PIL.ImageOps import mirror

from mapteksdk.project import Project
from mapteksdk.data import Raster
from mapteksdk.operations import object_pick

if __name__ == "__main__":
  with Project() as project:
    oid = object_pick(label="Pick an object to mirror its rasters.")
    with project.read(oid) as read_object:
      for oid in read_object.rasters.values():
        with project.edit(oid) as raster:
          raster: Raster
          image = raster.to_pillow()
          image = mirror(image)
          raster.pixels_2d = np.array(image)
The following animation shows this script running on the cube rastered by the first example:
When using pillow with mapteksdk it is necessary to keep the following points in mind:
-
When converting pixels between the maptek.data.Raster and
pillow.Imageclasses you should call thenumpy.flipfunction on the pixels. The Raster class considers the image coordinate [0, 0] to be the bottom left-hand corner of the image whereas Pillow considers the image coordinate [0, 0] to be the upper left-hand corner — they consider each other's images to be upside down. Failing to callnumpy.flipwill cause the image to end up upside down in the other representation. -
To assign the pixels from a
pillow.Imageobject to Raster.pixels_2d the image must use the format RGBA. Example R9 uses Image.convert(“RGBA”) to convert it into this format.
