System Preferences
Source file: system-preferences.htm
System preferences are a group of administrative and user tools for configuring users and managing system events. To open system preferences, click the  button in the system management bar. The following items are available:
|
|
Manage existing users or add and remove users. Roles are also assigned to users in the page. To learn more, see Users. |
|
|
Manage roles that administrators can assign to users. Create new roles and assign specific permissions to each role. To learn more, see Roles. |
|
|
Review system activity as it is recorded or viewed historically. To learn more, see System Logs. |
|
|
Search for and view the list of events that have occurred. This facility allows you revert events such as material movements and many other user, or system based transactions, operating like an undo command. To learn more, see Event Manager. |
|
|
Users can configure their personal telemetry settings and contact Maptek for support. To learn more, see User preferences. |
|
|
Exit MaterialMRT after your shift. After logging out, the login page is reloaded for the next user to log in. |


Users
A user is an individual that has access to MaterialMRT. This is normally achieved through the organisation’s network domain credentials. Access is administered by the mine site IT personnel. A user can then be allocated one or more roles by an administrator. The allocation of roles determine which permissions and pages can be accessed.

Note: You may need specific permissions to access or use certain buttons or controls. Seek help from your system administrator if your role is lacking access to a required function. To learn more about roles and permissions, see Roles in System Management Bar > System Preferences.
Users panel controls
This panel allows you to assign roles to individual users. When a role is assigned to the user, permissions associated with that role are inherited. Users are listed in the left-hand pane and roles assigned in the right-hand panel.
Note: This panel is only available for personnel with administrative privileges.
The individual settings are as follows:
| Function | Description |
|---|---|
|
Show Inactive (users) |
When |
|
Users |
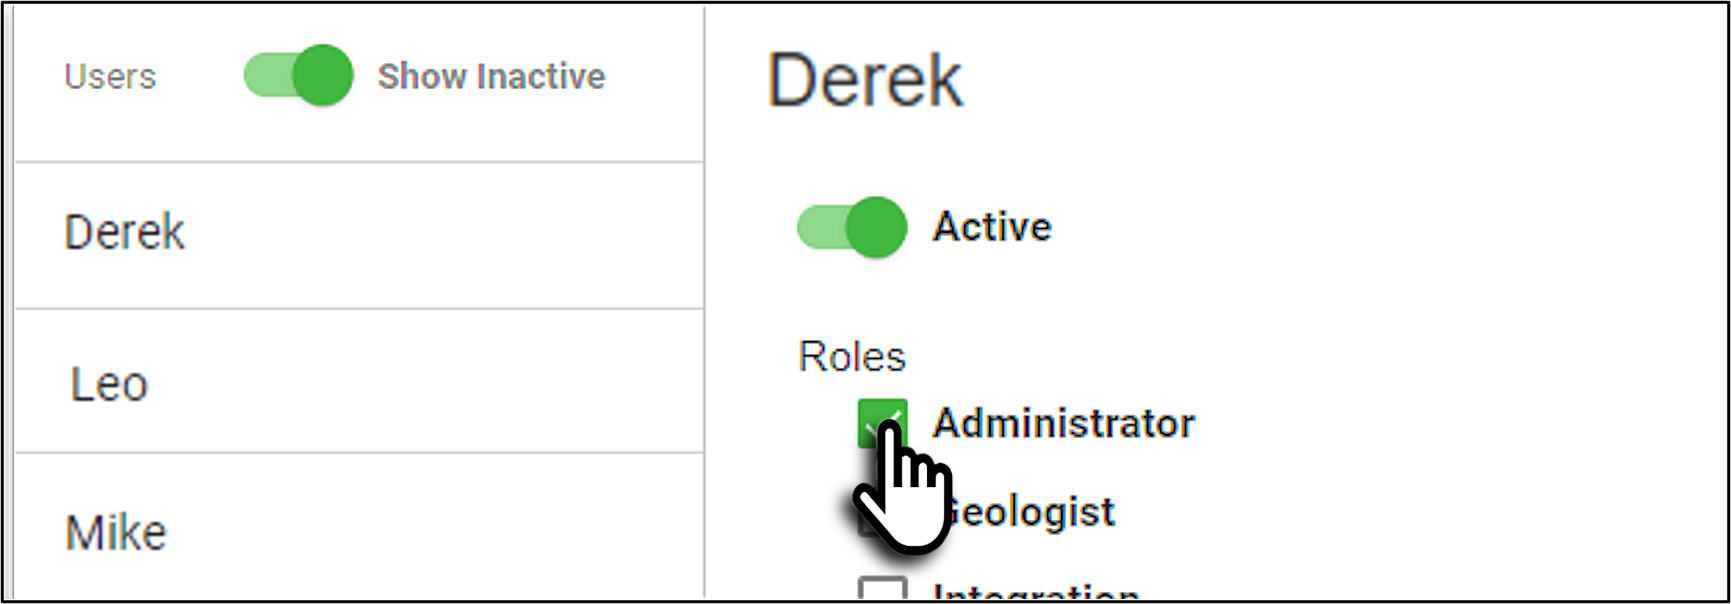
Click on a user to select it. The user’s name is shown in the assigned roles panel, along with a toggle for setting the user’s active/inactive status and their assigned roles. |
| Active |
Set the toggle to Set the toggle to the Inactive ( |
|
Roles |
A list of roles are shown in the user’s configuration pane. Select the roles pertinent to the type of operator that fits the user. To select a role, select its check box, e.g. |
| Update | Click the  button whenever changes are made. button whenever changes are made. |
|
Revert |
Click the |

") is enabled, inactive users appear in the users list.
is enabled, inactive users appear in the users list. . The user has access to
 ") )
) .
. button to undo any changes that were made.
Assigning roles to a user
- Locate the user to be edited in the list pane and click on it.

- Set the user to Active if required.
- In the roles panel, select the required roles using their check boxes.
- Click the button to accept and save your changes
Roles
The Roles page allows users with the PagesRoles permission to create, define and allocate roles. Roles control which permissions are attributed to a particular role, for example, Administrator has all available permissions assigned to it. By comparison, WebUser only has permission to view pages when the view-only PagesGeneral permission is granted.
Permissions are wide ranging. They allow qualified users to perform particular functions or access certain pages. There are over 30 permissions that can be allocated. These are self explanatory by their labels, so they will not be itemised in this help.
Note: Roles is only visible to administrators and users assigned the PagesRoles permission.
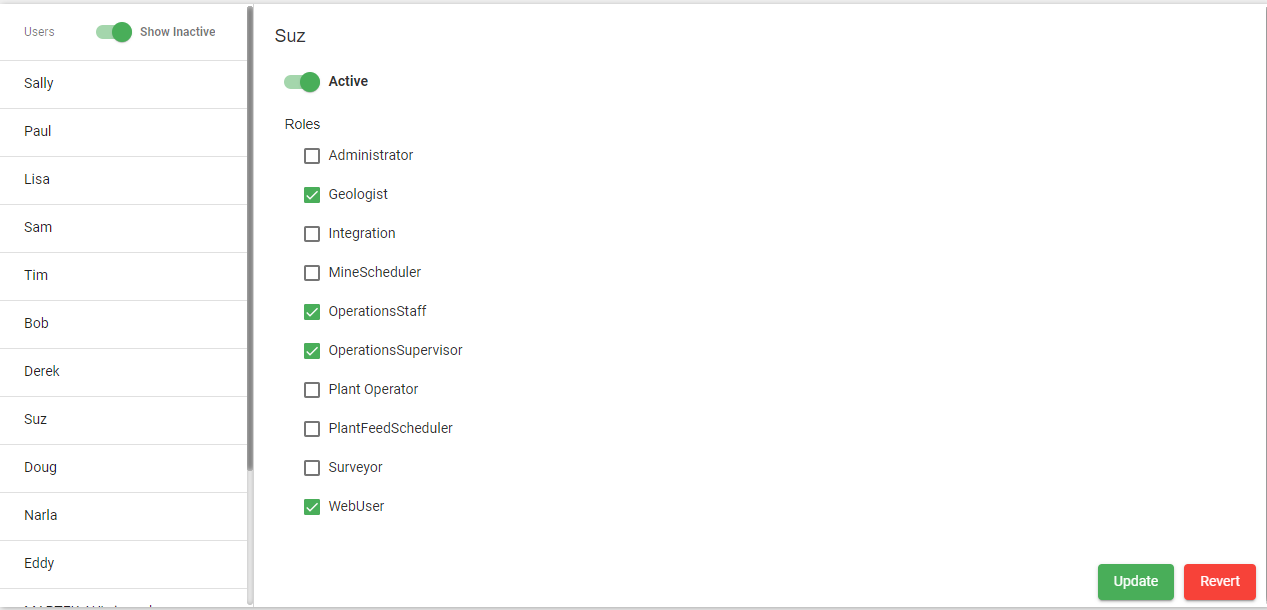
An example showing the roles allocated to the user, Suz.
The Roles panel consists of the Roles list pane and the Permissions pane. Permissions are assigned to a given role and roles are assigned to a user.
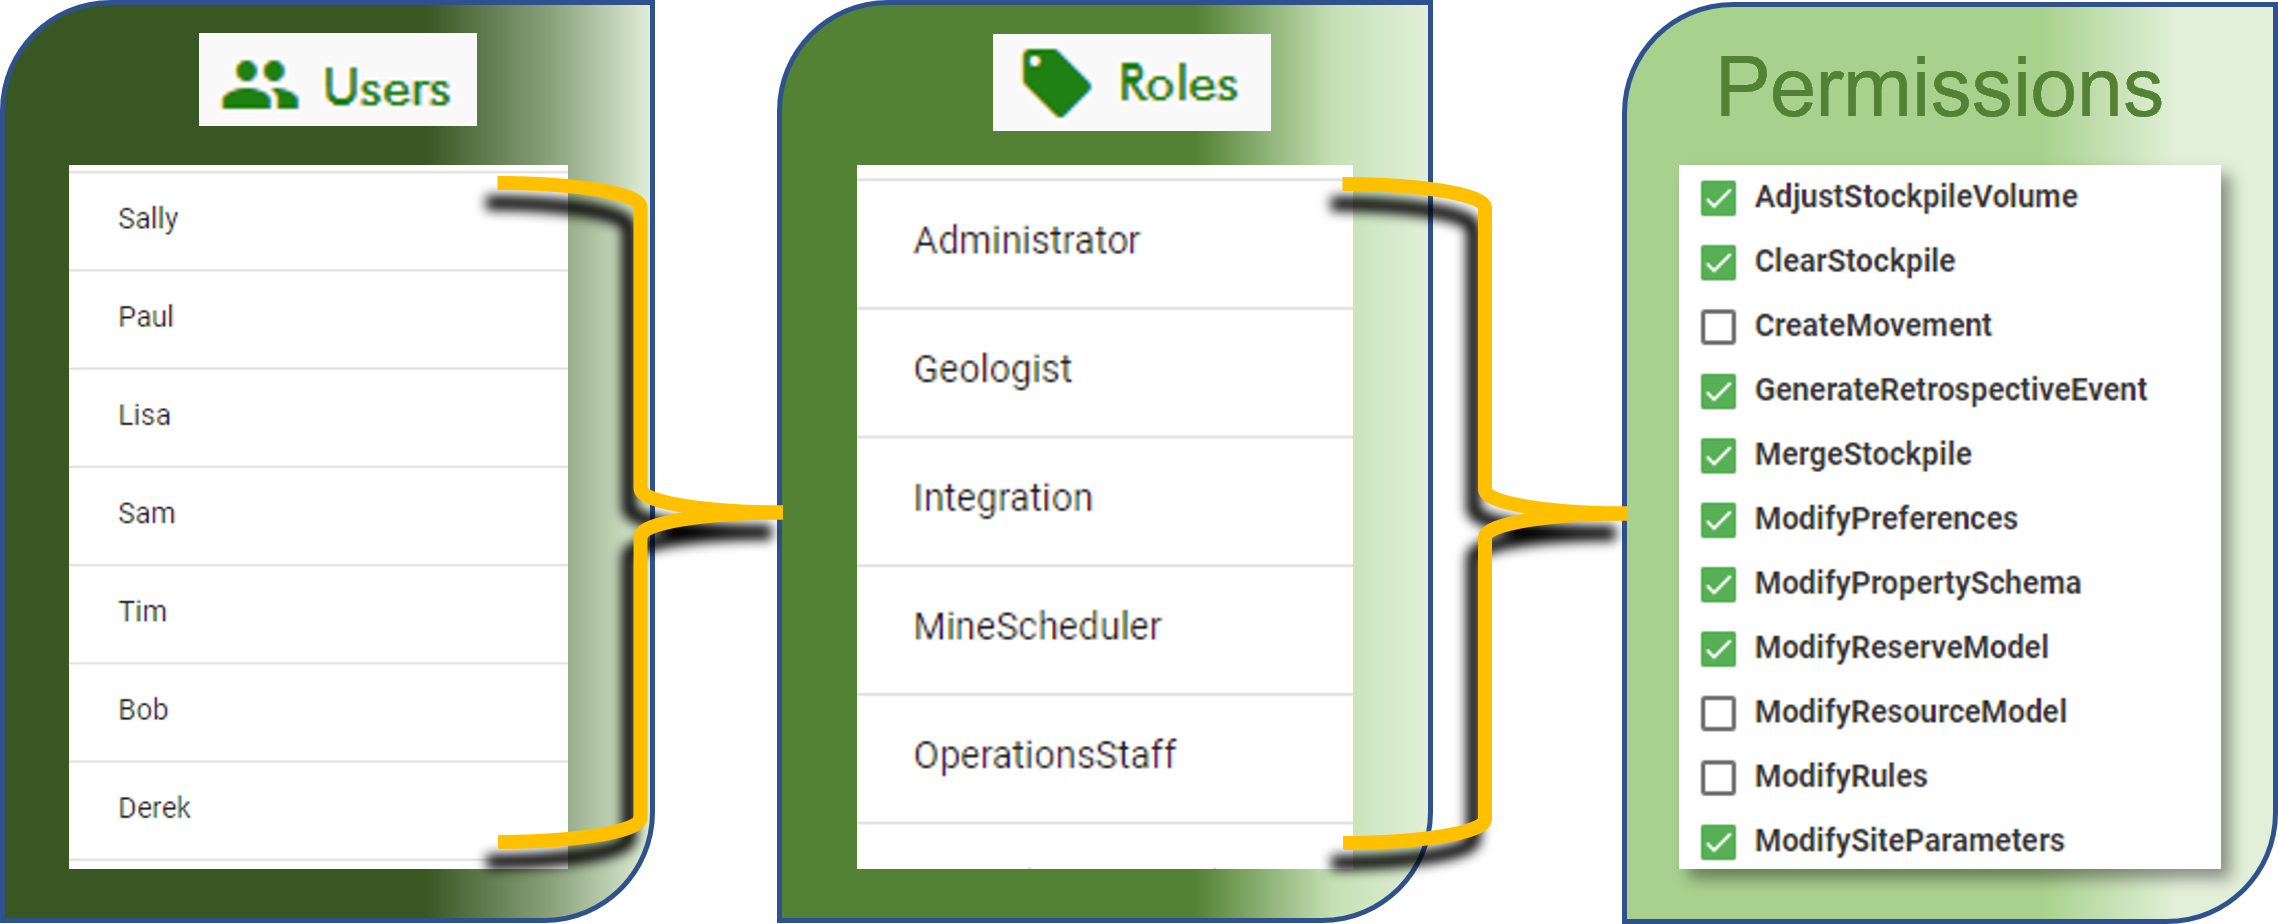
In the above diagram, a user can be assigned one or more roles which in turn may be assigned one or more permissions. The user acquires the accumulated permissions that are assigned to those roles.
Note: Access to the Users panel is limited to administrators or roles that have the PagesUsers permission selected.
Roles panel elements
Refer to the table below for an explanation of components of the Roles page.
| Function | Description |
|---|---|
| Roles |
View the list of available roles. A default list is provided for administration and quick deployment of MaterialMRT. Administrators may alter the permissions allocated to the selected role. |
|
|
Creates a new role. See Adding a new role and assigning permissions. |
|
|
Deletes the selected account. |
|
Important: Deleting a role with administrator permissions may disable access to core administrator functions. Avoid deleting the Administrator account. |
|
| Permissions |
Review, allocate, and revoke permissions to a role using the check box. |
|
|
Saves changes made in the Roles panel. |
|
|
Undoes changes made in the Roles panel. |


Adding a new role and assigning permissions
You can create custom roles and set the permissions that best fit specific users’ access to MaterialMRT tools. To create a new role, do the following:
-
Click the
 button to open a blank configuration pane.
 -
In the Name field, type in the name of the role.
-
Select which Permissions you want to assign using the checkboxes.
-
Click the
 button (at the bottom-right corner of the permissions pane) to save the new role. The new role is added to the bottom of the roles list.
Deleting a role
Important: Do not delete the administrator unless at least one other role with sufficient permissions has been created.
To delete a role. follow these steps:
-
Click on the role in the list, the selected role’s name will appear in the configuration pane.
-
Click the
 button at the bottom of the roles list, the Confirm dialog appears.
 -
Click the
button in the dialog to complete the transaction, or click  to not proceed.
System Logs
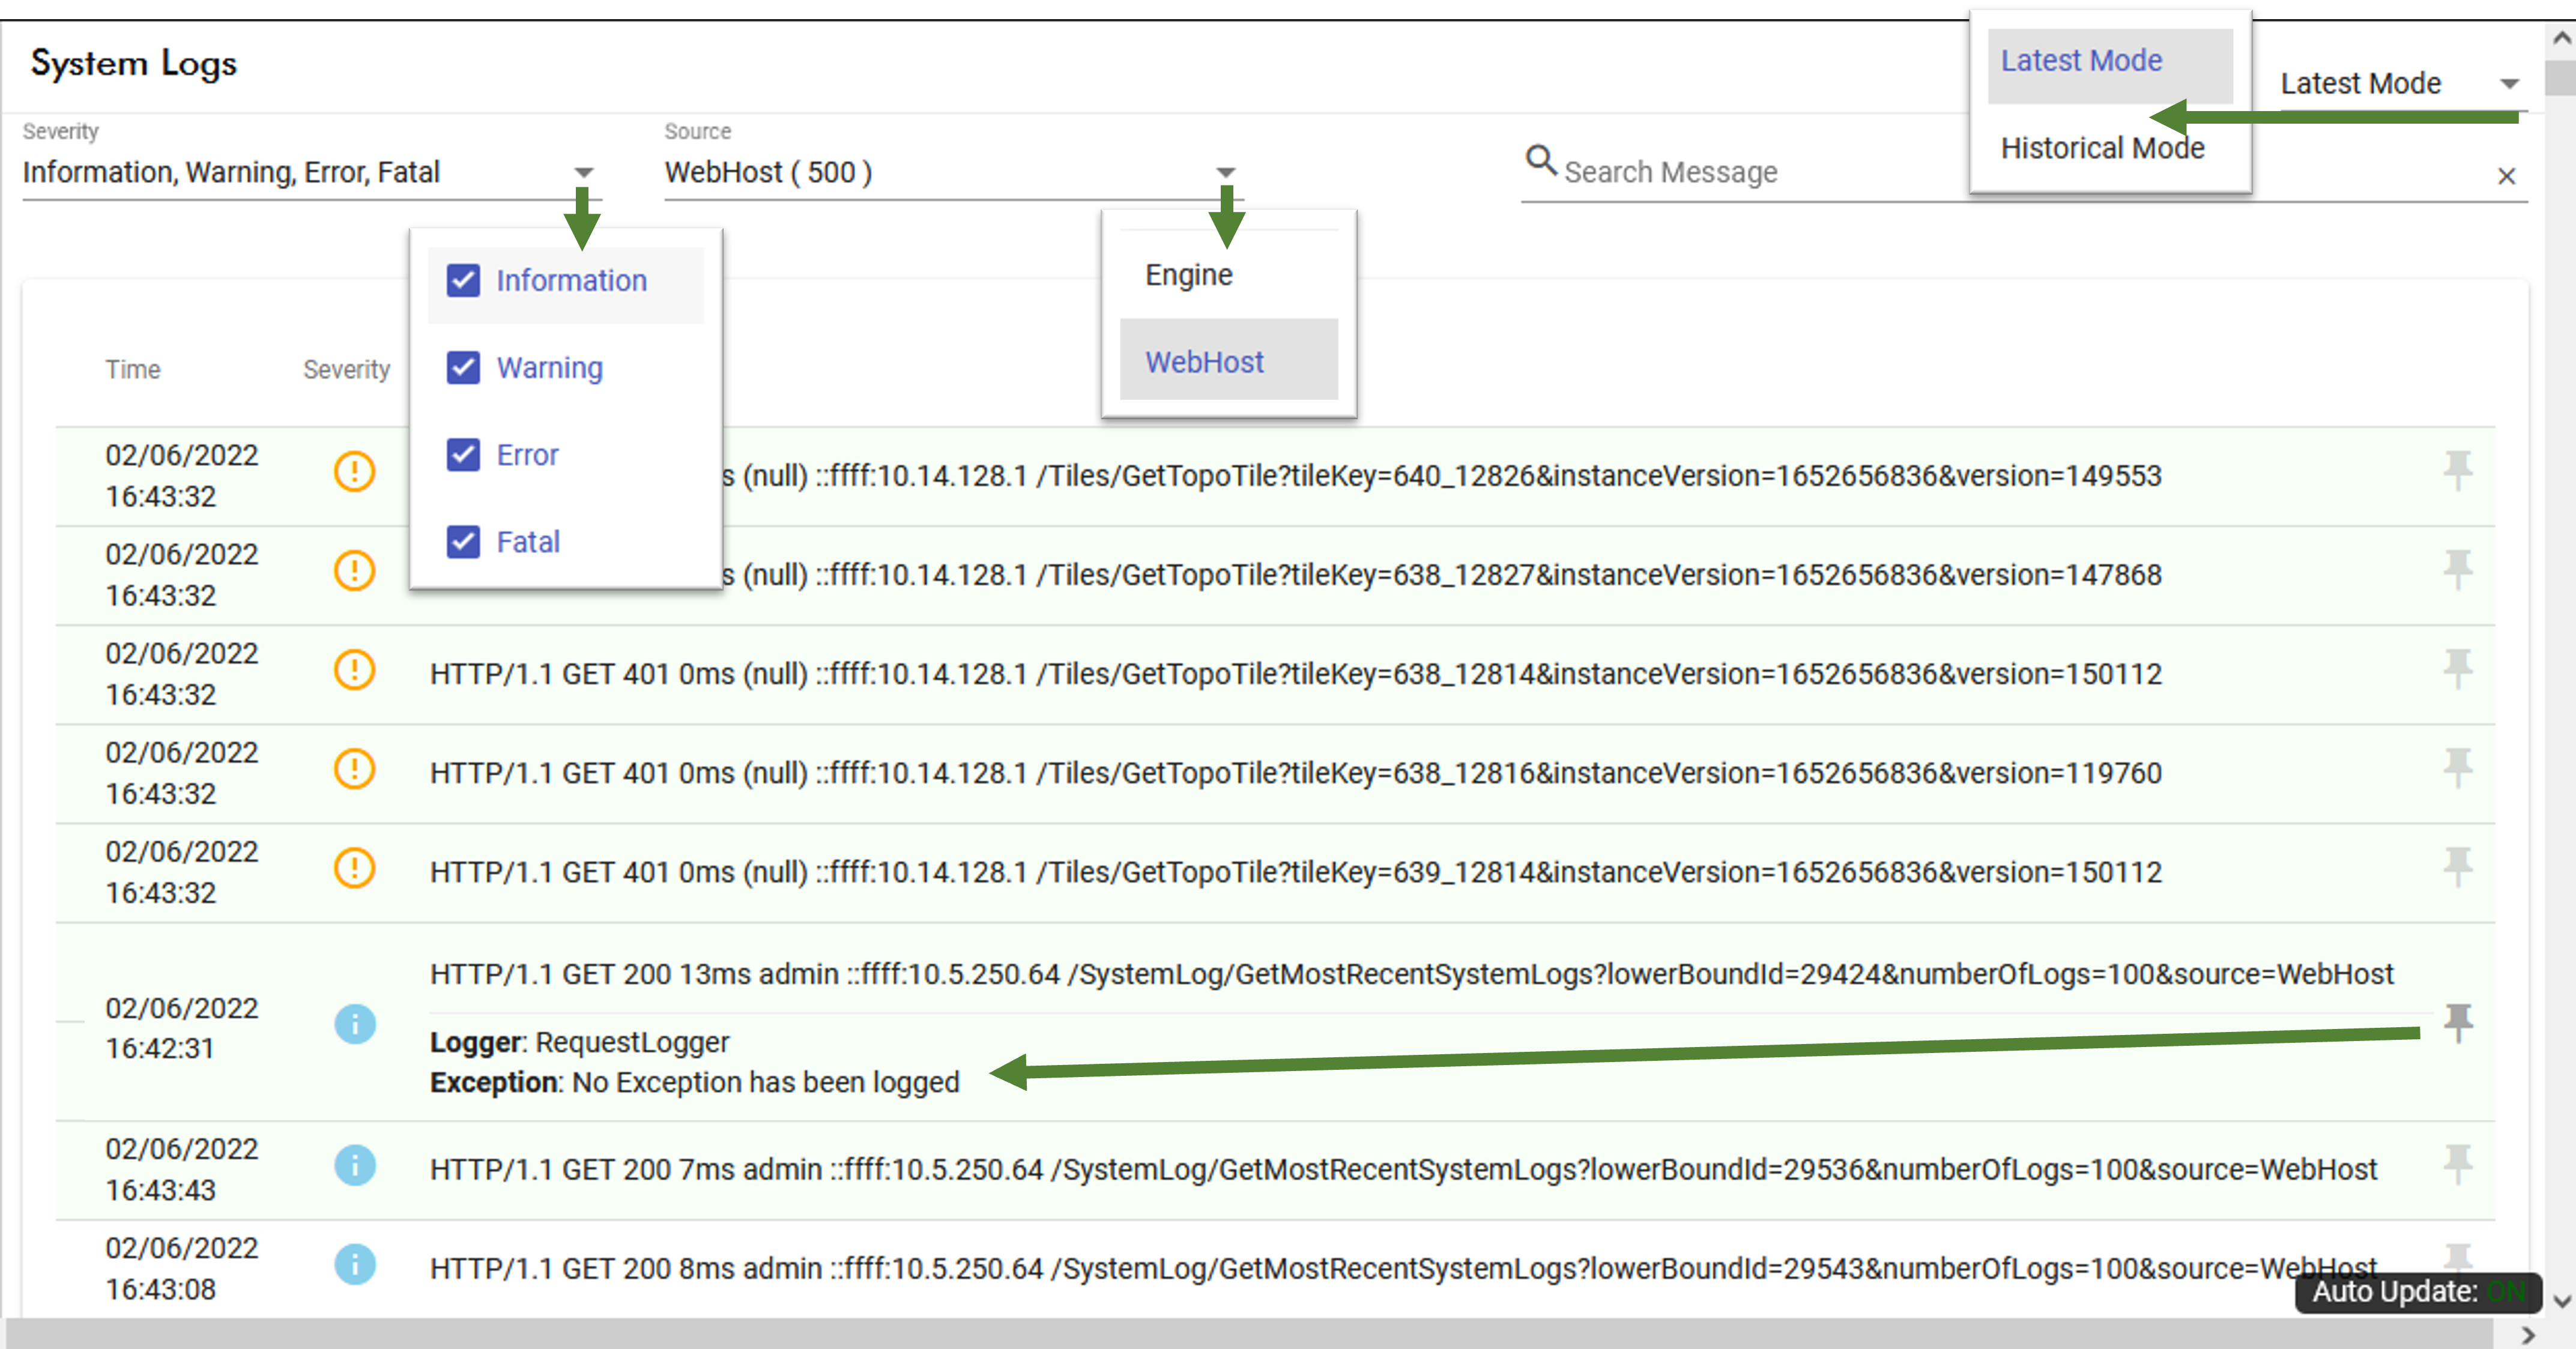
System logs records server activity through MaterialMRT. Activities such as server requests and responses as well as application-based logs are accumulated into this repository. Logs are derived from two sources: The WebHost and Engine. The WebHost is HTTP traffic and the engine is associated with the application server. All activities are logged in real time and is represented in the Latest Mode view. Historical Mode is used for filtering log data over a set time range, refer to Latest Mode/Historical Mode drop-down list.
Filtering information in the log panel
The following categories may be filtered in the system logs page:
| Function | Description |
|---|---|
| Severity |
Expand the drop-down and select which categories to display. Unselected categories are filtered from the list. |
| Source |
Select between Engine (application level) or WebHost (web-server level) sources. |
| Sort order (for Time, Severity or Message) |
Click on any column header to change its sort order . |
| Search Message |
Type in this field to perform a phrase search. All columns are included in this search. |
| Latest Mode / Historical Mode |
Click on the drop-down arrow to select between modes. See Latest Mode / Historical Mode drop-down. |
| Date Range (historical mode only) | Use the calendar picker to select a preset period or choose a custom range including a start and end time. |
|
|
Click on the search button to generate the filtered log after setting your date range. |
 (historical mode only)
List columns and Items
Refer to the table below for a description of the following:
| Function | Description |
|---|---|
| Time | Date and time of the log entry. |
| Severity | Indicates the status of the log using symbols indicating their severity, i.e. Information, Warning, Error, and Fatal. |
| Message | Displays the log text. |
Latest Mode / Historical Mode drop-down
Select either of the two modes depending on the time scale involved. Latest mode provides near-real-time updates as new entries are created. The latest entries appear at the top of the list in chronological order unless the sort order is changed in any of the log table’s columns, see Filtering information in the log panel.
When Historical Model is selected, the Date Range calendar picker appears. It allows you to select a date, set period, or custom range. Select a set period, such as Today, Yesterday, etc. If you select Custom Range, select the month and year using their drop-downs then, click on the start day followed by the end day. If you want to include a start and end time, use the drop-downs to set the start and end hours and minutes. Click  to save your range.
Event Manager
The event manager logs system activity, this includes user interactions, system events, and scheduled events. Some typical examples include recording of analyser and lab results, user activities such as changing preferences or modifying information, and real-time activities such as trips and schedules.
Filtering log data
There are several ways that data can be filtered by doing any of the following:
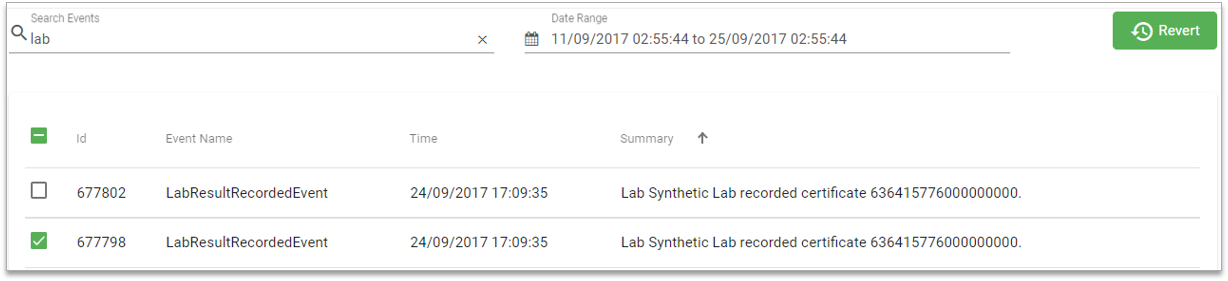
- Enter a keyword in the Search Events to find matching entries.
- Use the Date Range calendar picker to narrow your search to a period of time. Select a preset period or a custom range, then click .
- Toggle Show Reverted Events to show or hide reverted events. When enabled, reverted events are listed in chronological order with strikeout text.
- Click on any column header to change its sort order (Chronological-latest / A-Z / Z-A).
Examining expanded data
Detailed information for any event can be viewed as an extended tooltip, simply hover the mouse pointer over an entry in the ID column. There are no interactive controls for this panel.
Reverting an event
Reverting removes an event that has previously occurred. When an event is reverted, MaterialMRT forces a rewind to the event time and replays all other events. Sequential events relating to the reverted event, such as trips, are not processed. One or more events may be reverted to update or correct information, or to undo changes performed by a user.
To revert one or more events, follow these steps:
-
Use the checkboxes to select one or more events.
Note: The Revert button at the top-right of screen becomes green when at least one item is selected.
- Click the
 button, a dialog box opens.
 -
In the Justification field, enter the reason for the revert action. Click the
 button to complete the transaction or
  to not proceed.
Note: The time taken to rewind back to the date of reverted events and the reprocessing of subsequent events depend on the amount of reverted entries and the elapsed time.
Exporting events
Events can be exported to an external file as an Event Store Archive. This is a ZIP file containing the entire event log (or filtered subset), and files associated with those recorded events. The event export archive can be applied to another MaterialMRT instance.
To create an Event Store Export file, click  located near the top right-hand side of the page. A progress indicator appears while the event store archive is generated. The file
 EventStore Archive AAA.zip is normally saved to your Downloads folder, unless otherwise configured in Microsoft Windows.
If more that one event store iteration is made, an iteration number in brackets is appended after the file name, for example, a second copy of EventStore Archive AAA.zip will be EventStore Archive AAA(1).zip.
The “AAA” in the above example file is the site code of the MaterialMRT instance.
User Preferences
The User Preferences page is a user-level facility. To open this page click the button in the system management bar, then select  . In the page, you can do the following:
Telemetry:Decide what anonymous data is shared with Maptek as follows:
- Send usage data. Enable this toggle to allow MaterialMRT to send anonymous usage data to Maptek for the purpose of improving user experience.
- Personalise usage data: Enable this toggle to allow personalised usage data to be sent to Maptek. For more information, click on the End User License Agreement and Privacy Notice links to learn more.
Click to save your changes.
Log Out
To log out of MaterialMRT, expand the system preferences menu ( ), and select
  . After logging out, you are returned to the account login page.
