Joining Points
The Join Points tool joins a selection of points to create a line according to some user-specified indexing.
The main purpose is to allow you to quickly and automatically create an edge chain based off of data that you've already spent time creating - instead of creating an edge chain manually.
There are three indexing modes available depending on the selection type.
If the objects selected only contain a single point.
An example of single point objects can be:
- annotations
- survey points
- single point sets
- scans with only a single point
The tool will then create a single edge chain across all the objects selected.
The following indexing options are available for single point objects:
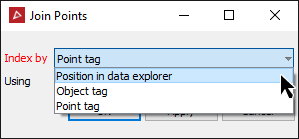
- By the Position of each object in the data explorer (available only for single point objects). In the example below the line will be drawn as follows:
-
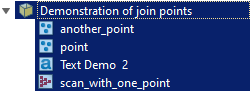
First point in the line will be the point from "another_point" Next point in the line will be at "point" Next point in the line will be at "Text Demo 2" The final point in the line will be at "scan_with_one_point" - By the Value of a specified object tag (available to all objects). The edge chain is created similarly to the previous example however the objects are sorted based on the value of a specified object tag. Objects in the selection without the specified tag are ignored.
- By the value of a specified point tag (available to all objects). This behaves identically to the "Object Tag Value" mode (described later in this topic), but uses the value of the point tag of the single point from the object and not from the object as a whole. Objects in the selection without the specified tag are ignored.
- This tool can save you a lot of time if you have specified objects point tags instead of object tags.
This would be useful if you sequentially named a set of survey points, and sorted them accordingly. You can then easily create an edge chain from the survey points.
This mode is useful if a surveyor has gone around a site taking measurements, and maybe went back and forth across a particular area to make sure they recorded enough points. The order of survey points wouldn't be correct for creating a line showing the shape of the surveyed area, but the surveyor would have designated a correct object tag for each point (e.g. 100, 101, 102, 103, 200, 201, 203, 204, 205, 104, 105, 106, 107, 300, 301, 302, etc - where 1xx points are area "1", 2xx points are area "2", 3xx points are area "3", etc).
If the selection contains an object with multiple points.
An example of multiple point objects can be:
- Point sets
- Scans with multiple points
- Edge objects
- Facet networks
- Surfaces
The tool will create an edge object for each multi-point object in the selection.
The following indexing options are available for multiple point objects:
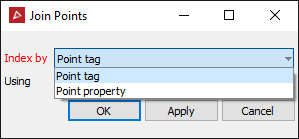
- By the value of a specified point tag where the points of the multi-point object are sorted by the value of the specified point tag, and an edge chain is then created from the position of those points in that order. Objects in the selection without the specified tag are ignored.
- By the value of a specified point property where the points of the multi-point object are sorted by the value of the specified point property, and an edge chain is then created from the position of those points in that order. Every point in the object must have a value specified, so no points are ignored in this mode.
Setting up the Tag attributes.
Tags can be applied to objects or primitives, in which case they are specifically referred to as "object tags" or "point/edge/facet/etc tags".
When applying tags to objects as object tags:
- The object tag specifies a value of a particular type for the entire object - not just the primitives of the object.
- Associating a value to an object tag is optional.
- The value of an object tag can have different data-types across objects.
When applying tags to primitives of an object as a point/edge/facet/surfaces tag:
- A primitive tag can only be applied to a specific primitive type - e.g. a point tag can only be applied to points and not to edges.
- A primitive tag can be applied to a subset of primitives. You can use Edit Attributes to specify a point tag on only half the points of a scan and the other points of the scan are simply listed as "not having that tag".
- Associating a value to a primitive tag is optional.
- The associated values of a primitive tag can have different data-types across the whole primitive. One point with a point tag can have the integer value 17, and a different point on the same object with the same point tag can have the string value eg."ore deposit", yet another point on the same object with the same point tag can simply not have a value.
Setting up the Properties attributes.
- Properties attributes can only be applied to primitives, and are specifically referred to as "point/edge/facet/surfaces properties".
- Properties attributes must be applied to every primitive of the object.
- Properties attributes must have a value specified for every primitive of the object.
- Cannot change data-type between primitives of the object for that property.
Note: If the selection doesn't have any attributes assigned to it, they will first need to be created.
For assistance in creating attributes refer to the ![]() Edit Attributes topic.
Edit Attributes topic.
The process of joining points using attributes.
-
Select the object in the project explorer.
-
On the Create ribbon tab navigate to the Topology group and select
 Join Points.
 -
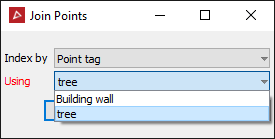
Choose the indexing type that was used to create the attribute, using Point tag or using Point property.
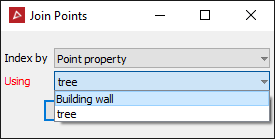
-
Select which of the points you wish to join up.
In the above examples if the attribute tree was to be used then all points that have been labelled as tree will be joined.
Same if the Building wall attribute was to be used, then all points that have been labelled as Building wall will be joined.
-
Click OK or Apply.