Snap Modes
If a position is clicked in an area empty of data, snap modes will snap the position to the nearest defined primitive type. These snap modes work in conjunction with the 2D action plane.
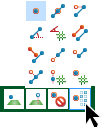
The snap modes are found in the status bar, in the lower right corner of the user interface. The snap modes only appear when you open a tool for which they are relevant.

| Icon | Description | Shortcut |
|---|---|---|
|
|
Pick a point anywhere in 3D space. |
toggle X |
|
|
Pick restricted to points on the action plane. |
toggle X |
|
|
Project picked point onto action plane. |
shift |
|
|
Disable transient snap targets. |
ctrl |
|
|
Change
active transient snap targets. |
|
|
Active transient snap targets options |
||
|
|
point |
|
|
|
midpoint |
|
|
|
line length |
|
|
|
angle from line |
|
|
|
angle from grid |
|
|
|
parallel to line |
|
|
|
perpendicular to line |
|
|
|
collinear to line |
|
|
|
collinear to endpoint perpendicular |
|
|
|
collinear to midpoint perpendicular |
|
|
|
collinear to point on grid |
|
|
|
grid point |
|
-
Do not confuse snap modes with the selection toolbar icons. The point selection icon does not mean that you will snap to a point when clicking in the view.
-
Snap modes will open with the mode that was most recently used selected.
-
Right-click on the Snap modes target options displays selections of All - (all on) and None - (all off).
Details of 2D and 3D picking
The introduction
of the action
plane has brought with it two different types of picking. The
3D picking is what everyone is used to from previous versions of Studio.
The 2D picking is what is used in the new 2D CAD options where the user
must digitise 2D geometry on the action plane. The 2D picking also has
similarities to the old 'keep last Z' workflow which is explained on this
page.
| Type of location pick | Modifiers | Toolbar state | Behaviour |
|---|---|---|---|
|
3D |
None |
|
Picks points on data. Picks on the action plane in blank space. |
|
3D |
Shift |
|
Picks points on data and projects them onto the action plane. Picks on the action plane in blank space. |
|
2D (action plane) |
None |
|
Picks on the action plane ignoring all data in the view. |
|
2D (action plane) |
Shift |
|
Picks points on data and projects them onto the action plane. Picks on the action plane in blank space. |
-
The projection of points to action plane is done in the direction of the action plane normal. If there are any snaps active the projection is of the snapped point to the action plane.
-
The 3D and 2D modes with projection on are equivalent and picked points will always be on the action plane due to the projection.
Crosshairs
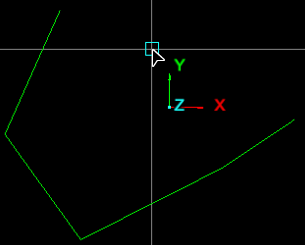
When doing location picks (set centre of rotation, create line, points, polygons or planes) there is now visualisations drawn to help indicate where your pick is going to go. The crosshairs indicate a number of things to the user when doing location picks.
- When the crosshairs are shown the action plane is relevant to the location that will be picked (the picked point will be on the action plane).
- The lines of the crosshairs indicate the orientation of the action plane grid
- If a snap is active a circle will be drawn in orange.
- If a projection is active (that actually does a projection) you will see a cross (orange if a snap is active, green otherwise).
- If no snap and no projection is active a square indicator will be shown.
- The indicator shape sizes are based on the snap distance preference
| Description |
Overhead view |
Another view |
|---|---|---|
|
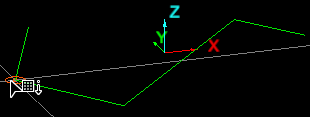
No snaps in range, over blank space. Cross-hairs and square indicate plane. Square indicates pick in blank space on plane. |
|

|
|
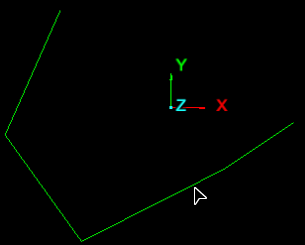
No snaps in range, over data. Cross-hairs not shown as the point under the cursor is not on the plane so they are not relevant. |
|
|
|
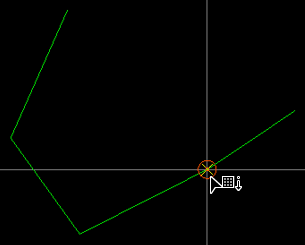
Snap in range, snap is on plane. Cross-hairs and circle indicates a snap to point. |
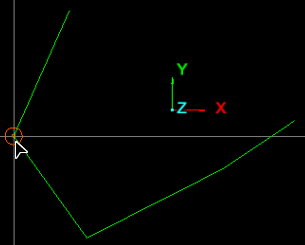
|
|
|
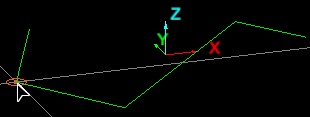
Snap in range, snap is off plane. Cross-hairs not shown as snap point is not on plane so they are not relevant. Circle indicates a snap to point. Circle is not shown on the action plane as the snap has nothing to do with the plane. |
|
|
|
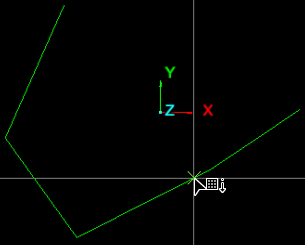
No snap in range over blank space. Square indicates pick in blank space on plane. No cross is shown as there is no projection being done (point is already on plane). |

|
|
|
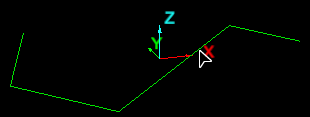
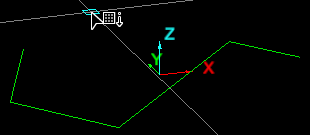
No snap in range over data. Cross-hairs and cross indicate plane. |
|
|
|
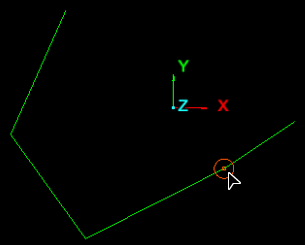
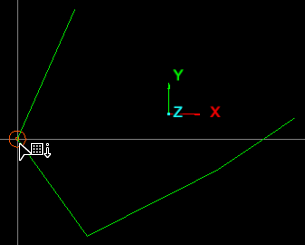
Snap is on plane. Circle indicates a snap point. No cross is shown as there is no projection being done (point is already on plane). |
|
|
|
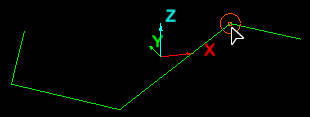
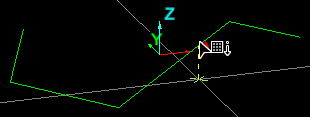
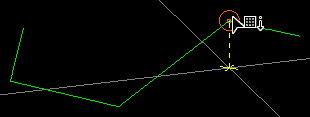
Snap is off plane. Circle indicates a snap point. Cross-hairs and yellow cross at projected point indicate plane. |
|
|
New 'keep last Z' workflow
In previous versions of Studio the Shift key could be held to do a 'keep last Z' point pick. This workflow is still possible with the changes to CAD picking in Studio 6.0 however it is a slightly different workflow as it separates the setting of the Z level and actual digitisation of points. This workflow is commonly used in line creation but it can be used with other location picking options as well.
- Make sure the action plane is set to XY (default if you have not changed the action plane e.g. new view)
- On the
Create ribbon tab navigate to the Draw group. From the Line drop-down list select
 Line (to create a
3D line)
Line (to create a
3D line) - Change the pick mode to the 2D action plane mode (Shortcut X to toggle)
- Hold A and click a point to define the Z level of the action plane
- Release A
- Click point(s) that you want on this Z level
- To change the Z level repeat from the hold A step.