Register
Source file: labs-register-group.htm
The Register group of the Labs tab provides additional tools to manage and assist with scan registration.

|
|
Verify Registration Verify the registration of objects. |
|
|
Registration I/O Import, export and print registrations. |
|
|
Set Scan Origin Set a scan's origin coordinates to a specific location without altering coordinates of its points. |
|
|
Coordinate Calculator Convert geodetic coordinates between coordinate systems. |
|
|
Visualise Geoid Visualise a geoid as a points grid. |
|
|
Assisted Initial Positioning Position a point cloud manually, with automatic rotation estimation. |
Verify Registration
Raw scan data can have positional errors resulting from many factors, such as the scanner's precision and accuracy, environmental conditions, and types of material being scanned. Other objects may also have positional errors as a result. Registration involves matching and overlapping individual objects of neighbouring areas to build up a model of an entire scene. Once the objects have been suitably registered, you can use the registration verification tool to check the resulting accuracy of the combined regions.
The Verify Registration tool provides a summary of the registration or alignment error between common regions under investigation. The tool includes metrics and warning messages. Errors are reported as RMS (Root Mean Square) value differences between corresponding points on objects where they overlap.
Note: This tool is intended to indicate variations or errors that exist at a given point in time, but is not intended to compare time lapse situations, such as movement in a pit wall over a month, or change in material excavated over a week.
-
To verify registration, follow these steps:
-
On the Position and Filter tab, or on the Labs tab, in the Register group, click
 Verify Registration.
-
Highlight at least two comparable objects to be verified in the project explorer.
-
Click
 to add objects to the verification set.
 The verification process will begin immediately.
-
Click any of the other buttons as required:
-
Click
 to clear the table.
 -
Click
 to disable automatic updates of the registration table.
 -
Click
 to check and modify registration settings, as described below.
 Expand for detail on registration settings

Scan options
These options allow you to override existing registration settings on registered objects.
Override translation restriction:
- Free allows any movement of the origin.
- Fixed restricts any movement of the origin during registration.
- Bounded restricts movement to within an ellipsoid whose main dimensions are the horizontal and vertical scan tolerances.
Override rotation restriction:
- Free allows rotation in all directions.
- Bearing allows rotation in the horizontal plane only.
General options
Detect edges:
- If selected, the tool will apply an edge detection filter to restrict the selection of points to the vicinity of edges.
- If cleared, sampling will be uniformly distributed across the data.
Tip: Use edge detection when dealing with data consisting mainly of large, relatively flat surfaces, such as buildings and low vegetation areas.
Minimum separation: This applies a minimum separation filter to data, producing a quicker registration by processing fewer points.
Note: Using fewer data points is at the expense of accuracy. Use this option only when dealing with dense and varied data or as an initial pass for quick registration.
Disable auto-stop:
-
When selected, registration will continue until stopped by the user. You can stop the registration when the data reaches a satisfactory level of convergence.
-
When cleared, registration is continually checked and automatically stopped once convergence is reached.
Grouping options
No groups: Objects will register to nearby objects.
Group with objects above threshold: Objects will register to nearby objects with registration qualities above the threshold, adding objects below the threshold as associated data.
Register only to better quality: Objects will register to nearby objects which have a better registration quality (i.e. are higher up on the table).
Range
Select Range then, in the From and To fields, enter the minimum and maximum distances from the scans' origins of points to be processed.
-
-
Click
 to generate a PDF report.
-
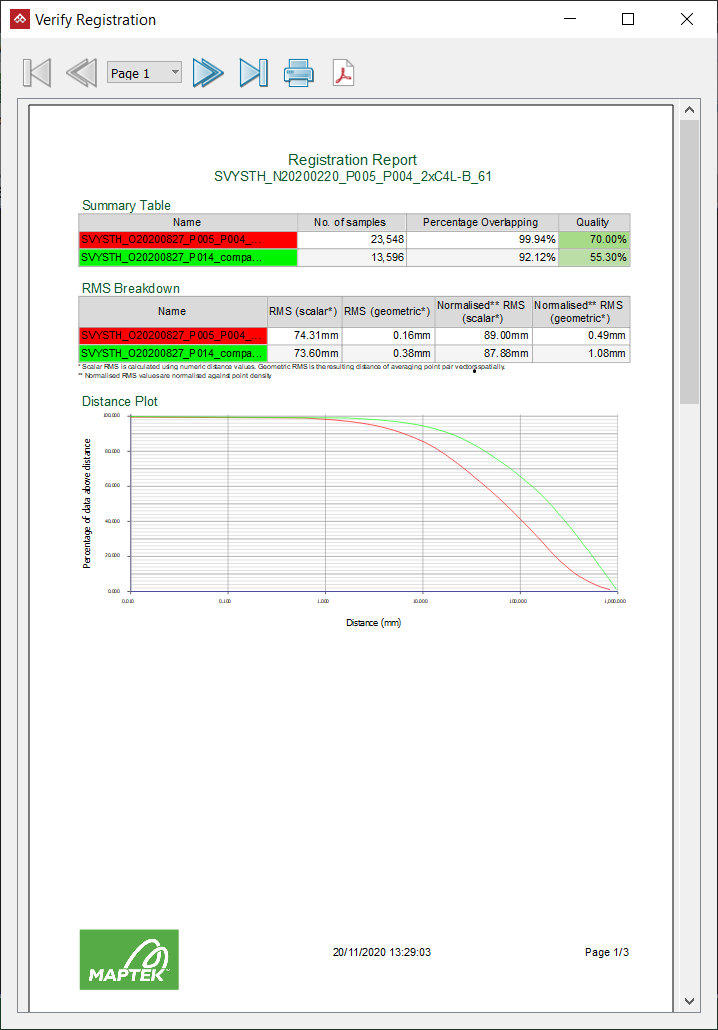
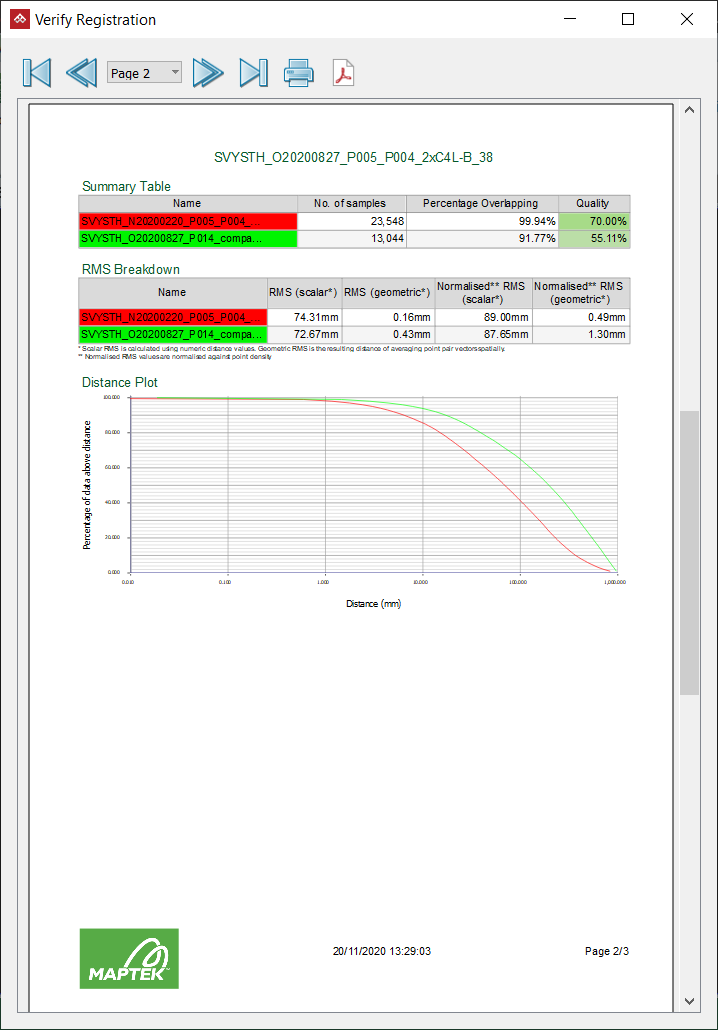
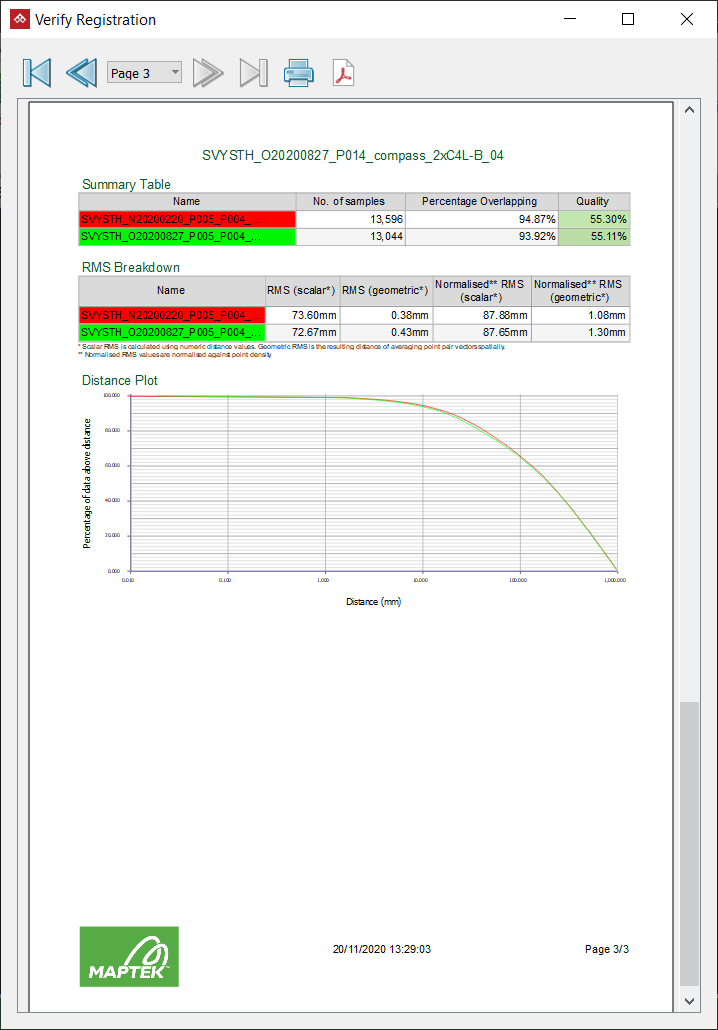
The report size will vary, depending on the number of objects selected for verification. Verification values are calculated between all objects that overlap.
|
|
|
Example of a three page registration verification report. |
Registration I/O
The Registration I/O tool enables you to save registration data of specific objects. The registration data can then be recalled and re-applied to one or more objects. The exported registration data for each object is saved in a single file.
Note: Recalled registrations should only be applied to scans with the same scanner location and orientation as the original.
The Registration I/O tool has the following options:
- Print registration will print registration data to a report window.
- Import registration from will import registration data from a file and apply to selected objects.
- Export registration data to will export registration data from a selected object into a text file.
-
To import and export registration
-
Select objects for registration I/O.
-
On the Labs tab, in the Register group, click
 Registration I/O.
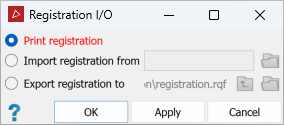
-
Select the operation to apply.
-
Specify file name, or search for a file as required.
-
Click OK or Apply to complete.
-
|
|
|
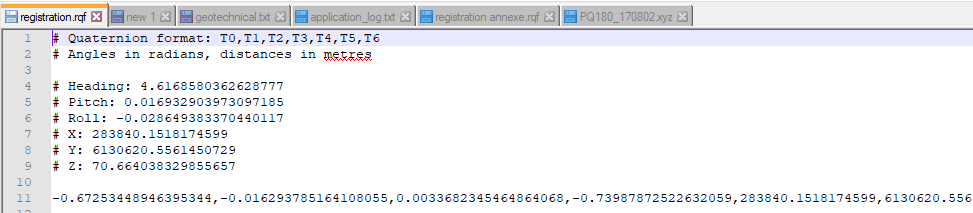
Typical information contained in a Registration I/O file. |
|
|
|
Registration data will be displayed in the report window. |

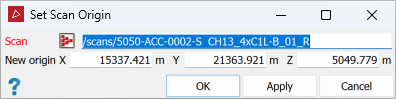
Set Scan Origin
The Set Scan Origin tool allows you
to edit and set a new origin for scan data, as follows:
-
Select the scan data to be changed.
-
On the Labs tab, in the Register group, click
 Set scan origin.
 -
Enter new origin coordinates or select a coordinate field and click on point in the view window.
-
Click on OK or Apply to finish.
Coordinate Calculator
The Coordinate Calculator converts a location defined in one coordinate system to the equivalent coordinates in another coordinate system.
To calculate new coordinates, proceed as follows:
-
On the Labs tab, in the Register group, click
 Coordinate Calculator.
 -
Define Source coordinate system by picking an object, or clicking the New system button and entering details of the appropriate coordinate system in the panel that opens.
Tip: To set up a coordinate system manually, see Coordinates.
Note: Click >> to expand the panel and show more details of the selected system.
-
Repeat step 2 for the Target coordinate system.
-
Select a coordinate field for the Source point at the bottom left of the panel, the either click on a point in the view window or enter the coordinates. The conversion to the target coordinates will appear automatically in the Target point fields at the bottom right of the panel.
-
Click Report to output the details to the report window.
|
|
|
Main panel showing Source point and Target point input areas. Note inputs and resulting conversion process of source point to target point. |

|
|
|
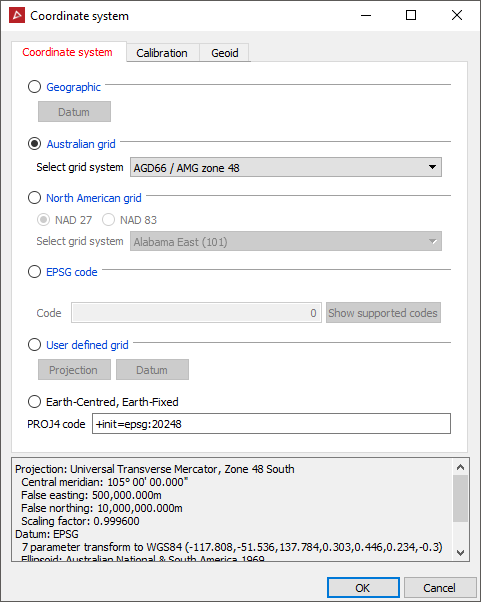
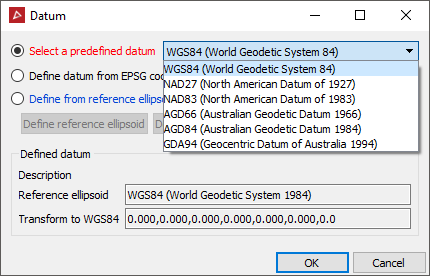
Coordinate system panel that opens when defining a coordinate system and the Datum panel that opens when selecting a datum. |
Note: For more information on coordinate systems, see Coordinate Systems.
Visualise Geoid
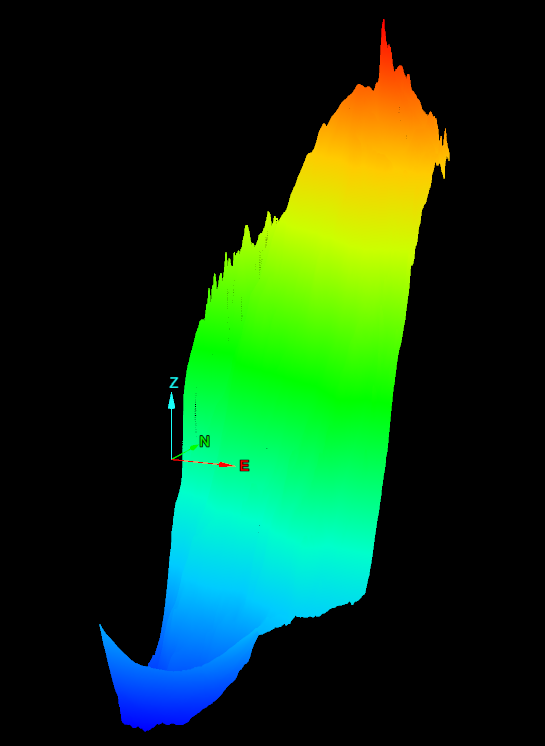
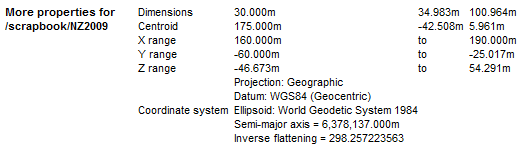
The Visualise Geoid tool opens and displays the geoid values as a surface.
Note: For more information on geoids, see Geoids.
To display geoid values, proceed as follows:
-
On the Labs tab, in the Register group, click
 Visualise Geoid.
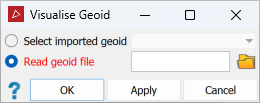
 -
Select a geoid that has already been imported, or read data in from a geoid file.
Note: Geoid files must have one of these extensions:
.asc,.byn,.ggf, or.gtx.
Assisted Initial Positioning
The Assisted Initial Positioning tool allows you to register unregistered scans against a reference scan. These methods are relatively easy to use and produce a reasonably good fit for a first attempt. Once positioned, complete the registration with Global Registration (see Global).
Note: The Assisted Initial Positioning tool requires that the scans be level or approximately level.
-
To position scans with the Assisted Initial Positioning tool, follow these steps:
-
Register the reference scan

 .
. -
View the reference and unregistered scans
in a view window. -
On the Position and Filter tab, in the Register group, click
 Assisted Initial Positioning.
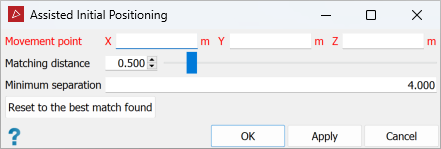
- Select an unregistered scan at a Movement point that can be dragged onto the equivalent position on the reference scan. The unregistered scan will be oriented to fit over the reference scan in the appropriate position. You can zoom in and continue adjusting the position to acquire the closest fit.
- Matching distance is the maximum distance points from one point set can be from corresponding points in the other point set, to be considered a match.
- Minimum separation pre-filters data using minimum separation distance to improve speed.
-
Continue the process with all other unregistered scans by clicking on an appropriate movement point and dragging it onto the reference scan.
-
Press the OK or Apply to finish and accept the alignments.
-
Proceed with global registration. See Global.
-
|
|
|
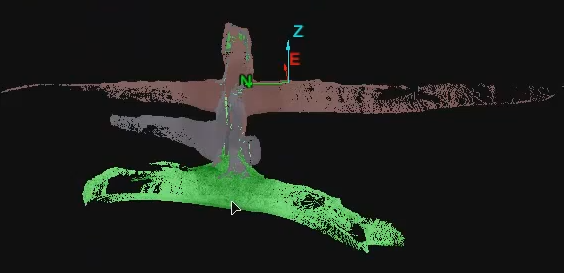
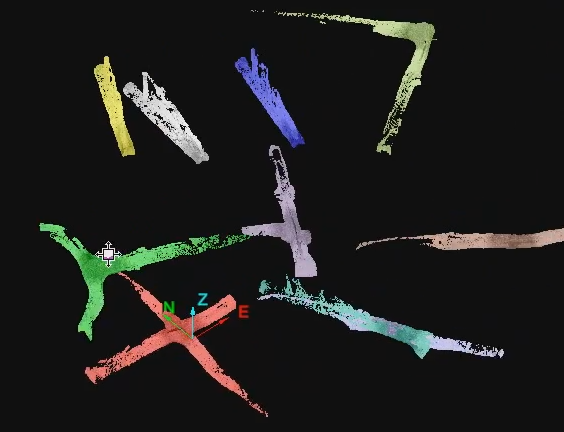
An initial group of unregistered scans. Reference scan indicated by the axes. |
|
|
|
Unregistered scans dragged onto the reference scan. |