Rotating the Data
Data can be rotated around the three axes (X, Y, Z) or around an arbitrary axis.
-
On the Edit ribbon tab navigate to the Transform group and select
 Rotate
or in the Position and Filter ribbon tab navigate to the Transform group and select
Rotate.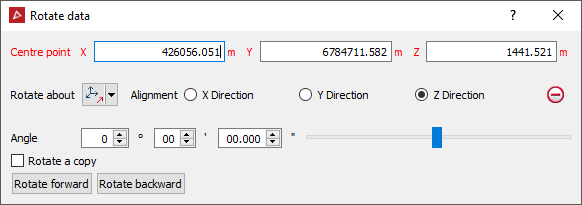
- Select a Centre point of rotation. The centre of rotation can be clicked on in the view window or entered.
Tip: Right-clicking on Centre point field will display a context menu with additional basic options.
Enter values manually into the entry boxes, or click in them and then at the desired location in the view window, or adjust sliders where appropriate.
-
Select the method of defining the rotation axis from the Rotate about drop-down list.
Depending on the Rotate about selection type the panel will change to request additional inputs.
|
|
The Rotate about options are:
|
-
Select the object to be translated in the project explorer and make sure that no other objects are highlighted.
-
Enter an Angle to rotate and use the Rotate forward and Rotate backward buttons to rotate clockwise and anti-clockwise.
-
Select Rotate a copy to duplicate the original object and rotate the new copy each time Rotate forward or Rotate backward is selected.
-
Select the object to be rotated in the project explorer and make sure that no other objects are highlighted.
-
Select Rotate forward to rotate the data clockwise, or Rotate backward to rotate the data anti- clockwise.
The rotation vector guide
The effect of the rotating on the data is illustrated via the translucent green circular arrow, illustrating the direction of rotation. The vertical arrow is the centre of rotation.
