Bolt Analysis - Rock Bolt Detection
The Rock bolt analysis comprises a suite of tools that allow you to locate and report on rock bolts in underground scans.
- Use the Rock Bolt Detection tool to automatically locate rock bolts on scans.
- The Verify Bolts tool can be used to check the results and remove any false positives from the automated process.
- The Place Rock Bolt tool is a smart tool that helps you quickly place individual rock bolts on the scan. This is particularly useful to add in any rock bolts that were missed in the automated process.
- Once you are satisfied with the rock bolt set, use the Rock Bolt Report to generate a PDF report that visually and numerically summarises the distribution of rock bolts.
Locating rock bolts automatically with Rock Bolt Detection
-
On the Query ribbon tab navigate to the Rock Bolts group and select
 Rock Bolt Detection.
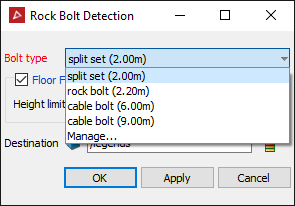
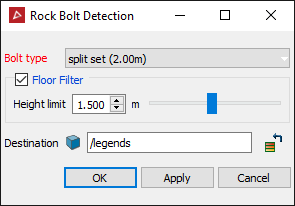
The Rock Bolt Detection panel appears.
-
Select a bolt type to search for from the Bolt type drop down list or select Manage... to create a custom bolt. (There is an example at the end of this topic)
-
Floor Filter: if ticked and a height limit is given, the tool will scan everything above that limit (height in meters) and skip scanning everything below that limit.
-
Name the destination container.
-
Click OK or Apply.
The Rock Bolt Detection tool will find all the rock bolts and place them in a container labelled Rock Bolts.
Creating a custom bolt
To create a custom bolt select Manage... ffrom the Bolt type drop-down list.
In the following example we created a custom bolt type named New Bolt and it is 1m long with a protrusion of 10cm and orange in colour.
