Import
Source file: import-data.htm
The data importing tool is an all-in-one tool with which you can import multiple files of different supported types simultaneously.
Importing data files from computer storage
-
Scan files: *.3dd, *.3di, *.3dp, *.3dr, *.3dv, *.4dd, *.asc, *.e57, *.fls, *.ixf, *.las, *.laz, *.mpc, *.ptg, *.ptx, *.r3s, *.rsp, *.rxp, *.toc and *.zfs
-
Polygon file format: *.ply
-
Triangulation files: *.**t, *.00t, *.dwg, *.dxb, *.dxf, *.obj
-
SRTM height files: *.hgt
-
Keyhole markup language files: *.kml, *.kmz
-
Maptek object files: *.maptekobj
-
CAD files: *.arch_d, *.bmf, *.dgd, *.txt
-
CSV files: *.csv
-
Dynamic image files: *.ecw, *.jp2
-
Images: *.bmp, *.bpw, *.jpeg, *.jpg, *.jgw, *.png, *.pgw, *.tif, *.tiff, *.tfw, *.tga
-
Shapefiles: *.shp
-
Vulcan design data files: *.dgd.isis
-
Vulcan legend files: *.scd
Note: All files to be imported must reside in the same folder.
To import files, follow the procedure below:
-
On the Home ribbon tab, go to the Data group and click
 Import.
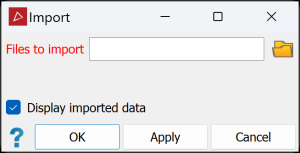
-
Click
 to browse
to the data location.
to browse
to the data location.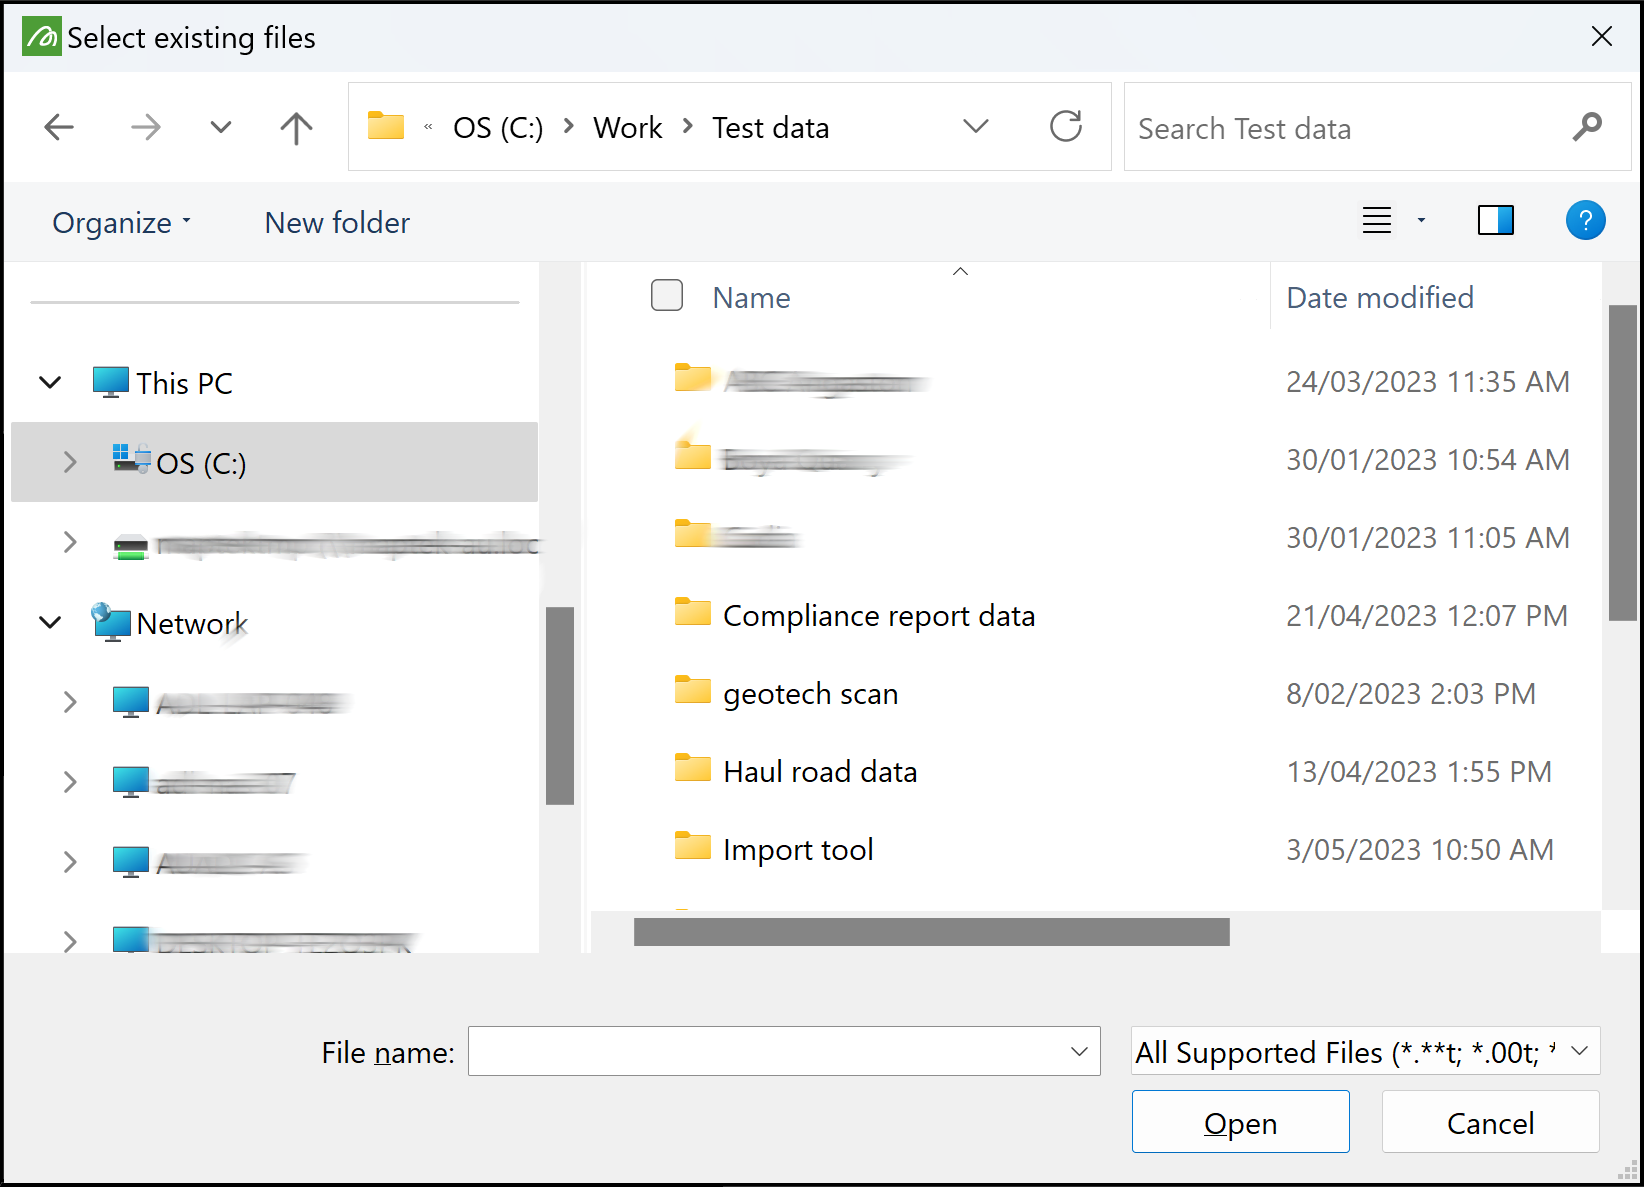
Tip: Click All Supported Files to see allowable file types.
 above.
 -
Select the files to be imported and click Open.
-
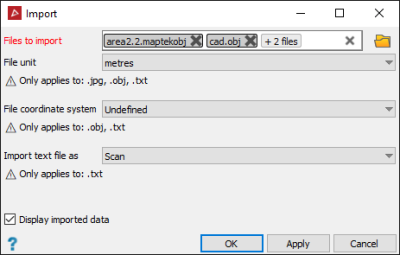
Where applicable, PointStudio presents the options available for each of the selected objects. Select the options required for the objects being imported.
-
If there is a coordinate system associated with a file to be imported, this option will not appear.
-
The default selection is the coordinate system defined in Preferences. Leave this as is to apply the default coordinate system.
-
You can also select New system... from the drop-down, then complete the details per Define. The files will be imported using the new system, but will then be converted to the default coordinate system.
-
For .3dr files, Automatically calculated UTM zone will also appear on the list. Select this to read the GPS coordinates of the scan origin and automatically determine the UTM coordinate system to use for that scan.
-
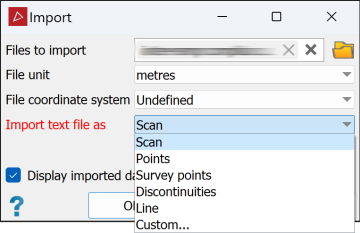
The default selection is Scan. Leave this as is to import the data as a scan.
-
Select one of the other pre-defined options, as appropriate.
-
Select Custom... to import differently formatted ASCII data, then click OK or Apply and follow the procedure here.
Note: Option selections are not needed or requested for these file types: .3dp, .r3s, .ply, .hgt, .kml, .kmz, .maptekobj, .ecw, and .jp2.
Expand below for detail on import options.
Applies to: .asc, .3di, .ixf, .las, .laz, .00t, .dxf, .dwg, .dxb, .obj, .bmf, .arch_d, .txt, .csv, .bmp, .bpw, .jgw, .jpeg, .jpg, .pgw, .png, .tfw, .tga, .tif, .tiff, .shapefiles, .dgd, and .dgd.isis
A wide range of units of length is offered. Simply select the required units from the drop-down list.
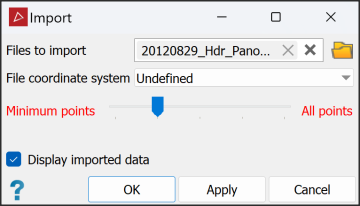
Applies to: .3dv, .3dd, .4dd, .3dr, .e57, .ptg, .ptx, .rxp, .asc, .3di, .ixf, .las, .laz, .fls, .mpc, .toc, .zfs, .rsp, .00t, .dxf, .dwg, .dxb, .obj, .arch_d, .txt, .csv, .shapefiles, .dgd and .dgd.isis
Applies to: .fls, .mpc, .toc and .zfs
These files often consist of a very large numbers of points. Set the slider at an appropriate level to reduce the number of imported points, making the scan more manageable.
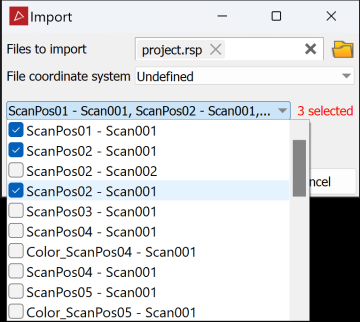
Applies to: .rsp
An .rsp file is a project file that references multiple .rxp scans. From the drop-down list, select each .rxp scan file to be imported with the .rsp.
Applies to: .txt and .csv
Take one of the following actions:
Applies to: .shapefile
Select this option to merge the shapefile's edge objects into a single edge network ![]() .
.
Applies to: .dgd and .dgd.isis
Click on Specify layers to import to open the layer selection panel. Select the required layers from the list. Select Merge objects for any that you want to combine.
Applies to: .scd
Click on the colour swatch to pull-down the palette and select a suitable colour.
-
When Display imported data is selected, the data will be displayed in a new view window. Clear this option if the imported data are not to be displayed.
-
Click OK or Apply.
-
You can also drag files directly from Windows File Explorer into a view window.
-
Alternatively you can drag files directly from Windows File Explorer into a specific project container. This will import the data without loading and displaying in a view window.
Depending on the file types selected, you may be required to make additional choices to finish importing data. Expand the relevant heading below for further instructions.
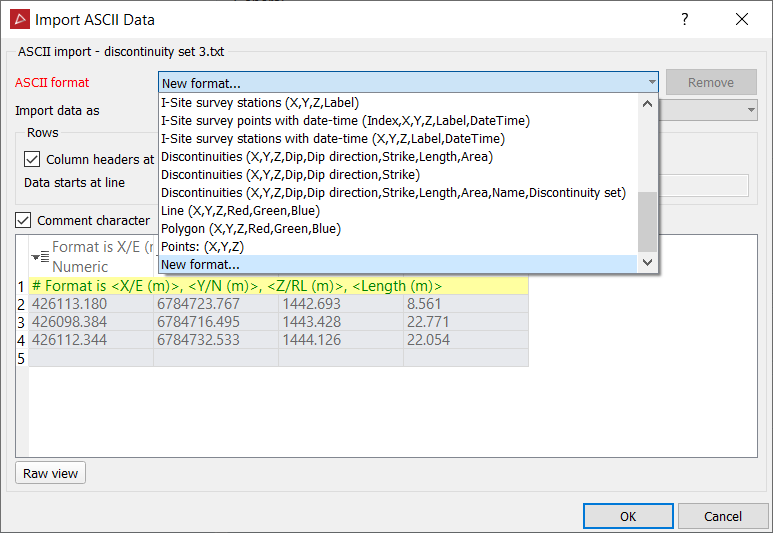
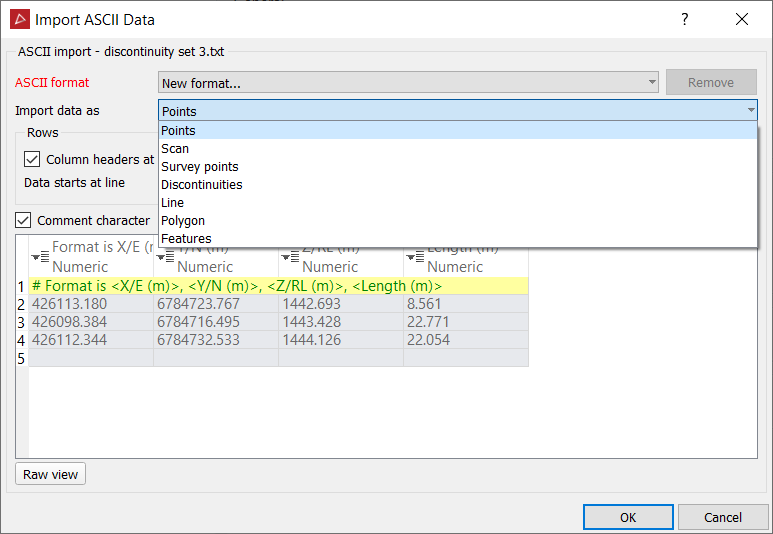
Having selected a text or CSV file and chosen Custom... from the Import data as field, the Import ASCII Data panel will appear. Proceed as follows:
-
Click in the ASCII format field listing the standard data arrangements which have been predefined.
-
Select New format....
-
Click the Import the data as field.
-
Select the data type to be imported from the drop-down list.
-
Define the data type. Different data types can have different attributes, as follows:
- Points: Must include X, Y coordinates. May include Z and colour RGB data.
- Scan points: Must include X, Y coordinates. May include Z, colour RGB and intensity data.
- Survey points: Must include X, Y coordinates and label. May include Z, an index and date-time.
- In the Columns area, select the correct options for column delineation.
-
The Comment character defines the character used in the file to prefix comment text.
- If
the custom format is likely to be used frequently, type a meaningful
name in the ASCII format name
field.
The next time data is imported, the newly defined name will appear in the Import test file as and ASCII format lists.
Tip: You can delete formats that are no longer required by selecting them from the drop-down list and clicking Remove.
-
Click OK when done.
It is possible to import file types that are not in the supported files list, provided they contain recognised ASCII data.
-
In the file selection dialog, click on All supported files and select All files (*.*)
-
Navigate to and select the files to import.
-
Click Open.
-
A message will appear indicating that you have selected an unsupported file type, asking if you want to import the files as ASCII. Click Yes to continue.
-
Proceed as above to define the data format and finish importing.
The files will be imported and their types permanently associated with ASCII. Their types will appear in the support files list under Interpreted as ASCII.
Imported images may have associated world files (types .pgw, .tfw, .bpw and .jgw, listed above), with the same names. World files specify how aerial images are to be positioned. If there is an associated world file for an image, it will be detected and selected automatically and there is no need to register the image to a surface.
Important: Set all monitors to the same resolution to ensure these tools display correctly.
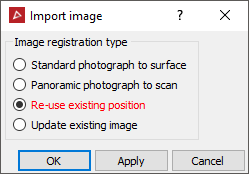
If an image has no associated world file, it will need to be registered. The Import Image panel will open after clicking OK.
-
Select the required Image registration type from the options:
-
Standard photograph to surface if the image is of a section of a scene to be stitched onto a surface.
-
Panoramic photograph to scan if the image is panoramic, extending all the way around a scene.
Note: A panoramic image must be a 360° x 180° spherical projection with an aspect ration of 2:1 (width:height). If it is not, PointStudio will return an error message.
-
Re-use existing position to reuse an existing photographic position on a scan.
-
Update existing image to replace an image on an object, and then adjust or update.
-
-
Click OK or Apply.
A new image import window will appear, according to your selection. Click
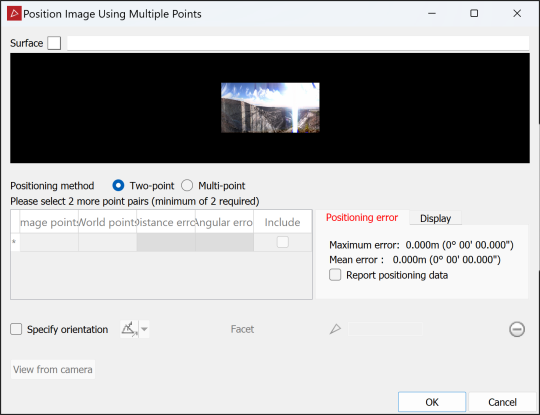
to see the relevant procedure. Standard photograph to surface
-
Drag the surface to be associated with the image into the Surface field.
-
Select the Positioning Method:
- Two-point requires a minimum of two point pairs to apply the image to a flat surface region.
- Multi-point requires a minimum of eight point pairs to apply the image to a surface region.
- See Apply an image to an object for detailed instructions.
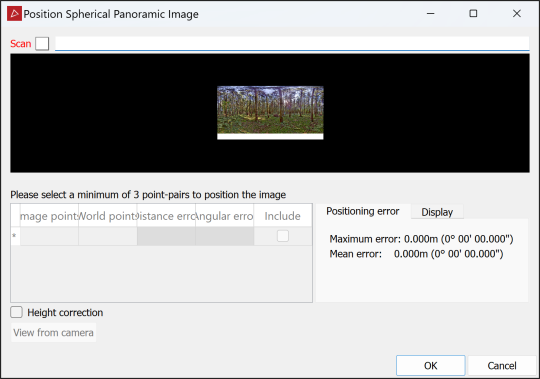
Panoramic photograph to scan
-
Drag the scan to be associated with the image into the Scan field.
-
Populate the point pairs table by selecting corresponding points in the panoramic image (in the preview window) and the scan (in a view window). Select at lest three point pairs.
-
Select the remaining options as required:
-
Height correction to compensate for any vertical offset between the camera and scanner.
-
On the Display tab:
-
Select Reprojected image points to compare point pairs in the view window. The image point positions are indicated by magenta lines radiating from the camera position.
-
Select Reprojected world points to compare point pairs in the image window. The scan point positions are displayed as magenta crosses.
-
-
-
Click OK
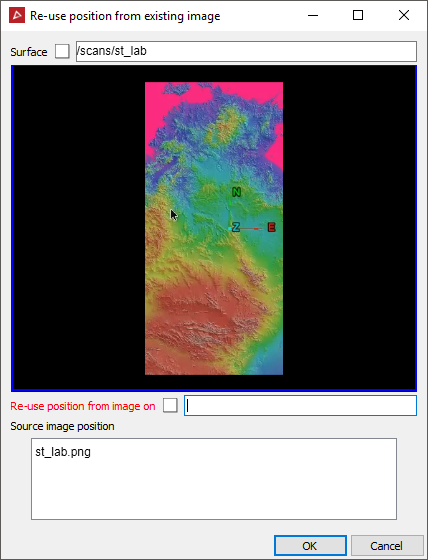
Re-use existing position
-
Drag the surface to be associated with the image into the Surface field.
-
Drag the scan or surface with the existing image associated into the Re-use position from image on field.
-
Select the Source image position.
-
Click OK
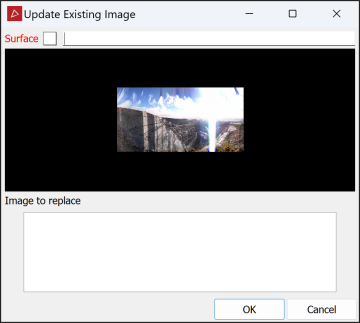
Update existing image
-
Drag the surface to be associated with the image into the Surface field.
-
Select the image to be replaced from the Image to replace field.
-
Click OK
-
- Click OK when done, then close the import tool.
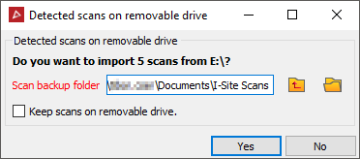
Auto-importing scan files from USB media
Scan data acquired by a scanner can be saved or transferred to a USB flash drive and can then be imported into PointStudio. To import scan files, proceed as follows:
-
Remove the flash drive from the scanner or scanner controller.
-
In PointStudio, create a new project, or open an existing one.
-
Insert the flash drive containing the scan files into the PC.
PointStudio will recognise the files and automatically launch the scan import tool.
-
Change the location of the scan backup folder if required. The default location displayed is the location of the project.
-
If you want to retain the original data on the flash drive, select Keep scans on removable drive.
-
Click Yes.
The scan files will be imported into the open project and a backup copy created. Scans will be placed into containers according to the date they were acquired.
