Import Attributes
Use the this option to import an ASCII file containing block model details and grade estimation results into a pre-existing block model.
This is usually the case when a Vulcan block model has been exported to an ASCII file in order to perform grade estimation using another software package. The results can then be imported back using this option.
The format of the ASCII file must be:
X Y Z data1 data2 data3
where X, Y, Z is a point in space.
Whatever block encloses the point has data1, data2, and data3 inserted into the specified fields. If two data points exist for the same coordinate point, or two coordinate points lie in the same block, then the last coordinate in the ASCII file overwrites the previous entries.
The data variables in the ASCII file do not have to be in the same sequence as the block model. Not all the variables in the block model have to be in the ASCII file, but all the data variables in the ASCII file must be imported otherwise errors occur when reading the file. Therefore, if the ASCII file has eight data variables and only three of them are to be imported, then strip the file of the excess columns by using an "awk" script or by reformatting in a spreadsheet.
Note: In order for the contents to be imported, the values in the chosen ASCII file must be delimited by spaces, colons, semicolons, commas, tabs, or spaces.
Instructions
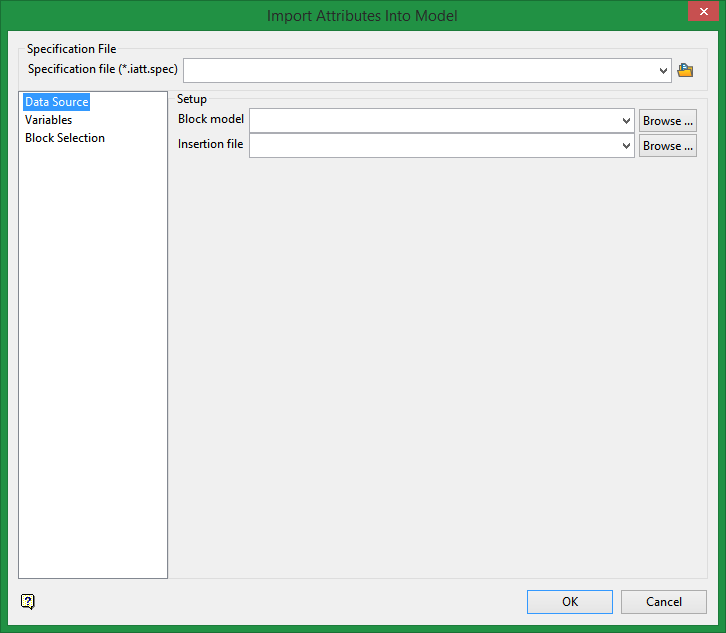
On the Block menu, point to Transfer, and then click Import Attributes to display the following interface.
If a block model is not currently open, you will be prompted to open one first.

Block Model
Select the block model in which to import the attributes.
The drop-down list contains all block models found within the current working directory. Click Browse to select a file from another location.
Insertion file name
Select the ASCII file that contains the information you want to import. The drop-down list contains all files found in your current working directory. Click Browse to select a file from another location.

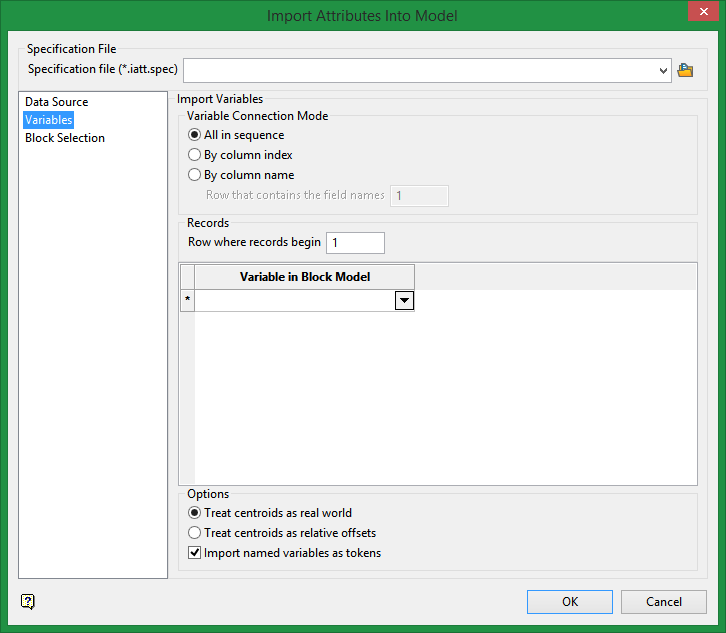
Import Variables
Variable connection mode
The Import Attributes option provides you with three possible connection modes.
-
All in sequence - Select this option to manually select the block model variables. The order specified in the available grid must match the order contained in the nominated insertion file.
-
By column index - Select this option to use column numbers to import the attributes. You will need to specify the block model variables as well as the columns containing the appropriate attributes.
-
By column name - Select this option if you want to use column headers to import the attributes. This option should be used when the nominated insertion file contains column headers. You will need to specify the block model variables as well as the columns containing the appropriate attributes. You will also need to identify the header line, that is, the line containing the column names.
Records
Row where record starts
Enter the starting position for the records, for example, a value of '1' represents the first line in the nominated insertion file.
Treat centroids as real world/relative offsets
Centroids can be imported as real world or as relative offsets. Real world coordinates are an actual location in space, for example, AMG coordinates. Relative offsets are the distances with respect to the origin of the block model.
Use block matching
Select this check box to specify variables for importing specific blocks from a block model.
Import named variables as tokens
Select this check box to import named variables, such as 'waste' or 'ore', as tokens. If this check box is not selected, then the integer values contained in the chosen ASCII file, for example, '0' for waste and '1' for ore, will be imported instead.

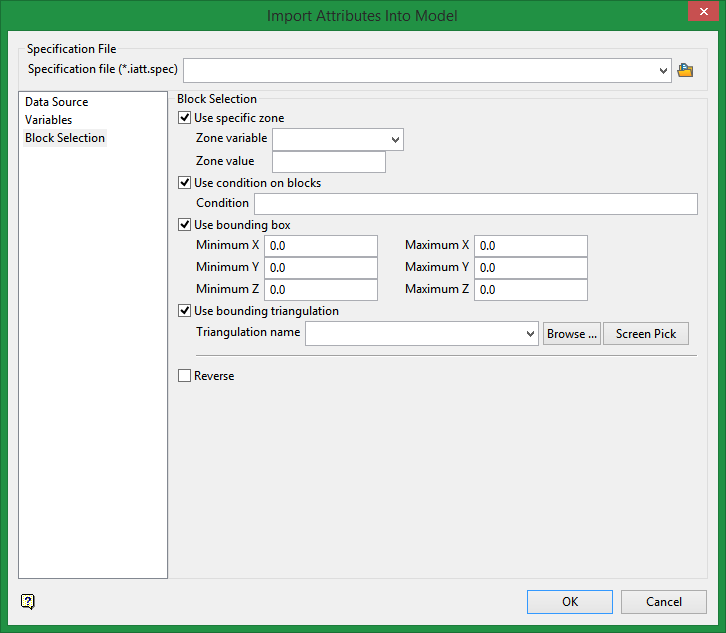
Block Selection
Use specific zone
Select this option to select blocks by categorical variable.
Use condition on blocks
Select this option to use a further constraint upon a numeric block model variable, for example Fe GT 10.0 (iron value greater than 10.0). A list of available operators/functions is provided in Appendix B of the Core Documentation.
Use bounding box
Select this option to restrict the blocks by a box. You will be required to enter the minimum and maximum X, Y and Z values in either model coordinates or real world coordinates.
Use bounding triangulation
Check this option to restrict the blocks by a triangulation. You will be required to specify the bounding triangulation.
Reverse selection
Select this option to exclude the selected blocks. This option works in combination with the other options on this panel. For example, if you set up Condition on blocks to select all blocks that have a gold grade of (-99.0), then selecting Reverse selection will prevent any block with a gold grade of (-99.0) from being selected. Or as another example, if you set up a bounding box to limit Z values between 2300m and 5500m, selecting Reverse selection will prevent blocks with Z values between those elevations from being selected and select blocks with all other Z values.
For further explanation and examples, click here .
Click OK.
The importing process is then displayed in a shell window. If you selected the Use block matching check box, then the Block Selection panel displays first.

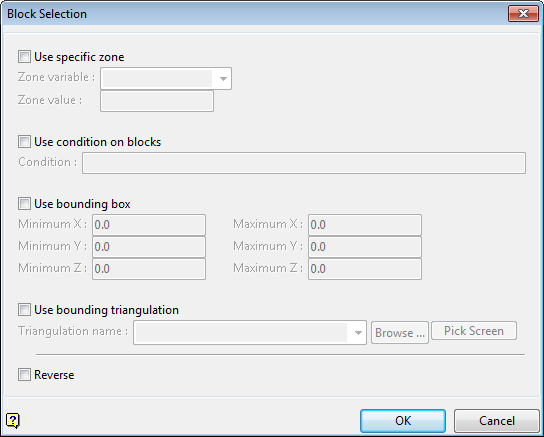
Block Selection panel
Block model file name
Specify the name of the block model that will be used. By default, the name of the currently loaded block model will be displayed.
The drop-down list contains all block models found within the current working directory. Click Browse to select a file from another location.
The drop-down list contains all block models found within the current working directory. Click Browse to select a file from another location.
Use specific zone
Select this check box if you want to limit the estimation to those blocks where a specified variable equals a certain value. Both the variable and the value are forced to be lowercase.
Use condition on blocks
Select this check box if you only want to apply a condition to the blocks to be estimated. A single condition can contain up to 132 alphanumeric characters. For a condition to contain more than 132 alphanumeric characters, you will need to manually edit the.bef file. Refer to Appendix D of the Vulcan Core documentation for a list of available operators/functions.
Use bounding box
Select this check box if you want to restrict the estimation to those blocks whose centroids lie within a specified range of co-ordinates. Enter the minimum and maximum co-ordinates (in the X,Y and Z directions). These co-ordinates are offsets from the origin of the block model (i.e. block model co-ordinates).
Use bounding triangulation
Select this check box if you want to limit the estimation to those blocks that lie within a specific solid triangulation. The triangulation name can either be manually entered or selected from the drop-down list. Click Browse to select a file from another location. You can also select loaded triangulations from the screen by clicking the Pick Screen option.
Reverse
Select this check box to select outside the regions specified.
For example: To restrict blocks to those where Material equals Ore, you would select Material as the variable and enter Ore as the value. However, if you require all blocks that do not have this specified value, that is, where Material does not equal Ore , then you would enable the Reverse check box.
Click OK.

