Import Text
Use the Import Text option to insert existing text files into the current design database and save them as design objects. 2D text can only be displayed in the XY plane (Plan view).
Text can be edited using options under the Text Edit submenu, while blocks of text are subject to a limited number of other editing functions, such as being moved ( Design > Transformation > Translate ) or having their colour changed ( Design > Attribute Edit > Graphics ).
If you are entering a large amount of text of the same style, then we recommend that you set text defaults through the Defaults : 2D Text section of the Tools > Preferences option. Once enabled, you will only need to indicate the text origin point and enter the text. For the description of this option, it is assumed that the text defaults have not been set.
Instructions
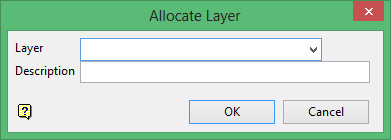
On the Design menu, point to Create, and then click Import Text to display the Select Text File... panel. If the current working layer has not been defined prior to selecting the Import 2D Text option, then the Allocate Layer panel displays first.

Name
Select the name of the layer from the Name drop-down list, or enter a new name to create a new layer. If you select an existing layer that is already loaded, subsequent digitising will be appended to this layer. If you select an existing layer that is not loaded, you will be prompted to specify whether you want to load the existing layer or overwrite its existing content.
Description
Enter a description of this layer. The description can contain up to 80 alphanumeric characters and can include spaces. If a description is not entered, a default description will be used instead. If the selected layer already has an assigned description, it displays when the layer is selected. Existing layer descriptions can be overwritten.

Allocate Layer panel
Name
Select the name of the layer from the Name drop-down list, or enter a new name to create a new layer. If you select an existing layer that is already loaded, subsequent digitising will be appended to this layer. If you select an existing layer that is not loaded, you will be prompted to specify whether you want to load the existing layer or overwrite its existing content.
Description
Enter a description of this layer. The description can contain up to 80 alphanumeric characters and can include spaces. If a description is not entered, a default description will be used instead. If the selected layer already has an assigned description, it displays when the layer is selected. Existing layer descriptions can be overwritten.
Click OK.

Select the text file (.txt).You can also use '~/' to select a file from your home directory, for example '~/mytext.txt'.
The drop-down list contains all.txt files n your current working directory. Click Browse to select a file from another location.
Click OK.
Using any of the design entry modes (refer to the Digitising section for more information) digitise the origin and text direction.
A list is then displayed of the available fonts (fonts are located in the ENVIS_RESO area). Refer to the Fonts section for information on the differences between fixed and transformable fonts.
If you select one of the fixed fonts (small, normal, medium and large), then the Drafting attributes panel displays.
Text drafting size in plotter units
Enter, in plotter units, the size of the text. It is used only when plotting the text.
Frame text
Select this check box to put a box around the text. The box is only for display purposes. It is not included in the plot.
Fixed fonts will always appear 'face-on' (horizontal) regardless of the text direction. However, the angle will be taken into account when plotted. All of the other fonts appear the same on the screen as when plotted.
If you selected one of the transformable fonts, then the Text sizing panel displays.
Text drafting size in plotter units
Enter, in plotter units, the size of the text.
Map scale for this size
Enter the scale for the plot. This will determine the size of the text on the screen.
For example: If the text size is set to.0.30' and the map scale to '1:100', then the text will appear on the screen the same size as an object that is 30 units tall. Changing the scale, in either this option or any of the plotting options (under the File > Plot submenu) to '1:1000' results in the text appearing as 300 units. Changing the scale to '1:1000' results in a text size of 3000 units and so forth.
Transformable fonts are created in a horizontal plane, which means that the text will not appear 'face-on', or the same size, if you have changed (by rotating or zooming) the view.
Click OK to accept either panel.
The text block (object) is then displayed. It will be in the default colour.
The name of the text is
TEXT$<n>
where <n> is a number that increases each time a new object is created. A default description is also provided, indicating the time and date of creation.
Use the Name option (under the Design > Attribute Edit submenu) to change the object name. Text can be edited or deleted through the Edit option.

