Arc 
Use the Arc option to design a circle, arc or spiral with a Z value based on a plane defined by two or three points. The circle, arc or spiral is composed of segments determined by an arc length step size.
This option can also be accessed by selecting the Arc button ![]() from the Design toolbar.
from the Design toolbar.
Instructions
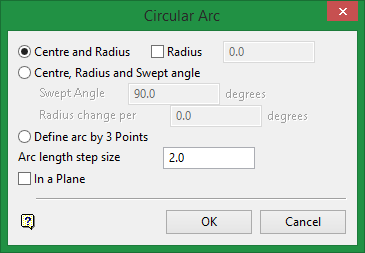
On the Design menu, point to Create, and then click Arc to display the Circular Arc menu.
The following panel is then displayed. If the current working layer has not been defined prior to selecting the Arc option, then the Allocate Layer panel displays first.

Figure 1 : Allocate Layer panel
Name
Select the name of the layer from the Name drop-down list, or enter a new name to create a new layer. If you select an existing layer that is already loaded, subsequent digitising will be appended to this layer. If you select an existing layer that is not loaded, you will be prompted to specify whether you want to load the existing layer or overwrite its existing content.
Description
Enter a description of this layer. The description can contain up to 80 alphanumeric characters and can include spaces. If a description is not entered, a default description will be used instead. If the selected layer already has an assigned description, it displays when the layer is selected. Existing layer descriptions can be overwritten.
Click OK.
Centre and Radius
Select this option to create a circle. You will need to specify the arc length step size, as well as indicate the circle's centre point (once the Circular Arc panel has been completed). The radius of the circle can be defined by using either a nominated point or by using a specified radius.
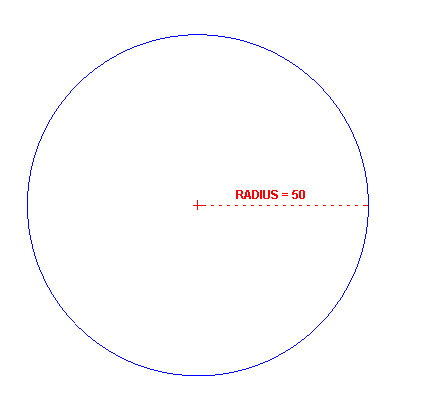
Figure 2 : Circle created using a Centre Point and a defined Radius value
If the Radius check box has not been enabled, then you will be required to specify the 'radius point' once the Circular Arc panel has been completed.
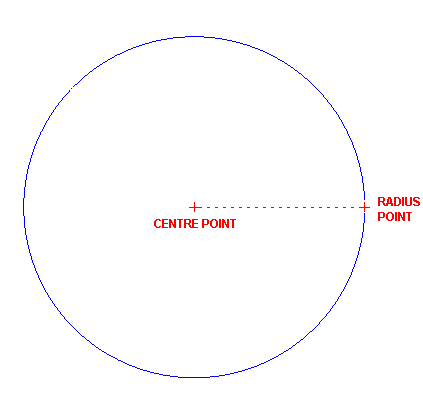
Figure 3 : Circle created using a Centre Point and a Radius Point
Centre, Radius and Swept angle
Select this option to create a spiral or an arc. You will need to specify the arc length step size, radius change per degree and the swept angle. Once the Circular Arc panel has been completed, you will be required to indicate both the centre point and the radius point (the latter will be used as the start of the spiral).
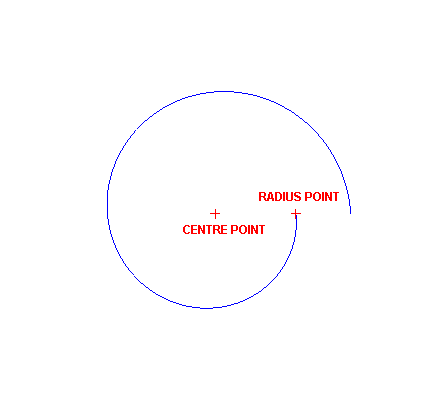
Figure 4 : Spiral created with a Swept Angle of 360°
Define arc by 3 points
Select this option to create an arc that passes through the 3 points. You will need to specify the arc length step size. Once the Circular Arc panel has been completed, you will be required to indicate the three points. The resulting arc will start at the first point, end at the last point and pass through the second point.
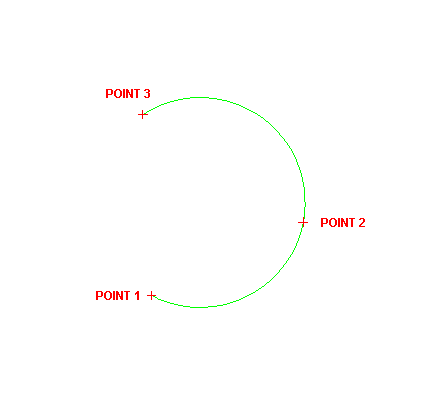
Figure 5 : Arc defined by 3 points
Arc length step size
Enter the distance between points in the resulting circle or spiral, i.e. the circle or spiral is composed of segments determined by the step size. For example: A circle with a step size of '5' would have points every five units of measurement.
Radius change/degree
Enter the change in radius for every angular unit in the spiral. A positive number will generate a spiral that moves out from the indicated radius point, while a negative number will generate one that moves in towards the centre point. If you are using the spiral option to design an arc, then set this number to '0.00'.
Swept angle (degree)
Enter the angular units scribed by the spiral. For example: An angle of '720' will generate a spiral that consists of two full rotations.
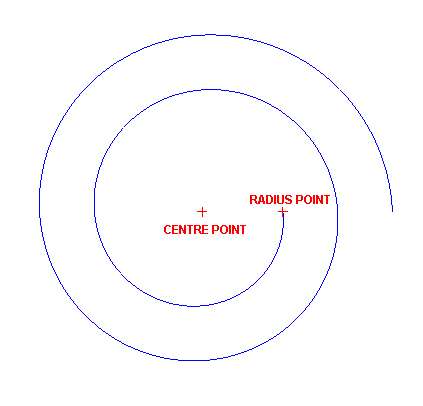
Figure 6 : Spiral created with a Swept Angle of 720°
A positive number will produce a spiral that is anticlockwise from the radius point (as shown in Diagram 3), while a negative number will produce one that is clockwise (as shown in Diagram 6).
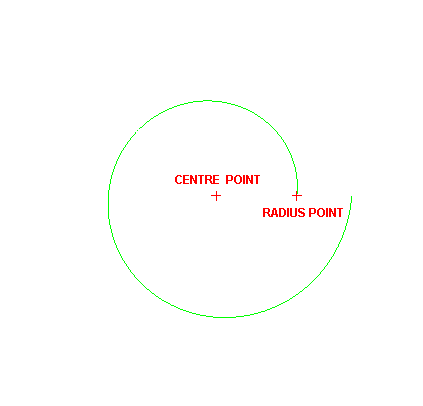
Figure 7 : Spiral created with a Swept Angle of -360°
In a Plane
Select this check box if you want the object to be created in a specified plane rather than in Plan view. If this check box is enabled, then the Plane dialog box displays once the Circular Arc panel has been completed.
Click OK.
The prompts displayed depend upon the creation method chosen through the Circular Arc panel.
If you chose to use the Centre and Radius or Centre, Radius and Swept angle option, then you will be prompted to indicate the centre point as well as the radius point. The latter is only applicable when you have not enabled the Radius check box while using the Centre and Radius option.
If you chose to use the Define arc by 3 points option, then you will be prompted to indicate the 3 points that will be used to create the arc.
If you enabled the In a Plane check box, then the Plane dialog displays before you are asked to indicate any of the necessary points. The Plane dialog box contains the following options:
2 Points
Select this option to define the plane using 2 points. The plane will be the plane that passes through the 2 points with a dip of 0° perpendicular to the 2 points.
3 Points
Select this option to define the plane using 3 points. The plane is the unique plane that contains all 3 points. If you enter 3 points that happen to be co-linear in the X/Y plane, then you will be prompted to re-enter the points.
When the circle, arc or spiral is created, it will be drawn according to the settings specified through the Status toolbar, i.e. the default colour, line type and fill pattern. The resulting object will be named:
ARC$<n>
where
<n> is a number that increases each time a new object is created. A default description is also provided, indicating the time and date of creation. Use the Name option (under the Design > Attribute Edit submenu) to change the name.
Once the first object has been created, you will be prompted to indicate the next set of points. The next circle, spiral or arc will have the same parameters as the first one. If you don't want this, then return to the Create submenu and reselect the Arc option.
Use the Filter option (under the Design > Object Edit submenu) to reduce the number of points in the object.

