Name
Name and Label a Point
Use the Name option to name and label one or more points in an object. Point names cannot exceed 40 alphanumeric characters.
N ote To view any currently assigned point names, right-click on the object and select the Label > Point name option from the context menu.
Prerequisite
The object whose points are to be named must be loaded.
Instructions
On the Design menu, point to Point Edit, and then click Name to display the Change point names panel.
Note: If you are using the Prompt for Name naming type, the Optional formatting section of the panel will not be available. Instead an additional pop-up dialog box will appear, allowing you to complete the definition. See thePrompt for Namesection below for detailed instructions.
- Select how the naming is to occur from the three options in the Naming type section.
- Select how each point will be chosen using the three options in the Point picking section.
- If you have selected to Name by Point Sequence Number or Name by Order of Picking, use the Optional formatting section to define any desired prefix, suffix, or leading zeros. You may also define the starting number.
Naming type
Name by Point Sequence Number
Select this option to name the points with their sequence number (the order they were digitised).
Name by Order of Picking
Select this option to name each point, in selected order, with a user defined sequence. Note the first point picked will be named with the starting number defined in the Order of picking start number field. Subsequent point names are incremented by one.
Prompt for Name
Select this option to be prompted for the point name.
Point picking
Individual Points
Select this option to select each point to which to apply a name. The label displays immediately. Cancel when you have finished selecting points. You will be returned to the Optional Formatting panel, where you can change the parameters and continue labelling points.
Sequential Points
Select this option to label a sequential subset of the points. You will be prompted for the first and last point in the sequential subset. The labels are displayed immediately. You will be returned to the Optional Formatting panel, where you can change the parameters and continue labelling points.
All Points
Select this option to label all of the points. The labels are displayed immediately. You will be returned to the Optional Formatting panel, where you can change the parameters and continue labelling points.
Note: Regardless of the naming type or how the points are picked for labelling, all labels are displayed in a fixed (non-transformable) font. Text in a non-transformable font remains the same on the screen regardless of zoom factor, and will always appear 'face on' (horizontal) regardless of screen orientation. If you want to change the font, put the labels into a separate layer, thus making them text objects (see the Analyse > Label > Point Label to Text option).
You can select to label all points, selected points or a sequence of points. You can also specify an optional prefix and/or suffix to add to the sequence number.
Optional formatting
If you selected name by Point Sequence Number of Name by Order of Picking, you can also specify an optional prefix and suffix for the sequence number, choose whether to add leading zeros to the sequence number and, if they are added, define the total number of digits in the number section of the label.
Optional Prefix
Use up to 15 alphanumeric characters to enter a prefix for the points.
Optional Suffix
Use up to 15 alphanumeric characters to enter a suffix for the points
Leading zeros on numeric part
Select this check box to place leading zeros on the sequence number.
Field Width
Specify the field width, up to 10 characters, which is the number of digits that will appear in the number part of the label.
Click OK.
For example, if the field width is 5 , and the sequence number is 2 , then the number part of the label will be 00002.
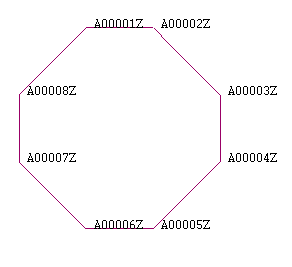
Figure 1 : Points Named by Sequence
In the above diagram, the prefix was A , suffix Z and the field width was 5.
Name by Order of Picking
The following panel displays.
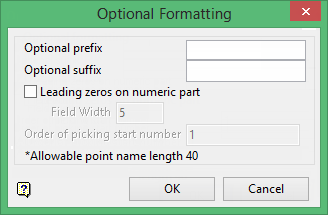
This panel allows you to specify the starting order number, an optional prefix and suffix for the order number, whether to add leading zeros to the order number and if they are added the total number of digits in the number section of the label.
Optional Prefix
Enter a prefix.
Optional Suffix
Enter a suffix.
Leading zeros on numeric part
Select this check box to place leading zeros on the order number. You will need to specify the field width. The field width value is the number of digits that will appear in the number part of the label.
For example, if the field width is 5 and the order number is 2 , then the number part of the label will be 00002.
Order of picking start number
Enter the value you want to use as the order number for the first selected point. Subsequent points will be incremented by 1.
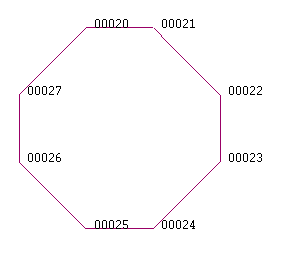
Figure 2 : Points Named by Order
In the above diagram, the starting number was 20 , and the field width was 5. A prefix and a suffix weren't assigned.
Click OK.
Select the object that contains the points you want to name. Once chosen, the selected object and its points are highlighted.
Select from the confirm box, the method of selecting points. You can select Individual Points, Sequential Points or All Points.
Individual Points
Select this option to select each point to which you want to apply a name. The label displays immediately. Cancel when you have finished selecting points. You will be returned to the Optional Formatting panel, where you can change the parameters and continue labelling points.
Sequential Points
Select this option to label a sequential subset of the points. You will be prompted for the first and last point in the sequential subset. The labels will then be displayed immediately. You will be returned to the Optional Formatting panel, where you can change the parameters and continue labelling points.
All Points
Select this option to label all of the points. The labels are displayed immediately. You will be returned to the Optional Formatting panel, where you can change the parameters and continue labelling points.
Prompt for Name
Select the object that contains the points you want to name. Once chosen, the selected object and its points are highlighted.
Select from the confirm box, the method of selecting points. You can select Individual Points, Sequential Points or All Points.
Individual Points
Select this option to select individual points and then apply a name. A panel displays in which you can enter the new name. You will then be able to select another point to name.
Sequential Points
Select this option to label a sequential subset of the points. You will be prompted for the first and last point in the sequential subset. A panel will then be displayed in which you can enter the name of the first point. The panel will be redisplayed for the subsequent points and the default value will be the first point name with an increasing (starting from 1) integer suffix.
For example: If the name of the first point was Vulcan , then the default name for the second point would be Vulcan1 , and for the third point Vulcan2. These defaults can be overwritten.
All Points
Select this option to label all of the points. A panel displays in which you can enter the name of the first point in the digitised sequence. The panel will be redisplayed for the subsequent points and the default value will be the first point name with an increasing (starting from 1) integer suffix.
For example, if the name of the first point was Vulcan , then the default name for the second point would be Vulcan1 , and for the third point Vulcan2. These defaults can be overwritten.
If using Name by Point, the following dialog box will appear:

New point name
Type the new point name.

