Measure
Insert Points into a String at a Required Spacing
The Measure option to insert points into a line segment along a grade, along an elevation or by plan view distance. Line segments can be selected by object, group, feature or layer.
You can also use the Interpolate option to insert points along a grade.
Instructions
On the Design menu, point to Point Insert, then click Measure.
Use the Multiple Selection box to choose your method of selecting the objects and select the objects. If you select by objects, then you can choose (after the Measure Parameters panel has been completed) to insert the points in the entire object or in a part of the object.
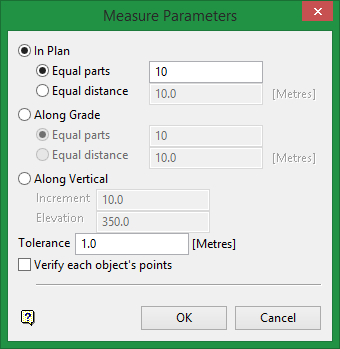
The following panel is then displayed.

Measure Parameters panel
This panel allows you to specify the method of inserting points, the parameters for the insertion and the insertion tolerance.
In Plan
Select this option to insert points at either equal distances or in such a way that the object is divided into equal parts in Plan view. This option is very similar to the Along Grade option except that distances are measured as plan distances rather than 3D distances.
The points can be inserted at equal distance or at equal parts.
If you select the Equal parts option, then the object(s) is divided evenly into the number of parts and the points are inserted in the appropriate positions. If you select the Equal distance option, then the first inserted point is placed at the specified distance from the first point in the object(s) (the digitising sequence is used to determine the first point) and subsequent points are placed the specified distance from each other.

