Rotate 2D 
Set the Angle of Rotation in 2D
The Rotate 2D option to rotate an object at a specified angle around the Z-axis.
This option can also be accessed by selecting the ![]() Rotate 2D button from the Move toolbar. The Move toolbar is a "sub toolbar" and can either be accessed through the Modify toolbar or through using the Toolbar Visibility option (under the Tools menu).
Rotate 2D button from the Move toolbar. The Move toolbar is a "sub toolbar" and can either be accessed through the Modify toolbar or through using the Toolbar Visibility option (under the Tools menu).
Instructions
- Select Design menu
- Select Transformation submenu
- Select Rotate 2D option
Indicate a point for the centre of rotation. ![]() Snap to Points or
Snap to Points or ![]() Snap to Objects modes can be used for a precise location.
Snap to Objects modes can be used for a precise location.
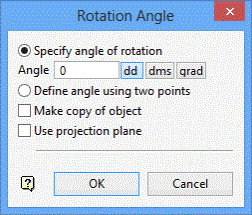
The following panel is then displayed.

Rotation angle panel
This panel allows you to select the method of specifying the angle of rotation (either as an angle or by using two points to define the angle), whether to make a copy of the object at its rotated location or to rotate the original object and whether to perform the rotation in a specified plane.
Specify angle of rotation
Select this option to specify the angle of rotation. A positive angle will result in the object being rotated in an anticlockwise direction while a negative angle will result in the object being rotated in a clockwise direction.
Define angle using two points
Select this option to define the angle using two points. The necessary points will be indicated once the Rotation angle panel has been completed.
Make copy of object
Select this check box to rotate a copy of the object, that is keep the original
Use projection plane
Select this check box to perform the rotation in a specific plane. If this check box is enabled (i.e. checked), then the Projection Plane panel displays once the Rotation Angle panel has been completed.
Select OK.
The Multiple Selection box is then displayed. Choose your method of selecting the objects and select the objects.
If you are selecting by object, then the object is rotated immediately. If you are selecting a category other than object, then the object that is rotated is the first digitised object in the selected category and you are asked whether or not you want to keep the rotation. If you do, then all other objects in the selected category are also rotated.
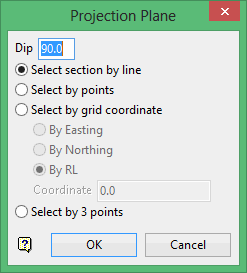
If you enabled the Use projection plane check box, then the Projection Plane panel displays before the Multiple Selection box.

Dip
The dip is the angle of the section from horizontal. Valid dip angles are between -90° and 90°.
Select section by line
Select this option to define the plane by selecting an existing line and specifying the dip.
Only design strings may be picked and it is not possible to pick a line in an underlay. The direction of the view, and therefore the direction of the stepping, depends on the digitised sequence of the line. The digitised sequence of the line can be reversed using the Design > Object Edit > Reverse.
Select by points
Select this option to define the plane by digitising two points and specifying the dip.
To locate a point precisely, use the Snap to Objects ![]() or Snap to Points
or Snap to Points ![]() modes (on the Digitise toolbar). Points may be snapped onto underlays, such as block model slices or triangulations. If you use Indicate
modes (on the Digitise toolbar). Points may be snapped onto underlays, such as block model slices or triangulations. If you use Indicate ![]() mode to select the points, then the points have the current default Z value.
mode to select the points, then the points have the current default Z value.
Select by grid coordinate
Select this option to define the plane by using a specific grid coordinate. The grid co-ordinates can contain up to three decimal places. To achieve the best results for the following three methods, we recommend using the Zoom Data Extents icon ![]() (on the Graphics toolbar) in order to view all of the graphics.
(on the Graphics toolbar) in order to view all of the graphics.
-
By Easting - Select this option to enter a specific Easting value (X value).
-
By Northing - Select this option to enter a specific Northing value (Y value).
-
By RL - Select this option to enter a specific RL value (Z value).
Select by 3 points
Select this option to define the plane by digitising 3 points. To locate a point precisely, use the Snap to Objects ![]() or Snap to Points
or Snap to Points ![]() modes (on the Digitise toolbar). Points may be snapped onto underlays, such as block model slices or triangulations.
modes (on the Digitise toolbar). Points may be snapped onto underlays, such as block model slices or triangulations.
Using this option will allow you to explicitly define the location and orientation of a plane by indicating 3 points. The first two points define the bearing of the plane, and the third point defines the dip of the plane.
Click OK.
Subsequent selections have the same angle unless you exit the option and re-select.
Tip: Preselected design data can be used with this option, i.e. objects are selected prior to running the Rotate 2D option. Using preselected data will allow you to bypass the Multiple Selection box.

