Load
Use the Load option to load a plot file, which was generated in Vulcan or Datamine, into a nominated layer. You can then edit the plot file using the normal Design options.
Instructions
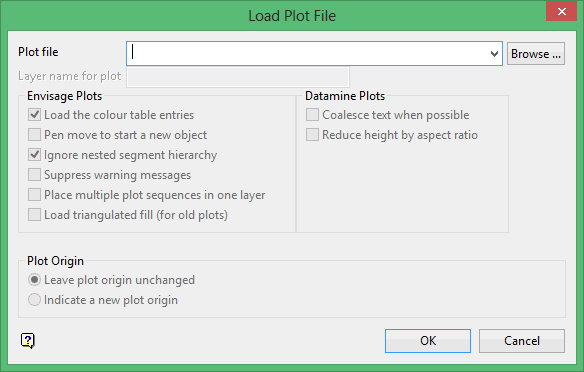
On the File menu, point to Plot Edit, and then click Load to display the Load Plot File panel.

Plot file
Enter the filename or select the file from the drop-down. Click Browse to select a file from a different location.
If you want to start the Plot Editor, then leave this field blank.
The following plot files are supported
-
-
Comclicked plot files (*.vpgz)
-
standard Vulcan plot files (*.vpgz, *.*p_plot, *.dhq, *.00_plot, *.plot)
-
Contour plot files (*.*c_plot)
-
Cross Section plot files (*.xsq)
-
Borehole Graphics hardcopy (*.bgq, *.bhg_plot)
-
Vulcan Legacy plot files (*.??q)
-
Datamine plot files (*.dm)
-
Note: Datamine plot file names must be in lower case.
Enter a layer name. The entire plot will be loaded into this layer.
To create a new layer, enter the layer name. The layer name:
-
- may contain up to 40 characters.
- must begin with an alphanumeric character [0-9] or [a-z].
- cannot include spaces.
- can include hyphens [ - ], plus signs [ + ], underscores [ _ ], periods/dots [. ].
- can include the special characters of ÁÂÃÀÇÉÊÍÓÔÕÚÜÑ that are used in the Spanish and Portuguese languages.
Layer name for plot
If the specified layer name matches that of an existing layer, which is currently loaded, then the plot information will be appended to the layer. However, if the layer name matches that of an existing layer, which is not loaded, then you will be asked whether you want to append to it, replace it or select another layer.
Vulcan Plots
This section of the Load Plot File panel will be unavailable when attempting to load a Datamine plot.
Load the colour table entries
Select this check box to load the colour table, which was current when the plot was created, with the plot. The colours of the plot will then match the colours used when the plot was created. This colour table will only affect the current Vulcan session.
Pen move to start new object
Select this Select this check box to start a new object for every pen move. With some complex plot files a very large number of objects can be created using this option. For example: a plot containing many pattern filled polygons. This may exceed the maximum number of objects that Vulcan can handle and consequently an incomplete plot will be produced. If this happens, then clear the layer containing the plot and reload the plot with this check box clear.
The Ignore nested segment hierarchy, Suppress warning messages and Place multiple plot sequences into one layer options relate to the manipulation of plot structures generated by legacy Vulcan (pre 4.5). These options have no effect on Vulcan generated plots (post 4.5). You may want to enable (check) all of these check boxes when loading Vulcan plots, as this will minimise the amount of interaction necessary.
Load triangulated fill (for old plots)
Select this Select this check box to retain the triangulated fill pattern that has been applied to plots created through earlier versions of Vulcan (pre 4.5). This check box does not normally need to be selected when loading plots generated through newer versions of Vulcan (post 4.5). However, if an older plot is loaded, and some filled polygons appear to lose their fill pattern, then we suggest that you try enabling this option.
Datamine Plots
This section of the Load Plot File panel will be unavailable when attempting to load a Vulcan plot.
Coalesce text where possible
Select this Select this check box to treat words that are separated by a space as a line. This to edit the words as an entire line in Vulcan rather than word by word.
Reduce height by aspect ratio
Select this Select this check box to use the Datamine character width for the size of the characters when loaded into Vulcan. If this check box is not checked, then the Datamine character height will be used.
Plot Origin
Leave plot origin unchanged
Select this option to map the plot to the (0, 0) position of the Plot Edit Window (that is, the left hand corner).
Indicate a new plot origin
Select this option to map the plot to a position other than (0, 0). This may be useful when loading more than one plot in the Plot Edit Window.
For example, to place several A3 sized plots on the same A0 sheet, load the first plot file with the plot origin unchanged (that is at 0,0). For the next and subsequent plot files, select this option and then indicate, with the mouse on the A0 sheet, where you want the plot to appear (the origin of a plot is the bottom left hand corner). When you are satisfied with the layout of your plots on the sheet, you can select the Create option.
Click OK.
If you chose to indicate a new plot origin, then you will first need to indicate the new position. The current window is then changed to the Plot Edit Window (if you are not already in this window) and the plot will start to load. If you left the plot file name blank, then only the Plot Edit Window displays.
As the plot file is loading, a percentage bar representing the progress of the loading process displays. You can cancel the loading at any time by pressing Esc. The plot data that is then loaded will equal the percentage of data shown by the progress bar before the Esc key was selected.
The plot file can be edited like any Vulcan object, for example through using the options under Object Edit, Point Edit etc.
Note: Existing objects that consist of text cannot be edited if they are in True Type Fonts.

