Create
Use the Create option allows a plot file to be produced from the current screen image. The total screen image will be plotted. As no item selection is offered, if there are items that are not to be plotted, then either make them invisible/shadowed or clear/delete them from the screen.
The generated plot file has the format:
<plot name>.plot
This option can only be used when in the Plot Edit Window.
Instructions
On the File menu, point to Plot Edit, and then click Create to display the Plot definition panel.
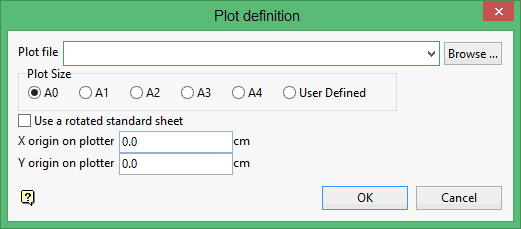
Plot file
Enter, or select from the drop-down list, the name for the plot file to be generated. The plot file will be put into your current working directory unless you enter a specific directory name or navigate to a directory using the Browse button. If the specified plot file already exists, then you will be asked whether or not you want to replace it, that is overwrite the "original" data.
Plot Size
The area to be plotted can be any area bounded by the A0 to A4 sheets. If you want to plot a different area, then select the User Defined option. This will allow you to draw a rubber band rectangle around the area to be plotted.
Defining the area yourself may be useful to make a plot that is bigger than the largest plot area available to your plotter. The plot can be made in separate sections by defining the rubber band over each section in turn.
If you use construction points, or type in coordinates for the corners of the rubber banded box, then you can get exact registration at the edges of the separate plots.
Use a rotated standard sheet
Select this check box to rotate the sheet, that is portrait rather than landscape. This option is only applicable when plotting from a standard sheet, that is A0, A1, A2, A3 and A4.
Tip: You can use normal Vulcan rotation and scaling to get plots to better fit a preferred paper size before plotting. Also, a plot can be split (see the Clip option) and two parts of a plot can be plotted side by side on the same piece of paper. Several plots can be loaded at the same time and arranged on the paper in order to minimise paper usage.
X/Y origin on plotter
Use this section to specify the origin position on the plotter.
Click OK.
You will then be asked whether or not you want to preview the plot. If you choose to preview the plot, then the plot displays in the Plot Preview Window. If you choose not to preview the plot, then the plot file name displays.

