Clip
Use the Clip option to select or split an area on the screen in order that it can be plotted directly or pasted onto another plot.
When editing a plot, it may become necessary to hide an area of underlying data in order to allow a clear view of an item you want to paste onto the front. For example: you may want to post a borehole plot onto an underlying picture or map. To see clearly the borehole, it may be necessary to hide the underlying information. Alternatively, you may want to select only the data in a small area of one plot to paste onto another plot, or you may want to split the data in a plot into two distinct parts.
The Clip option to perform all of these tasks by clipping data from the plot in a rectangular area.
Instructions
On the File menu, point to Plot Edit, and then click Clip to display the Clip area selection dialog box.
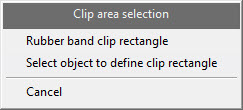
Rubber band clip rectangle
Select this option to indicate the diagonal corners of the clipping region. Click in the lower left and upper right corners of the region.
Select object to define clip rectangle
Select this option to select the object that defines the clip rectangle. Once the selection is confirmed, the rectangle displays.
The Clip action panel displays.
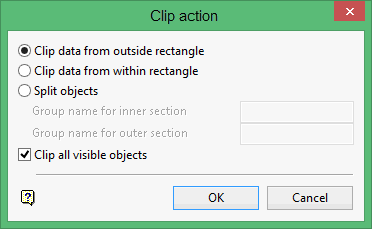
Clip data from outside rectangle
Select this option to discard data outside the rectangle.
Clip data from in rectangle
Select this option to discard data in the rectangle.
Split Objects
Select this option to split the data at the rectangle boundaries, but not discard it.
With this option you can also choose whether to nominate different group names for the objects in each part of the clip (the part in the rectangle and the part outside the rectangle). Leaving the Group name fields blank means that the names remain unchanged.
Tip: Giving different group names to the separate parts of a split makes moving the two parts independently easier! Refer to the Translate option (under the Design > Transformation submenu).
Clip all visible objects
Select this check box if you want all visible objects to be clipped or included in the split. If this check box is not checked, then you will be asked (via the Multiple Selection box) to select the objects that you want to clip or include in the split.
Click OK.
For text objects in the fonts Small, Medium, Normal or Large, a character falling mainly in the clip rectangle is regarded as being in the rectangle. A character falling mainly outside the clip rectangle, is regarded as being out the rectangle.
For text objects in any other font, the character will be included as at the boundary of the clip rectangle. The reason for this is that these fonts exist in the plot as line draws.

