Selection
Use this option to create a composite file using two nominated specification files.
Instructions
On the Geology menu, point to Compositing, and then click Selection.
Follow these steps:
-
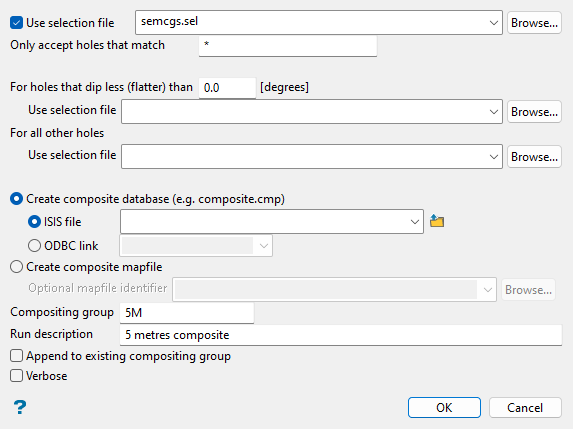
Select the Use a selection file checkbox if you want to limit the compositing to just those holes found in the nominated selection file.
-
Enter criteria in the Only accept holes that match field to limit the compositing to only those holes that match a specified name. Both the * (multiple character wildcard) and % (single character wildcard) may be used.
-
(Optional) Enter a value in the For holes that dip less (flatter) than field to specify a different specification file for the holes that dip less than the specified dip value. If no file is specified, then the holes will not be composited.
-
(Optional) Specify a different specification file in the For all other holes section for the holes that aren't applicable to the above-specified criterion. If no file is specified, then the holes will be ignored.
-
Choose between the options to Create composite database (e.g. composite.cmp) or Create composite mapfile.
-
Create composite database: Select this option to dump the composites into a database. You will then need to select between Isis file or ODBC link to create the nominated database type. Use the drop-down lists or the Browse... button to select an existing file, or enter a name to create a new file.
If you select to create an Isis file, keep in mind that although the drop-down list shows all database names, only a composite/samples database should be selected. To manually enter a new composite/samples database name, type the desired name, followed by a dot then a three-character composite extension of your choosing, and optionally a dot and the database identifier (i.e.
<database name>.<composite extension>.<isis>). The latter is only required if subsets of the database exist.Example: mydatabase.cmp.isis
-
Create composite mapfile: Select this option to dump the composites into an ASCII mapfile. The Optional mapfile identifier drop-down list contains all (
.map) files found within your current working directory. Click Browse... to select a file from another location. To create a new mapfile, enter a new file name.
-
-
Enter a name for the Compositing group (database index key) to which all composite information is related.
Example: Enter
RUN1to store composites built by a run length of 1 metre.This is especially useful for database composites as these may contain multiple sample groups. ASCII composite mapfiles may only contain a single group.
-
Enter text for the Run description to further describe the run. The maximum size is 40 alphanumeric characters.
-
Select the Append to existing compositing group checkbox if you want you to append the group to the same group of an existing database. This is only applicable when storing composites into an existing database. Since ASCII composite mapfiles only consist of one group, the compositing group specified above will overwrite the one in the existing ASCII composite mapfile.
-
Select the Verbose checkbox to generate a report for each hole, indicating the least (shallowest) dip for each hole during the selection process.
-
Click OK. A new window is then displayed and the composite generation process is run. Alternatively, click Cancel to close the panel without running.

