Reserves
Use the Reserves option to calculate the reserves between two surfaces in one or more polygons. These surfaces are defined by grids or data points, which must be displayed so that they can be selected in the usual manner.
The Reserves option is particularly useful in determining reserves between surfaces defined by survey points. This option to skip the step of actually creating two triangulated or gridded surfaces. The surfaces may be offset, up or down, to approximate roof and floor losses (or gains) in the case of a coal seam, or benches in the case of overburden.
The areas, volumes and tonnages displays through the Report Window, as well as stored in a generated text file ( .001 ). The units of measurement used are derived from the .dg1 file.
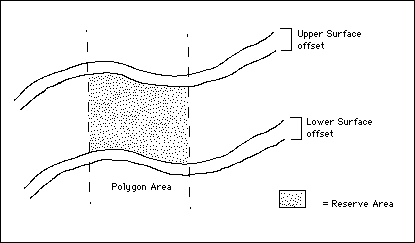
Figure 1 : Reserves between Surfaces
Instructions
On the Geology menu, point to Grid Reserves, and then click Reserves to display the Reserve Calculations panel.
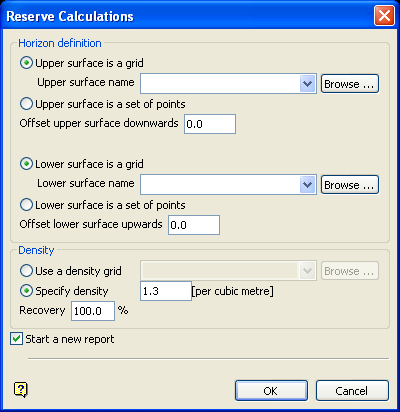
Horizon Definition
Upper surface is a grid
Select this option if the upper surface has been modelled as a grid, or is a surface parallel and offset above or below the modelled grid surface, for example a 90-foot bench above top of coal. You will need to specify the name of the upper surface. The drop-down list contains all supported grid files found in your current working directory. Click Browse to select a file from another location.
Upper surface is a set of points
Select this option if the upper surface is defined by a set of points, for example survey points. These points must be displayed on the screen.
Offset upper surface downwards
Enter the distance (in metres or feet) to move the upper surface. A positive value moves the upper surface downwards, i.e. to account for roof loss. A negative value moves the upper surface upwards, that is to account for roof gain or to define a bench above the surface.
Lower surface is a grid
Select this option if the lower surface has been modelled as a grid, or is a surface parallel and offset above or below a modelled grid surface. You will need to specify the name of the lower surface. The drop-down list contains all supported grid files found in your current working directory. Click Browse to select a file from another location.
Lower surface is a set of points
Select this option if the lower surface is defined by a set of points, for example survey points. These points must be displayed on the screen.
Offset lower surface upwards
Enter the distance (in metres or feet) to move the lower surface. A positive value moves the lower surface upwards, i.e. to account for floor loss. A negative value moves the lower surface downwards, i.e. to account for floor gain or to define a bench below the surface.
Density
Use a density grid
Select this check box to use a density grid. Density grids are used to model nonuniform densities. If your densities have not been sampled, or if they don't vary significantly over the reserve area, then you will not be able to model your densities with a grid.
You will need to specify the name of the density grid. The available drop-down list contains all supported grid files found in your current working directory. Click Browse to select a file from another location.
Specify density
If you are not using a density grid, then you will need to specify a density value. The value is specified as tonnage units per volume units. The volume units used displays on the panel for your convenience (for example [per cubic metre] or [per cubic foot]).
Recovery
Enter the recovery value (as a percentage) that is to be used to convert the in situ volume and tonnage to a recoverable volume and tonnage. The recoverable value is the in situ value multiplied by the recovery percentage.
Start a new report
Select this check box to start a new report section in the Report Window and overwrite the contents of the generated text file. If this check box is not ticked, then the resulting information will be appended to the calculation information in the Report Window as well as in the generated text file. The Start a new report check box is only available when the Reserves Calculations panel is redisplayed, i.e. after the reserves have been calculated.
Click OK.
If either the upper or lower surface is a set of points, then you will need to select the points to define the surfaces. These points can be selected by object, group, feature or layer. If both of the surfaces are defined by points, then you will need to repeat the above procedure for the other surface.
Once the points for the surfaces have been selected, or if both surfaces are grids, the selection criteria for the reserve polygons can be specified. Again, this can be done by category (refer to the Multiple Selection box described in the introduction to Vulcan).
The calculated reserves displays through the Report Window, as well as stored in a generated text file ( .001 ). The Reserve Calculations panel will also be redisplayed.
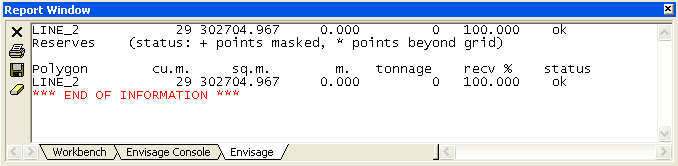
Figure 2 : Report Window Output

Figure 3 : Example Report File
| Abbreviations | |
|---|---|
| cu.m | Cubic metres (volume) |
| sq.m | Square metres (area) |
| m | Metres (thickness) |
| rec% | Recovery percentage (defined through the Reserve Calculations panel) |
| status | Status of the polygons or grids used. Possible values are:OK - No issues |

