Resource Polygons
Use the Resource Polygons option to create resource polygons based on distances from drillholes or points of observation. The Resource Polygons option will first create circles around each point before merging the overlapping circles to create the resulting polygons. In order for a point to be used in the polygon creation it must intersect with two other circles. The Resource Polygons option is particularly useful for geologists that want to create polygons for resource reporting.
The Resource Polygons option is able to create polygons with up to three different radii, unlike the Design > Polygon Edit > Radii option, which only creates polygons of a single radius.
Note: The resulting polygons will be created at the default Z value.
Instructions
On the Geology menu, point to Grid Reserves, and then click Resource Polygons to display the Resource polygons panel.
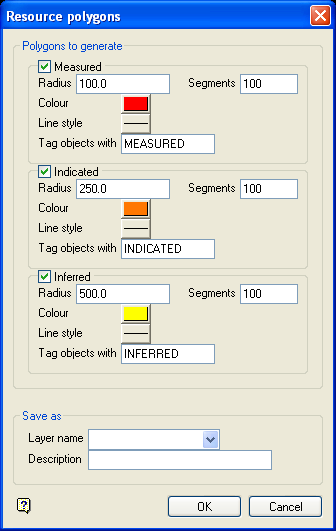
This panel allows for the creation of up to three types of resource polygons: measured high level of exploration confidence), indicated (reasonable level of exploration confidence), and inferred (low level of exploration confidence). In the following diagram, measured polygons are coloured red, indicated polygons are coloured orange and inferred polygons are coloured purple.
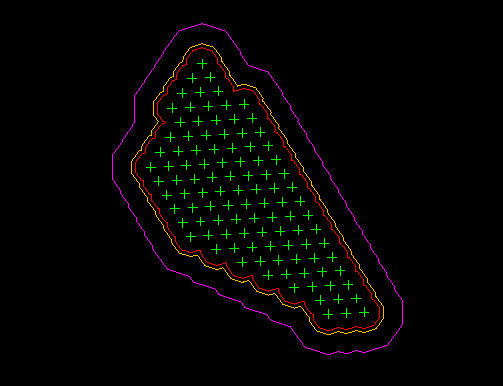
Figure 1 : Resource Polygons
Polygons to generate
Measured
Select this check box to generate a "measured" resource polygon. You will need to specify the radius and number of segments for the circle displayed at each point, as well as the colour and line type that will be used when displaying the resulting resource polygon. By default, the resulting resource polygon will be assigned an object name of " MEASURED ".
Indicated
Select this check box to generate an "indicated" resource polygon. You will need to specify the radius and number of segments for the circle displayed at each point, as well as the colour and line type that will be used when displaying the resulting resource polygon. By default, the resulting resource polygon will be assigned an object name of " INDICATED ".
Inferred
Select this check box to generate an "inferred" resource polygon. You will need to specify the radius and number of segments for the circle displayed at each point, as well as the colour and line type that will be used when displaying the resulting resource polygon. By default, the resulting resource polygon will be assigned an object name of " INFERRED ".
Save as
Layer name
Select the layer that will be used to store the resulting polygons.
Description
Enter a description to further describe the contents of this layer. The description can be up to 80 alphanumeric characters and may include spaces. If a description is not entered, then a default description will be used instead. If the chosen layer already has an assigned description, the description displays when the layer is selected. Existing layer descriptions can be overwritten.
Tip: The Design > Layer Edit >Name option can be used to change the layer name and description.
Click OK.
The Multiple Selection box is then displayed. From the displayed dialog box, nominate a selection method followed by the objects that you want to use as centroids. Cancel when you have finished selecting the desired objects.
You will then be prompted to create resource polygons or to cancel. Upon confirmation, the polygons of influence will be created around the selected objects. The Resource polygons panel will also be redisplayed, allowing you to generate additional radial polygons. Select the Cancel button to exit the option.

