Define Sections
Use the Define Sections option to define one or more sections in which to carry out interpretations and produce resources. Sections are stored in a default layer named < interpretationcode_.
Note: Once the sections have been defined, you will need to set the working section (through using the Working Section option) to carry out any of the digitising, building and reporting options.
Instructions
- Select Geology menu
- Select Section Resources submenu
- Select Define Sections option
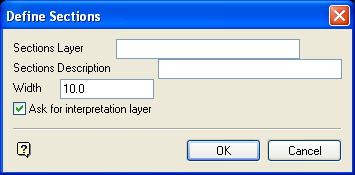
The following panel displays.

Define Sections panel
Sections Layer
Enter the name of the layer in which to store the sections. The maximum size is 40 alphanumeric characters (no spaces allowed). The default layer name is < interpretationcode_.
Sections Description
This is an optional field of 80 alphanumeric characters used to describe further the sections layer. The default description is " Sections for < interpretationcode interpretations ".
Width
Enter the total width of the section. This value must be greater than 0 (zero).
Ask for interpretation layer
Select this check box to be prompted for an interpretation layer for each section that you define. The interpretation layer is the layer into which interpretations and zones will be stored (see the Digitise Contacts option).
If this check box is not ticked, then the interpretation layers will be generated automatically and their names will be based on the interpretation code and either the Easting or Northing of the section.
Example:
DEMO10826I>
where DEMO = interpretation code, 10826 = section number (i.e. Easting or Northing of the section), I = interpretation, P = polygons (zones). The interpretation layer name also becomes the section"s object name.
Select OK.
The Define Section dialog box is then displayed. If you ticked the Ask for interpretation layer check box (on the Define Sections panel), then you will first be prompted for an interpretation layer for each section that you create.
The Define Section dialog box, which allows you to select the required method to define the section, consists of the following options;
Manual
Select this option to define sections one at a time. Once selected, you will be prompted to define the section (by digitising the start and end point).
Once defined, you will be prompted to indicate a new section. Cancel to return to the Define Section dialog box.
Orthogonal
Select this option to create sections orthogonal to an Easting or Northing.
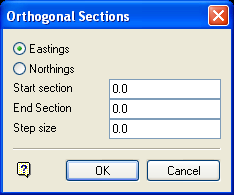
Once selected, the following panel displays.

Orthogonal Sections panel
Eastings
Select this option to generate sections orthogonal to a line between two Eastings.
Northings
Select this option to generate sections orthogonal to a line between two Northings.
Start/End section
Enter the Easting and Northing at which to create the first and last section.
Step size
Enter the distance between the centre of successive sections.
Select OK.
You will then be prompted to digitise two points that define the section. Once the points are digitised, you will be returned to Define Sections dialog box.
Perpendicular
Select this option to create sections perpendicular to a line.
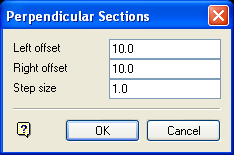
Once selected, the following panel displays.

Perpendicular Sections panel
Left offset
This is the distance to the left of the perpendicular line to extend each section.
Right offset
This is the distance to the right of the perpendicular line to extend each section.
Step size
This is the distance between the centres of successive sections.
Select OK.
You will then be prompted to digitise the line along which the sections are to created. Once this line has been indicated, you will be returned to the Define Section dialog box.

