Conversion Setup
Use the Conversion Setup option to convert and transfer Washability tables. This option is the core of the Wash Conversion module. The conversion process is by its nature a batch operation.
In this section, you set up the specifications that will be used to define the data selection of Washability Tables from the Mincom style data to a Maptek structure. This defines the horizons to select, the size fractions that will be extracted and/or combined, and the final structure of the wash-tables that will be created from Mincom data. The actual conversion happens when the Run Conversion option is selected from the submenu.
Note: This option only converts and transfers Washability Tables (i.e. gravity separation data). The other data types (froth and slimes) stay in the Mincom style database and are combined with float information only when a query is undertaken. These data are not converted at this stage. The reason for this is that the Washability Data subsystem is used only to display and query Wash Curves from gravity separation, so there is no point in converting data other than these.
Instructions
On the Geology menu, point to Wash Conversion, and then click Conversion Setup to display the Wash-Curve Data Transfer Specifications panel.

Wash data transfer specifications
Specify the name of the specifications. The drop-down list contains all the defined specification files that reside in the wash_curve sub-directory of the resource directory, and are named as name.
Click OK.
The following panel is then displayed. If you entered a new name (for new specifications), then the Wash-Curve Data Transfer Specifications panel displays first.

Wash-Curve Transfer Specifications panel
This panel allows you to enter new data transfer specification or to create a specification by copying and editing an existing specification.
Select OK.

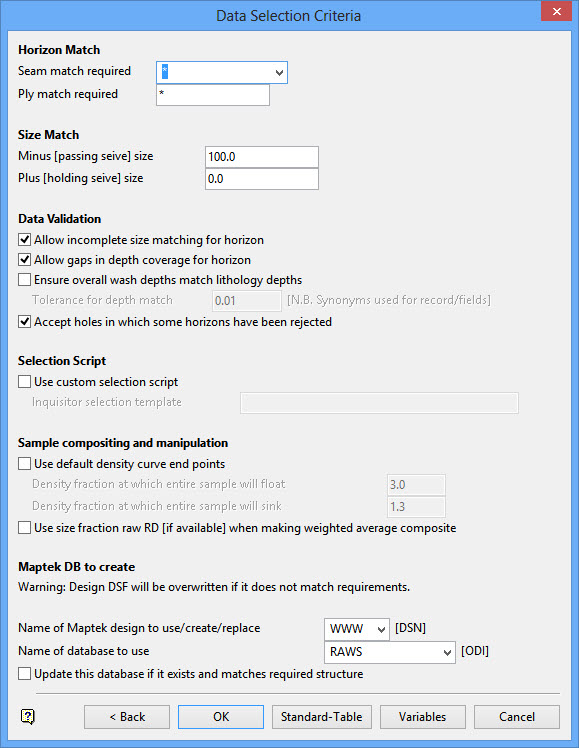
There are six sections to the panel, for which specifications have to be defined:
- The horizon selection.
- The size fraction selection.
- The level of data validation required.
- User definable selection script (if you don"t want to use the standard one).
- Some specifications which can (optionally) be used to control sample compositing.
- The name of the datasheet (design) and database that contains the Maptek style data.
There are also two tables which need to be defined. These are accessed by the Standard-Table and Variables buttons. The Standard-Table defines the number of float fractions required in the converted data and their specific-gravities. The Variables allows you to select which variables you want converted.
Horizon Match
Enter the name of the Seam(s) and
Note: If you do not have ply defined separately for your data, then always use the default wildcard "*" for this selection.
Size Match
Enter the upper and lower size fractions wanted. These must exist as distinct fractions in the data. As there is no statistically acceptable method of subdividing a sample size fraction, if it is not possible get the size fraction required, the horizon will be rejected and a comment to that effect will be added to the log file. However, it is possible to combine size fractions to achieve the fraction required.
Thus, if a number of samples have been made which cover the size fraction; for example:
SAMP1 - 0.5 - 5.5
SAMP2 - 5.5 - 7.7
SAMP3 - 7.7 - 12.7re
The wash tables for these sample fractions  will be composited (by mass weighted averaging techniques) to produce  a sample for the required size fraction. There may be more than one way  of achieving the required size fraction, for example there may also be a sample  for the same horizon in the same hole that has:
SAMP4 - 0.5 - 12.7re
covering the interval in one sample. The software will pick the first solution it comes to in this situation. However, Â if the only samples available for a horizon were, for example:
SAMP5 - 0.5 - 5.5
SAMP6 - 5.5 - 7.7 re
this would not cover the required fraction  and the horizon will be rejected. Likewise, if the only sample available  were, for example:
SAMP7 - 0.5 - 25.0re
this is too large a sample range and cannot  be mathematically treated to obtain data for a smaller size fraction,  so it would be rejected.
Data Validation
The fields in this section allow you to control  the acceptance or rejection of data when items are missing or incomplete.
Allow incomplete size matching for horizon
If it is not possible to composite size fractions  to obtain a compete size cover for the range required, then the default  situation is to reject the data. If this check box is selected, then:
SAMP5 - 0.5 Â - 5.5
SAMP6 - 5.5 - 7.7
would be accepted. As would a situation of:
SAMP5 - 0.5 - 5.5
SAMP6 - 5.5 - 7.7
SAMP7 - 7.7 - 25.0
the first two samples would be included in the composite as an incomplete size fraction.
Allow gaps  in depth coverage for horizon
If the depths  for a horizon on the sample(s) or in the lithology (see below) cover a particular depth range, but the washability data does not, then the horizon  will be rejected. This can be because data is missing, deliberately not  measured (for example a stone band), or even because a parting/sample has been  rejected as part of validation. Checking this box will allow data with  gaps to be accepted.
Ensure overall wash depths match lithology depths
The use of lithology is optional. They can, however, be useful. If a sample is missing  from the top or bottom of a horizon range and we do not use lithology, then it would be impossible to tell that it was missing (there being no  data covering the missing depth). By selecting this option the depth of  the horizon in the litho is compared with that covered by the samples  and rejected if they do not match. A tolerance for the mismatch is definable. If you have chosen to include lithology in the Mincom style database, then you will need to have defined the lithology synonyms for that database  in order to use this feature.
Accept holes  in which some horizons have been rejected
Normally, if any validation fails a sample is rejected. If a sample is rejected,  then the horizon may be rejected if there are no other matching samples to fill the gap. If a horizon is rejected, then the whole hole is rejected.  Selecting this option allows these incomplete holes to be accepted. This  practice is not recommended.
Selection Script
Primary selection  of washability tables is made using the relational database selection  tool Inquisitor. If for some reason the standard Inquisitor script template does not make the exact selection you require (for example if different field  values control raw coal definition in a non-Mincom database), then you  can supply your own version of this template. It is highly unlikely you  will ever need to use this facility.
To use this, you will need to be able to construct a template file along the lines of the default (found in the $ VULCAN_FLIB directory and called
Sample compositing  and manipulation
Normally, the composite Wash Tables are produced only from the data available. Therefore, values determined for a new table that contains float fractions outside  the range of measured data rely on being able to extrapolate the curves obtained form the table. This is achieved by some fairly sophisticated  statistical techniques. However, as with all extrapolation it can become unreliable the further the extrapolation is from the data.
Use default  density curve end points
Select this  option to control the end points of the washability curve graphs rather  than have them extrapolated. If you choose to use this option, then you  are prompted for the SGs at which the entire sample might be expected to float and sink.
Note: You must understand your  data in order to use this option. Merely guessing will produce much less  satisfactory results than allowing extrapolation. Also, you are specifying  global defaults, so if your site is very variable do not use holes from too large an area.
Use size  fraction raw RD [if available] when making weighted average composite
Select this option to use the raw coal fraction RD value (from the sample record) when calculating mass weighted averages. If this value is not entered (i.e. is left as zero) or this option is not selected, then the sample
Maptek DB to create
Select the name of the datasheet for the Maptek version of the data that will be created. This does not have  to exist already as it will be created by Vulcan with the appropriate  information. It is a good idea not to give the name of a datasheet in  use for other things as this and all associated databases will be deleted. Likewise, select or enter the name of the database to be created.
Normally, a new database will be created for each conversion run. However, you can select to update an existing database if you want. This can be useful if you are converting data where there are two separate and incompatible size fraction regimes (for example  data gathered at different times and analysed differently). But note, the database can only be updated if the structures of each run are the same. The structure depends upon the float fractions defined in the Standard  Wash Table and the variables defined in the Variable table. You must keep these the same to combine two or more conversion runs into the same Maptek database.
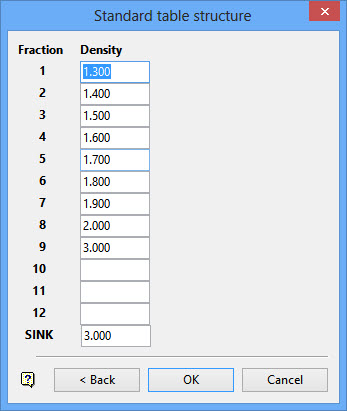
The button labelled Standard-Table displays the following panel.

This panel allows you to define a standard float/sink washability table structure for the converted composite tables to take in the Maptek version of the data. This does not have to match any of the wash tables in the original data, but the closer the resemblance the more accurate the composite. If, a table with 10 fractions is interpolated from an original table with only three, then you will not gain any additional accuracy that you would have obtained by performing the necessary tests. It is merely an interpolation from the original data.
Enter the upper SG of the flotation fraction. A sing fraction should also be given which should have the same
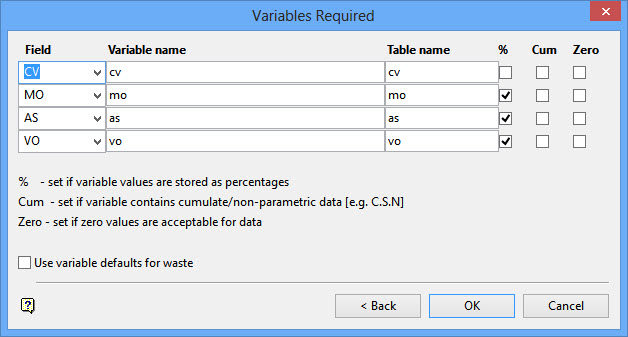
The button labelled Variables display he following panel.

This panel allows you to select which variables you want included in the Maptek version of the data. A maximum of 4 variables can be used. However, it is often better to only do one variable at a time, depending on the quality of your data. If there is a problem with any one variable (i.e. not measured), then that sample is rejected. Select the field name  containing the variable of interest, enter the variable (long) and table (short) names (used for graphs and reports in the Washability Data sub-system) and check the appropriate boxes against each variable.
To remove a variable, highlight the variable name and click the [Delete] key.
%
Select this check box if the variable is measured as a percentage.
Cum
Select this check box if the data is already in a cumulative or non-parametric form (as in crucible swell number
Zero
Select this check box if zero values are acceptable for this data.
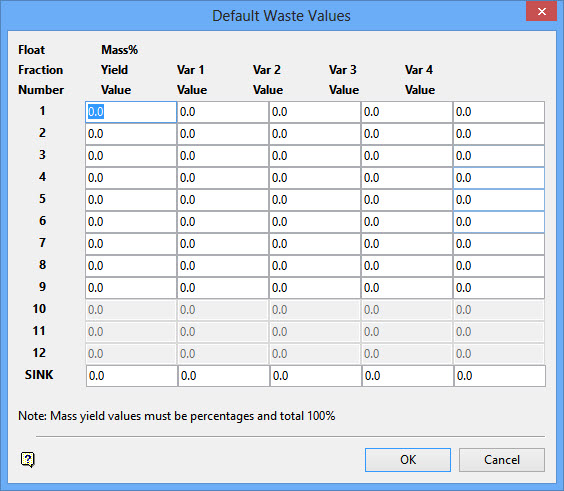
If you want to utilise default variable values for waste (i.e. unmeasured partings which may be rock rather than coal), then check the Use default values for waste check box. The Default Waste Values panel displays if you have already set up a standard table. Otherwise, you will be prompted to do that first.

Only those fields corresponding to the fractions set up in the Standard Table and the variables chosen will be available for entry.]
Mass Yield must total 100% including the sinks. Prior to Vulcan 4.0, the sink was updated automatically on the panel as 100 (sum of the fractions), but in newer versions of Vulcan, you will need to calculate this yourself.
If you have specified default waste values, then the Data Selection Criteria panel (the first panel) is redisplayed with an added Defaults button. This button allows you to go directly to Default Waste Values panel to edit the defaults. This button will also appear on this panel when you edit existing specifications that have default values defined.
You will not be able to select OK on the Data Selection Criteria panel unless the default values are set up correctly. If you decide you do not want default values, then go to the Variables Required panel and clear the Use default values for waste check box. The Defaults button will then be removed from the main Data Selection Criteria panel.
Using default values for waste allows a more accurate wash table to be calculated where mining will be taking everything in a horizon including dirt partings that were not analysed for washability, but are known to be of poor quality. Waste is defined as intervals between the top and bottom of the horizon for which there is no available washability data.
Note: If you have allowed the acceptance of holes where horizons or intervals have been rejected, then Vulcan will not be able to distinguish between missing intervals cause by bad data or because they are non-analysed dirt bands or partings. Thus, be aware of this when using default waste values or you may bias a seam towards poorer coal quality when it is just bad data.
When using default waste values, these defaults will be included in the mass weighted average for horizon proportionately for the missing intervals. If defaults are not used, then the mass weighted average is calculated using only the measured data that is available, as though there were not partings. Therefore, only a measure of the coal quality not the entire mined section in the event of there being dirt bands.
Click OK.
The specifications are validated and written to file in the wash_curve subdirectory of the project directory as name.

