Assignment Rules
The Assignment Rules cell on a row will only be enabled if one or both of Rules for Source or Rules for Grade-Block check-boxes have been ticked.
If the Assignment Rules cell is enabled then rule(s) must be set for that cell. The cell will contain the words ‘Set’ or ‘Unset’ to indicate the current status of the rules for that row.
Note: Assignment Rules are never set for the special attribute ‘Volume’, because the explicit volume of the item is always used. So this cell will always be disabled.
Setting the Assignment Rules
Selecting the button with the ellipsis on an enabled Assignment Rules cell will cause the edit/display panel for the rules on that row to be displayed.
There have been a number of changes and improvements made to the Assignment Rules setting with the new grade control. Rules can be set using either the standard condition/value form (similar to Legacy GC) or via the new, more flexible, programmatical rule format.
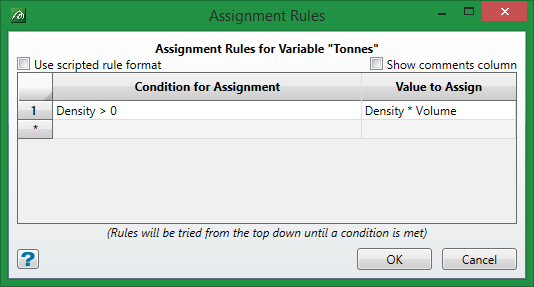
Standard Condition/Value Rules
The standard assignment rules panel will be displayed by default when entering assignment rules for the first time (as shown above, but with no data in it). The format of this is
if this ‘Condition’ then use this ‘Value’
Each condition statement is evaluated in turn – if that expression is true then its associated value is assigned to attribute and evaluation is stopped. It is advisable to have a catchall condition at the end (e.g. above ‘1’ - always true) in case none of the conditions above hold.
The syntax for the conditions is explained in the appendix. Note that the names of the attributes used in the conditions are case-insensitive.
As can be seen in the example above, using multiple variables in the determination of a value can become increasingly difficult as more values are needed. In the above case, only two values are being used, but for different categories of the second value the conditions of the first have to be repeatedly checked for each category. As more variables are used, so the number of checks increases exponentially. For this reason we have introduced the new option of Programmatical Rules to simplify the setup of categories dependent upon many attributes.
Programmatical Rules
By ticking the check-box ‘Use programmatical rule format’ the rules panel switches to a text-editor form which allows for programmatical rules to be written.
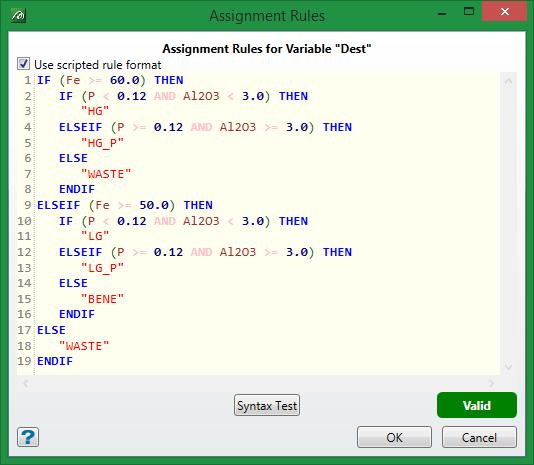
The example above shows the same rules from the standard example rewritten in programmatical form. While this does not dramatically indicate the simplicity of programmatical rules over standard rules (because only two attributes are involved) you can see that the maximum number of expression evaluations has considerably reduced. In this example, the programmatical rule will never require more than 3 expression evaluations to complete. Whereas the standard version of the same thing could require a maximum of 10 expression evaluations (even the catchall ‘1’ requires evaluating). This is a considerable improvement in efficiency.
Programmatical Rule Productivity Tools
There are a number of productivity tools incorporated into the programmatical rules panel to aid the creation of rules. These are linked to the function keys:-
-
F9 shows syntax structures
-
F10 shows a list of built in variables and the attribute names
-
F11 shows a list of the built-in variables
With all of these function keys a selection list pops up from which items can be selected. Selecting an item inserts that item at the current cursor position. This panel can be resized in the standard way to allow for ease of viewing when setting up large complex rules. Allied to this, the Text Editor provided by the New Workbench can be used, if required, to edit programmatical rules. Simply cut and paste the rules back and forth – this panel and the editor both respond to the standard text editing control keys (see right-click menu in the panel). In the Text Editor select ‘Assignment Rules’ from the syntax highlighting selector to obtain the same syntax highlighting as on the panel (F9/F10/F11 options are available in the editor).
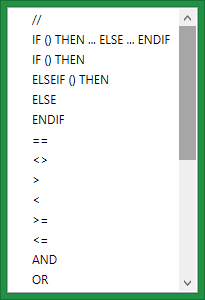
Syntax (F9)
Pressing F9 causes this syntax selection item to appear. Selecting an item from it will insert that item into the text at the current cursor position and then move the cursor to the most likely next position wanted.
For example, if the IF () THEN structure were selected it would be inserted into the text and the cursor would be placed between the brackets () because the most likely next entry would be an expression.
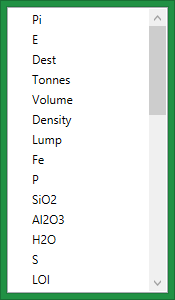
Variables (F10)
Pressing F10 causes this variable selection item to appear. Selecting an item from it will insert that item into the text at the current cursor position.
The list contains the built-in variables Pi and E followed by the user’s attributes in their supplied sequence.
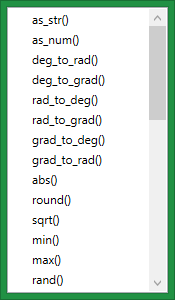
Functions (F11)
Pressing F11 causes this function selection item to appear. Selecting an item from it will insert that item into the text at the current cursor position and then move the cursor to the most likely next position wanted – between the brackets of the function call.
Set/Unset

The setting of the Set/Unset display item on the Assignment Rules cell will depend on the contents of panel.
If the ‘Use programmatical rule format’ check-box is not ticked, the item will only be Set if there is at least one rule defined – irrespective of there being programmatical rules defined.
Likewise, if the ‘Use programmatical rule format’ check-box is ticked, the item will only be Set if there is something types in the programmatical text entry section – irrespective of there being any standard rules defined.
The presence of the Set flag is no indication of the validity or syntactical correctness of any rule defined. But these will be check by the validation routines (either when loading the specs or specifically checking them) and a detailed description of anything invalid will be provided at that time.
Data Typing in Assignment Rules
Unlike Legacy grade control the V2 version strongly checks data types and will not allow them to be mixed together unless the user explicitly specifies this. The Legacy system allowed expressions to be written that mixed strings and number together without warning the user – the results of which were often unexpected.
So, with Grade Control V2 we cannot, for example, simply concatenate a string and a number in an expression; e.g.
GB_Name + Block_Num
where, GB_Name is STRING and Block_Num is INTEGER
This now has to have the Block_Num converted to STRING using the built-in function as_str() so that the assignment must now be written as
GB_Name + as_str(Block_Num)
This might seem an annoyance, but consider if the user had mistakenly typed
Block_Num + GB_Name
The old system would have converted the GB_Name to a numeric under-the-hood (which would be zero) and thus set the return result to numeric just the Block_Num value – which would have been converted back to a string and assigned something quite unexpected. The new system ensures that the user gets explicitly what they asked for.
Defined Variables
Certain special system defined variables are available for both types of assignment rules. These are items which begin with an underscore (a complete list of those available is in the appendix).
We will discuss one specifically here. That is the variable _this which is used to refer to the attribute on which the rule is being defined. Its purpose is to allow identical rules to be copied and pasted across several rows without them having to be edited.
Imagine a rule such as
Fe != -999
i.e. if Fe is not the default, set a weight 1 (the alternative to set it 0).
That would be fine for the Fe row, but if copied to the next row (e.g. Al2O3) it would still be referring to the Fe row value not the next row’s data value. By changing this test to be
_this != -999
would have exactly the same effect on the Fe row, but would allow the assignment rules to be copied to any other row and refer to that row’s value without needing editing. A worked example of this is shown in the block-model weight rules.

