Slice toolbar

|
Icon |
Tooltip |
Description |
|
n.a. |
Clip |
Allows selection of clipping direction, i.e. clip forwards, backwards, with shadow or around the slice. |
|
n.a. |
Step |
Sets the distance to be moved for the Slice Backwards/Forward icons. |
|
n.a. |
Front |
Sets the visible width in front of the slicing plane. |
|
n.a. |
Back |
Sets the visible width behind the slicing plane. |
|
|
Highlight Intersections |
Draws polygons of intersection whenever a triangulation intersects with the clipping plane. |
|
|
Clip Translucent Solids |
Allows you to enable/disable the clipping of translucent triangulations. |
|
|
Move Slicing Plane |
Allows you to drag and move the slicing plane displayed through the use of the mouse. When this option is selected the cursor will change to a hand. When the slicing plane is aligned, you are able to move the slicing plane forwards and backwards by dragging up and down with the mouse. However, if the slicing plane is not aligned, then the slicing plane will follow the mouse's movements. For example: If the slicing plane is aligned and you move the mouse downwards, then the slicing plane will move forwards. If the slicing plane is not aligned, and you move the mouse to the left, then the slicing plane will be moved left. |
|
|
Align View With Current Slicing Plane |
Changes the view perpendicular to the current slicing plane. |
|
|
Snap Slice to Nearest Slice Step Multiple |
Allows you to snap the slice to the nearest slice step multiple, relative to the original slice. |
|
|
Slice Backwards |
Moves the current slicing plane backwards through space. The distance moved will be equal to the specified stepping distance. You can also use the Page Down key to move backwards through the slicing plane. Use the Shift + Page Down keys to move the current slicing plane backwards through space by snapping to an exact multiple of the slice step, relative to the initial slice creation position. |
|
|
Slice Forward |
Moves the current slicing plane forwards through space. The distance moved will be equal to the specified stepping distance. You can also use the Page Up key to move forwards through the slicing plane. Use the Shift + Page Up keys to move the current slicing plane forwards through space by snapping to an exact multiple of the slice step, relative to the initial slice creation position. |
|
n.a. |
Display |
Defines the intensity of the slicing plane's graphical representation. If the slider value is set as 0, no slicing plane displays unless in Modify mode. If the slider value is set to full, then the slicing plane will appear to be solid. |
|
n.a. |
Current |
This displays the name of the current slicing plane. Refer to the View > Create Section option for information on naming sections. You can use the drop-down list to switch between slicing planes. |
|
n.a. |
Line Width |
Use this option to change the intersection line thickness of triangulations in section view. |

|
Reverse View | Use this option to reverse the view when you are in section view. |
|
|
Slice Predefined Backwards |
Moves to the next predefined slice backwards. The distance moved will be pulled from the predefined section specification file. Use the CTRL + Page Up keys to move to the previous predefined slicing plane. (backwards in space) |
|
|
Slice Predefined Forward |
Moves to the next predefined slice forward. The distance moved will be pulled from the predefined section specification file. Use the CTRL + Page Down Keys to move to the next predefined slicing plane. (Forwards in space) |


The slicing plane displayed is the intersection between the slicing plane and the 3D grid. This is the case even if the 3D grid is not activated.
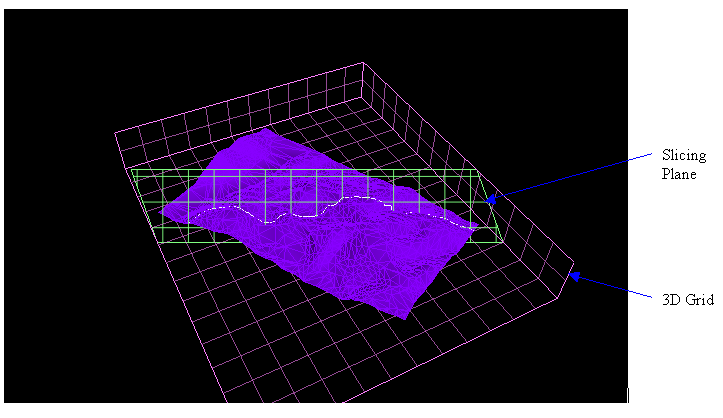
Figure 1 : Slicing Plane/3D Grid

