Getting Started
To start this tutorial, you will need to create an external database (our tutorial will use Microsoft Access) with values and a new project in Vulcan with design data.
Creating the Dynamic Positioning table
Creating the Datatips Database table
Creating the DG1 and the Design Database
Setting up a Haulage Route Design Object
Creating the Database
- Create a new folder called
Intelligent_Objects., for examplec:\Intelligent_Objects. - Create a new database in your
Intelligent_Objectsdirectory calledIntelligent_Objects.Ensure that there are no spaces in this database file name.
To be able to run Intelligent Objects, you now need to create some tables of data.
Creating the Dynamic Positioning table
To run through the Dynamic Positioning tutorials, you will need to set up the following table.
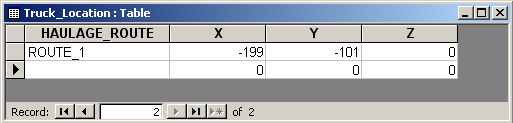
- In your
Intelligent_Objectsdatabase, create a table calledTruck_Location, which has fields,HAULAGE_ROUTE,X,Y, andZ.This table will hold information about the location of a haulage truck at any point in time. In a real world example, this table would be continually updated for the X, Y, Z truck location. - Set the field types as follows:
Field Name Data Type Field Size HAULAGE_ROUTE Text 10 characters X Number Single Y Number Single Z Number Single - Enter the following values into your table:
Figure 1 : Truck_Location Table
- Save the database.
Creating the Datatips Database table
To run all other tutorials, other than the Dynamic Positioning tutorial, you will only need to create the Datatips database table.
- Create a new table called ‘
Haulage_Information’, which has fields,HAULAGE_ROUTE,TRUCK_TYPE,CAPACITY,AVG_CYCLE,LOAD_SPEED, andEMPTY_SPEED.
This table will hold information about the haulage route and trucks used for this. This information can be gained through using the options under the Open Pit > Haulage Profile submenu. - Set the field types as follows:
Field Name Data Type Field Size HAULAGE_ROUTE Text 10 characters TRUCK_TYPE Text 10 characters CAPACITY Number Single AVG_CYCLE Number Single LOAD_SPEED Number Single EMPTY_SPEED Number Single - Enter the following values into your table:
Figure 2 : Haulage_Information Table

- Save the database.
You now need to establish an ODBC data source that will enable you to connect to the external database while using Vulcan. Refer to the ODBC Interface documentation for steps on setting up the ODBC link. Name your data source Intelligent_Objects.
Creating the DG1 and the Design Database
- Start Vulcan by double-clicking on the Vulcan button or selecting Vulcan from the Windows Start bar.
- Double-click on the word
Browsein the Vulcan Work Area section of the Vulcan 3D Software panel. - Browse to the
Intelligent_Objectsfolder and click OK. - Click on Vulcan.
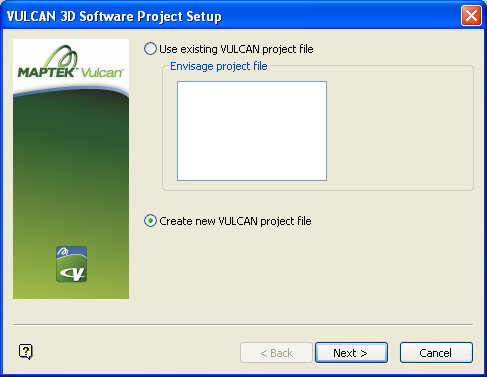
- Select the Create new Vulcan project file option and click Next.
Figure 3 : The VULCAN 3D Software Project Setup Wizard
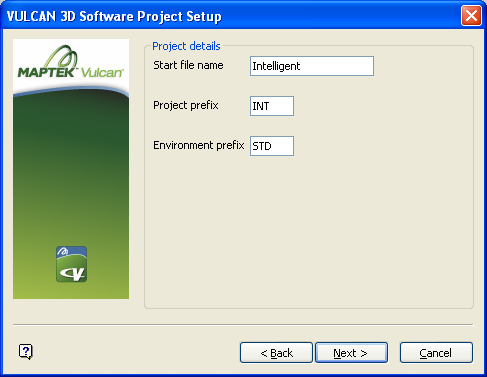
- Enter the following values:
Figure 4 : Project Details
- Click Next.
- Enter the following values:
Figure 5 : Project Details
Leave the remainder of the panel set to its default values.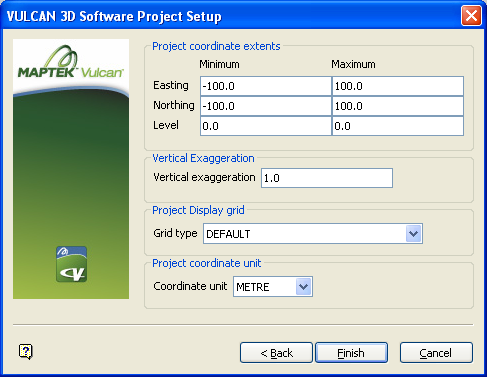
- Click Finish.
- On the Create New Design Database panel, enter
Intelligentand select the Load when starting VULCAN check box.Figure 6 : The Create New Design Database panel
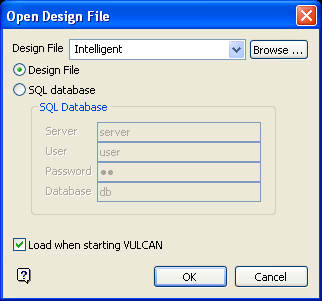
- Click OK.
Setting up a Haulage Route Design Object
The first option that you will use is the Datatips Information tool. To do this, you will need to digitise a design object to link the datatip to. In this case, the datatip will be linked to a haulage route (as the datatip gives information about that haulage route).
- Create a new line in a layer called
HAUL_ROUTE. - Using the
 Key in Point Data tool, key in the following coordinates for the line.
X Y Z -86 -26 0 -32 5 0 20 12 0 90 -14 0 - Right-click once to finish digitising the line, followed by another right-click to exit out of the Key in Point Data tool.
- The line object needs to be assigned an object name that will match the haulage route. Using either the Design > Attribute Edit > Name option or the Properties Window, assign the line an object name of
ROUTE_1.
Figure 7 : The 'ROUTE_1' Object
- Click the
 Save button to save the design layer.
The data created through this tutorial can now be used to work through the remainder of the Intelligent Objects tutorials.

