Tutorial - Multivariate Transformations
Principle Component Analysis (PCA)
The dataset for this tutorial is in the PCA_Demo file. (Click the link to download the dataset.) Extract and save the dataset as a separate working folder from which you can open Vulcan.
On the Geology menu, point to Samples, then click Principle Component Analysis to display the following interface.
![]()
By default, the window will open on the Forward Transformation pane. Leave it on this tab.
-
Specify a parameters file. Begin by clicking inside the parameters file textbox and typing a naming for your specification file. The extensions < *.MVT.SPEC > will be added automatically.
-
Specify a scenario ID name by clicking the
 New icon.
Type the name into the window that pops up. Click OK.
Forward Input
-
Select Isis File, then select the nilat3d.sam.isis database from the drop-down or by clicking browse.
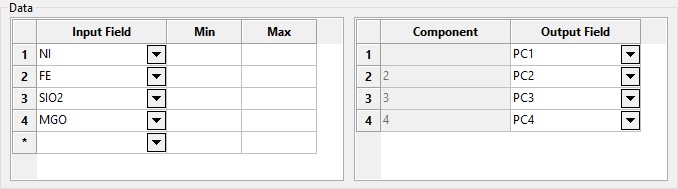
Data
This section is split in half vertically. On the left; specify the original input fields, of which there could be many. On the right; specify the fields for the output components. There are two grids for two reasons: First, to avoid associating an input variable with a particular component. We are going to transform Ni, Fe, MgO, and SiO2 into PC1, PC2, PC3, and PC4. But it isnotas if Ni becomes PC1, Fe becomes PC2, and so on. Secondly, there could be many input variables and relatively few principal components. Having a second grid allows that use case.
-
Fill out the input and output fields as shown above.
-
For the input fields there are optional columns for Min and Max. We will leave these blank. Because PCA requires completely homotopic samples (every variable in every row) these variables can substantially reduce the data that is used.
Settings
Weights
An arbitrary number of weighting variables can be used. They are just multiplied together. However, in this example we will not use any.
Standardize variables
The checkbox to standardize variables should always be checked. This will subtract the mean and so on creating a residual dataset, which is required for PCA. You might not need to check this box if you ran a normal score transform before running PCA.
Decorrelate only
This option will rotate the principal componentsbackto the original basis after sphering them.
Save transformation
-
Select a name for the transformation file. This will be needed for the back transformation. The extensions < *.PCA.TFN > will automatically be added.
Minimum Maximum Autocorrelation Factors (MAF)
-
Leave this option unchecked.
Domaining data
The next four tabs provide standard options for domaining your data. We will not be domaining our data in this tutorial. Since we are using our data as it is, we are finished with our input parameters.
-
Click Run Forward.
When Run Forward was clicked, several things happened in the background.
-
The two tables on the Report panel were populated.
-
A transformation file was created.
-
The component output fields in the database were populated.
Click on Forward Transformation > Report in the navigation tree to open the Report pane as shown below.
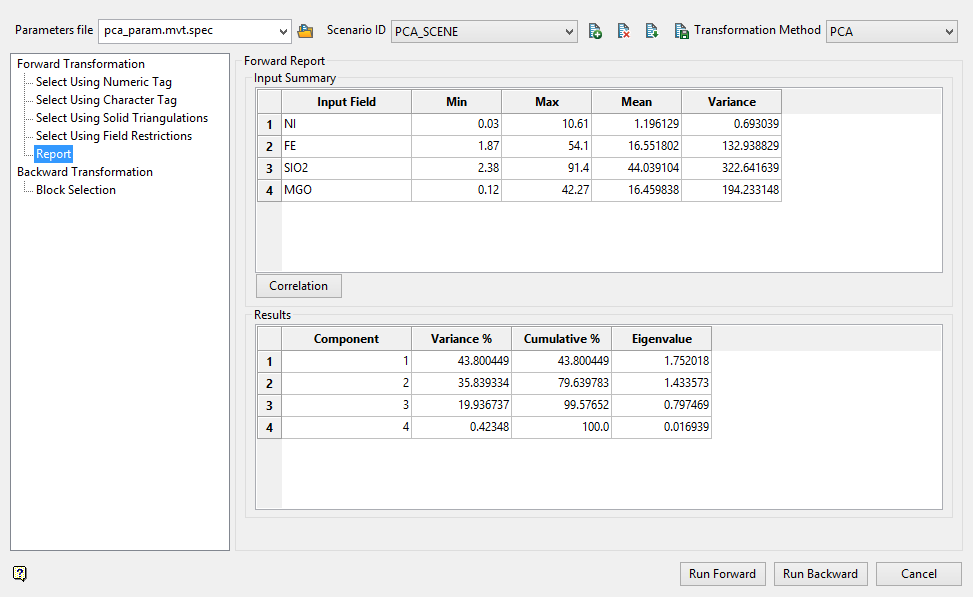
Forward Report
This shows a brief summary of the input data. The min, max, mean and variance are reported mainly to ensure that the sample selection was completed correctly. The Results pane also includes the eigenvalues and relative variance from performing the eigen decomposition of the covariance matrix.
Importance of Cumulative Percent
The most valuable column is probably the Cumulative % column. This indicates how much variance is explained by each component, and the preceding component combined. In this example, the first 3 components describe 99.58% of the variance within the system, and that fourth component shows very nominal influence. We will check this later.
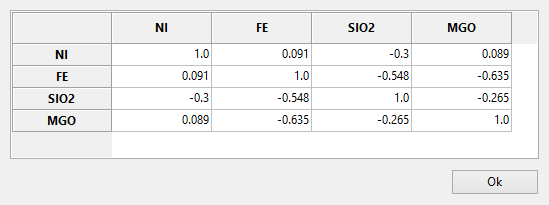
Correlation
Click the Correlation button. This brings up a panel showing a correlation matrix between your four input variables.
Verify the backward transform portion of PCA by back transforming the database values.
-
Using the same parameter file and scenario ID, select the Backward Transformation option in the navigation tree.
We are going to verify that the back transformation is exact.
- In the Backward Input section, select Isis File.
- You can either recalculate from the forward transformation parameters or use an existing report, such as the transformation file from earlier. Lets use the existing transformation file.
- Select the input and output variables, as shown below.
![]()
Again this is split into two grids, to parallel what was on the forward transformation file. And also to support transforming less components into the full set of variables
-
Click Run Backward.
We can check in ISIS and see that they are identical.
![]()

