Load by Location
Use this option to load a list of triangulations that are inside or outside of a user-specified region. You can also use a selection file (.sel) to load triangulations with this option.
Instructions
On the Model menu, point to Triangle Files, then click Load by Location....
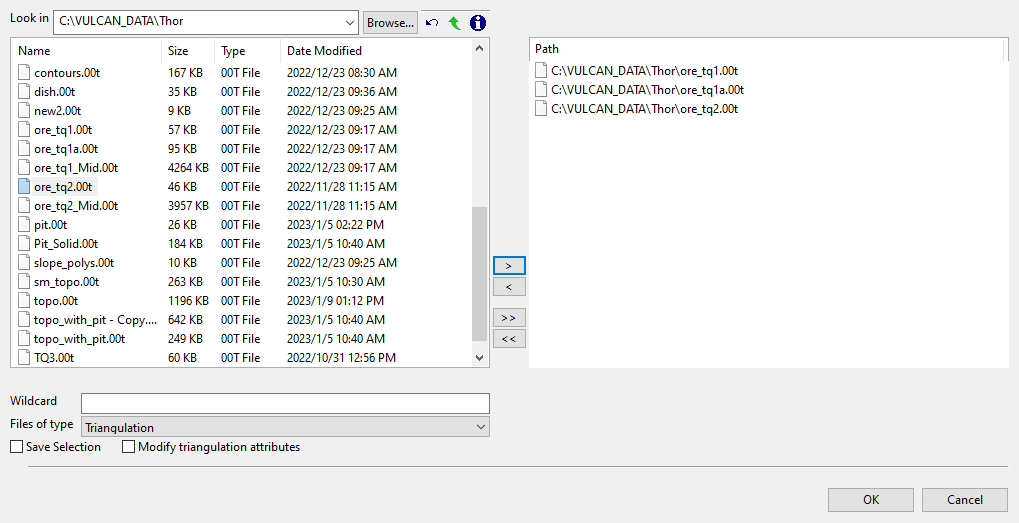
Use this panel to nominate triangulations to be considered for evaluation before defining the region that will ultimately be used to load the subject triangulations.
Follow these steps:
-
Select the desired triangulation file(s) from the file list, which shows all available files in the current working directory. You can select files from a different location by clicking Browse..., or use the
 buttons to go to the last folder visited, go up one level, or change the way details are viewed in the panel, respectively.
To highlight multiple list items at once, use the left mouse option in combination with the
Shiftkey (this is for items that are adjacent in the list; for non-adjacent items, use theCtrlkey and the left mouse option).TipTo filter file names using wildcard characters, type in a pattern in the Wildcard field using
*> for a multi-character and?> for a single-character wildcard.If you would like to use a previously created selection file (
.sel) containing a list of desired triangulation files to load, choose Selection Files (*.sel) from the Files of type drop-down list.Move the items to the selection list on the right side of the panel.
- Click the
 button to move the highlighted items to the selection list on the right.
 - Click the
 button to remove the highlighted items from the selection list on the right.
 - Click the
 button to move all items to the selection list on the right.
 - Click the
 button to remove all items from the selection list on the right.
- Click the
-
Select the Save Selection checkbox if you want to save the selection list (the right side of the panel), to a nominated selection file (
.sel). Once this panel has been completed, a panel displays to save the selection file. Choose a selection file from the File Explorer to store the triangulation selection list to and click Save. To create a new file, enter the file name. -
Select the Modify triangulation attributes checkbox if you want to modify the current display attributes for the selected triangulation files. This option is recommended if you don't want to use the display settings from a previous Vulcan session. Once this panel has been completed, a new panel displays to alter the triangulation properties.
NoteAltering a triangulation's display attributes updates the modification date stamp (date modified).
The Modify triangulation attributes checkbox is not applicable to triangulation files that are currently loaded on-screen. Use the Model > Triangle Files > Properties option to modify a loaded triangulation's display attributes.
-
Click OK to advance to the next panel and define the region that will be used to load subject triangulations.
-
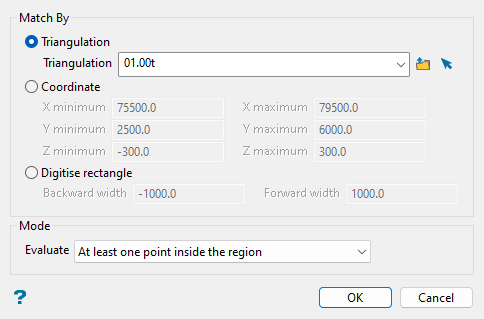
Select from the following methods to define the region to match triangulation locations to and filter the previously selected triangulations to load:
-
Triangulation: Select this option to choose an existing triangulation that will define the region. Select from the Triangulation drop-down list, which includes all triangulation files in the current working directory, or click
 Browse to select from another location. You may also select from triangulations that are currently loaded on-screen with the
  Screen Pick option.
 -
Coordinate: Select this option to manually specify the minimum and maximum X, Y, and Z coordinates of a 3D box to define the region.
-
Digitise rectangle: Use this option to digitise a rubber-band rectangle on the screen, with a specified thickness, that will be used to set the minimum and maximum X, Y, and Z coordinates of a 3D box to define the region. After completing this panel and clicking OK you will be prompted to pick the lower left corner then the upper right corner of the rectangle in the Vulcan workspace.
Note: Depending on your orientation in the Vulcan workspace when you select this option, you will need to specify either the Z minimum and Z maximum or the Backward width and Forward width to define the total thickness of the rectangle that you will digitise.
If the Vulcan workspace was in plan view when you selected the Load by Location... option, you will need to enter values for the following fields in the Digitise rectangle method to define the region. The default values for these fields are the minimum and maximum elevation defined in the project specification file (
.dg1).-
Z minimum: Enter the lowest elevation to be used to select the triangulations.
-
Z maximum: Enter the highest elevation that will be used to select the triangulations.
If the Vulcan workspace was in a rotated view (i.e. not plan view) when you selected the Load by Location... option, you will need to enter values for the following fields in the Digitise rectangle method to define the region. The default values for these fields are the dimension of the Vulcan screen.
-
Backward width: Enter the distance, in real world coordinates, behind the plane defined by the rubber-band rectangle (i.e. into the screen) to be used to select the triangulations.
-
Forward width: Enter the distance, in real world coordinates, in front of the plane defined by the rubber-band rectangle to be used to select the triangulations.
-
-
-
Specify the mode in which to filter selected triangulations to load with respect to the defined region. Select from the following modes available in the Evaluate drop-down list:
-
Triangulations fully inside the region: Select this option to load only triangulations that are completely inside the region.
-
Triangulations fully outside the region: Select this option to load only triangulations that are completely outside the region.
-
At least one point inside the region: Select this option to load triangulations that have at least one point inside the region.
-
At least one point outside the region: Select this option to load triangulations that have at least one point outside the region.
-
-
Click OK to load triangulations that match your defined criteria.
Note: If no triangulations are located that match the defined criteria, a warning message displays and no triangulations are loaded. If this occurs, check that triangulations do exist in the specified directory and that the defined 3D region is appropriate.

