Direction
Assign Wall Types
Use the Direction option to define the direction of the mining and block advance. This in turn sets the wall type (face wall, end wall, side wall). The method of assigning wall types to the blocks considers a strip as a set of blocks side by side. How they are in relation to the other block determines the block type.
- If a block has a wall in common with another block, for example the end points are common, it is set as a side wall
- If a wall is between two side walls, it is set as a face wall.
- If a wall is not common, and not next to a side wall, it is set as an end wall.
Symbols used for the different wall types are as follows:
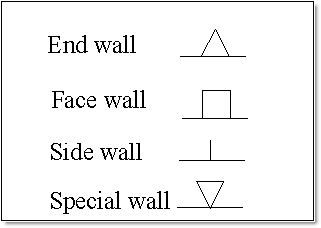
Figure 1 : Wall Type Symbols
Notes
- The Special wall symbol can also be used when the other symbols are not suitable.
- The choice of left or right side walls, left or right end walls, and current or next face walls is determined by the direction of mining and the block advance.
- The direction of the face walls is determined by the direction of mining and whether the block is a box cut or not.
- The block advance determines the direction of a side wall.
- All end walls project outwards.
- When wall types are applied to a wall or an open string as opposed to a block, all the walls will be face walls.
Refer to the Change Wall option for an example of wall types.
Instructions
On the Open Pit menu, point to Benching and Batters, and then click Direction.
When prompted, indicate a point, then the direction of the strip advance. This determines the direction in which the face wall will lie.
Next, select the direction of block advance from the centre of the mining direction line. This determines the direction along which the block is mined, and is usually perpendicular to the direction of mining. It also determines the direction in which the side walls will lie, if they are set to be non-vertical.
Note The direction of block advance is not relevant when using Benches and Batters to project using the walls methods.The Multiple Selection box is then displayed. This to select the first strip or wall by object, group, feature or layer. This will normally be the first strip or wall that is mined.
Selection by name
If you have chosen the Name... option from the Multiple Selection box, the following panel displays.
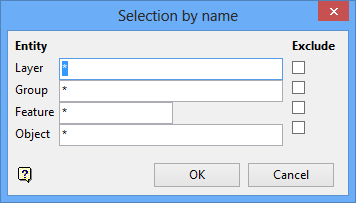
Select all objects that match a specific property name, for example a layer name, group code, feature and/or object name. Unlike other selection methods which require you to pick an object directly from the screen, the Name method requires you to enter the property details via the Selection by name panel.
Entity (Layer, Group, Feature, Object)
Enter the Layer, Group, Feature, and/or Object that is to be the first strip or wall mined.
Exclude
Check the Exclude check box to omit one or more specific categories.
The following example shows how to select objects in the group 'ABC' that have the feature 'PIPE' applied and are in layers that start with 'Test.'
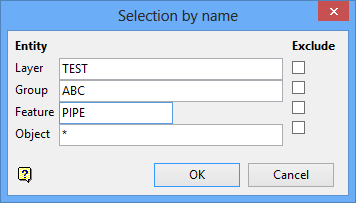
Checking Exclude for group 'ABC' would result in all objects being selected that have the feature 'PIPE and are in layers starting with 'Test' but are not in group 'ABC.'
Once the first strip or wall selection has been confirmed, the following panel displays.
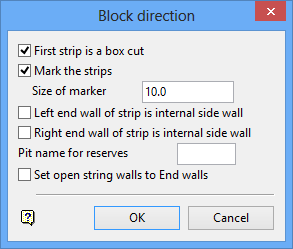
First strip is a box cut
Select this check box if the first strip is a box cut. If this check box is not checked, the strip is considered to be part of a preceding sequence.
Note: Generally when starting a new pit, a box cut is used. Faces parallel to the block advance, and orthogonal to the direction of mining, will generally bound a box cut. The box cut is attributed to the first strip and subsequent strips are automatically assigned as normal strips (non-box cuts). If a pit has already been developed, then it is not necessary to assign the first layer to a box cut.
Mark the strips
Select this check box to mark the strips with the type and direction of each face on the block.
Notes
- Marks are not drawn if the wall segment is smaller than the mark size.
- The marks are part of the block object and are removed when the block is projected.
Size of marker
Enter the size of the strip markers.
- The marks should be turned off ( Toggle Marks option) when editing a block.
- They should also be turned off when a simple projection is to be done ( Open Cut Design > Project option); otherwise the marks will be projected as well.
Left/Right end wall of strip is internal side wall
Check these boxes if the strip is a continuation of another strip, and you want the end walls to be reset as side walls so that the strips are able to join correctly.
Pit name for reserves
Enter a pit name, For example, PIT if the reserve database is <proj><PIT.rin, this will result in a link being set up from the original 2D block to the reserve database. This link will also be used by the individual block projections.
Set open string walls to End walls
Select this check box to set a disconnected or open string wall that is in a non-closed polygon as an end wall.
Click OK.
The selected strip is shadowed and you will be prompted to select the next strip. Confirm each selection. Continue to select each strip in sequence until finished.
Notes- All end walls should be shaped as a triangle, except for box cuts which should be square. If the end wall is not correct, use the Change Wall option and select block by block to fix the walls.
- The wall type is stored as the point name of the point preceding the wall segment. You can use the Analyse > Label Point Label option to display the names.

