Truck Library

Create a Truck Library
Use the Truck Library option to define the specifications, that is, speeds, loading time, bucket capacity, truck capacity, etc., for the Haulage Profile module. This information will be saved to the haulage_truck_library.spc file. This file will be stored in your resources area, that is, the directory pointed to by the ENVIS_RESO environment variable.
Click
![]() Truck Library button from the Haulage toolbar.
Truck Library button from the Haulage toolbar.
Note: There is no limit to the amount of equipment that can be defined.
Instructions
On the Open Pit menu, point to Haulage Profile, then click Truck Library.
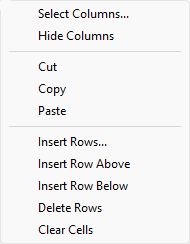
The panel utilises grid controls to manage the grid information, i.e. right-click context menus, that allow you to perform options such as hiding columns, cutting, copying, and pasting cells, and inserting and deleting rows. Right-click in the grid area to display the context menu. Descriptions of the available options are listed below.
-
Use the Select Columns option to choose which grid columns to display in the panel, and optionally save the selection to a template for future use. Alternatively, select cells and click Hide Columns to hide the respective columns directly.
-
Select cells and use the Cut, Copy, and Paste options to duplicate or move cell entries.
-
Select a cell in a row of interest and use the various insert and delete row options to manage the records in the grid.
-
Click Clear Cells to clear the contents of a selection.
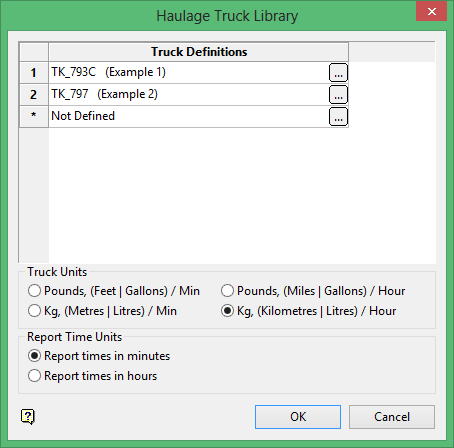
Truck Definitions
This column will list all of the defined trucks located in the
haulage_truck_library.spc
file. To create or adjust a truck definition, select the
 button. Once selected, the Truck Definition panel displays. Refer to the Creating/Editing Truck Definitions section below for more information.
Truck Units
This section to specify the units of measurement for the defined trucks, that is, kilometres per hour, feet per minute etc. These units can be changed at anytime. Once a new unit of measurement has been chosen, the values will be automatically converted.
Click OK to save the specifications to the
haulage_truck_library.spc
file.
Vulcan will check the truck library for a version number. If this number does not match the latest version, you will be prompted to run validation.
Click
to display the Truck Definition panel and create a new truck definition.
This panel is divided into three separate tab panels.
- Specification
- Performance
- Route Delays
The measurement units selected through the Haulage Truck Library panel are displayed next to each tab.
For example, if Metres/Min was selected, then (in Mins) displays next to the Specification tab and (in Metres/Min) next to the Speeds tab.
Specification
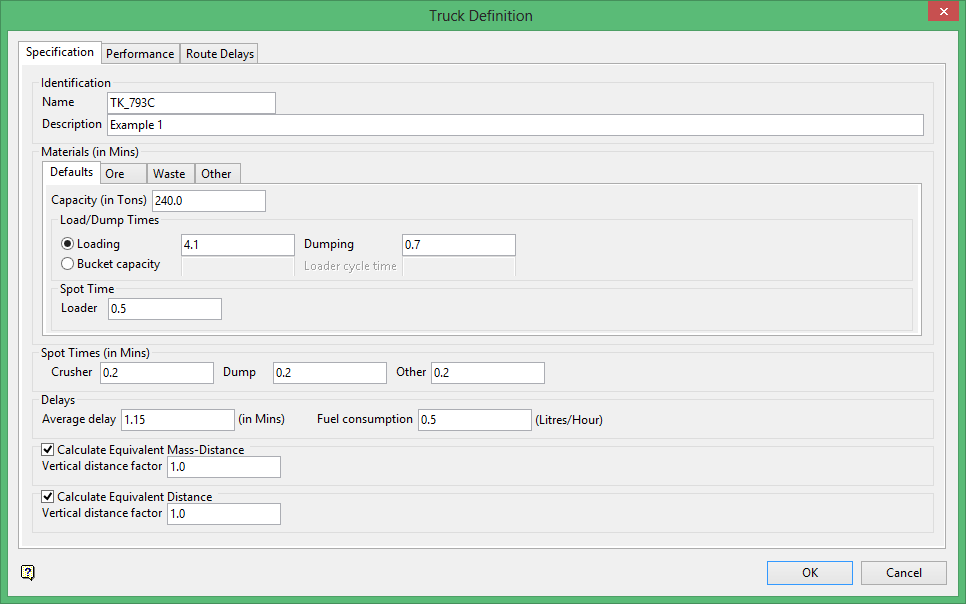
Identification
Name
Enter the name of the truck.
Description
Enter a description for the defined truck. For example, '
Cat 3516B-EUI engine
'.
Materials
This section, which is separated into 4 separate tab panels, allows you to define the materials classifications. Use the Defaults tab if any of the values, that is, loading and dumping times, are applicable to all materials. If only the Defaults tab contains values, then the values for the Ore, Waste and Other tabs won't be used.
Note The term Other is used to describe any material other than ore or waste. For example, stockpile material would be referred to as Other.
The following fields must be specified for each material, that is, Ore, Waste and Other. If a value is not specified, then the corresponding value under the Defaults tab will be used.Materials
Capacity (in tons)
Enter the truck's capacity.
Load/Dump Times
Loading
Enter the amount of time needed to load the material onto truck.
Dumping
Enter the amount of time needed to dump the material (at any location).
Bucket Capacity
Enter the bucket capacity, that is, the amount of material that the shovel bucket holds.
Loader Cycle time
Enter the amount of time (in minutes) it takes for the shovel to pick up the material and dump it onto the truck.
Spot Time at
Loader
Enter the amount of time that the truck spends waiting in line to be loaded with material.
Spot Time at
Crusher
Enter the amount of time that the truck spends waiting in line at the crusher. This value is only applicable to Ore material.
Dump
Enter the amount of time that the truck spends waiting in line at the dump. This value is only applicable to Waste material.
Other
Enter the amount of time that the truck spends waiting in line at the destination. This value is only applicable to Other material
Delays
Average Delay
Enter the amount of additional time spent making the trip.
Calculate Equivalent Mass-Distance
The EMD value is calculated with the following formula:

where:
VDF = Vertical Distance Factor (unitless)
x, y, z - coordinate values
block tons = (volume x density) or (xlength x ylength x zlength z density)
If uncertain, leave this option unchecked.
Calculate Equivalent Distance
If uncertain, leave this option unchecked.
Vertical distance factor
The vertical distance factor is user defined. If the VDF component is active, then the Report Settings panel will have an option to store the value.
Performance (formerly Speeds)
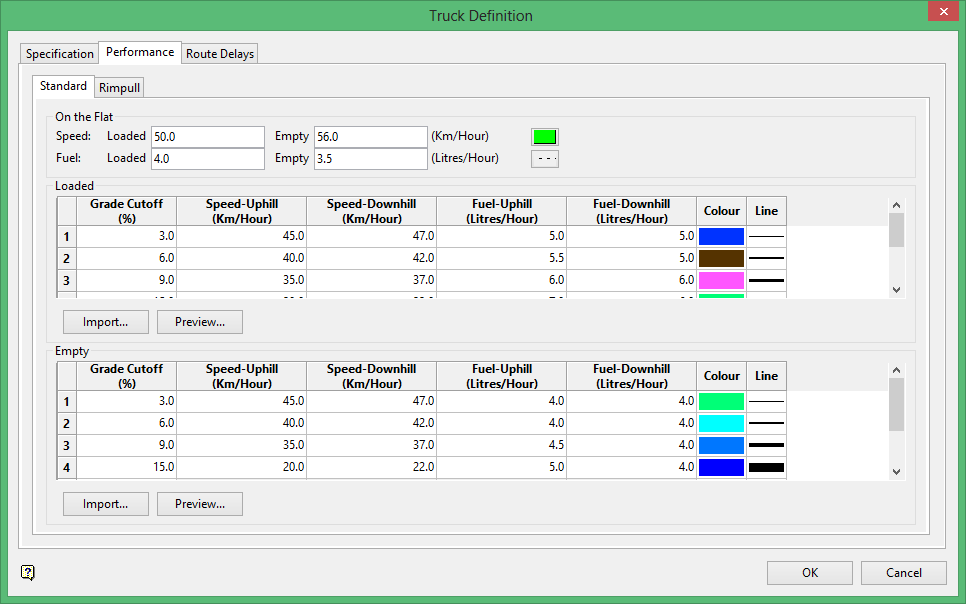
Use the Standard tab to define the speed of the truck.
On the Flat
This section to enter the truck's speed and fuel consumption over a flat surface. A colour and line type can be defined for each cutoff. These attributes will be used in the Route Cycle Estimation option.
Loaded
This section to specify the truck's speed when loaded.
Empty
This section to specify the truck's fuel consumption when empty.
Import
Select Import to use pre-existing data from a.csv,.dat, or txt file.
Preview
Select Preview to view a preview of Truck Performance Data.
Note Ensure that all cutoff grades, which are entered as a percentage, are in ascending order (lowest to highest).
Example Truck Speeds
If the truck's speed shown above were used, then the following would occur:
Full capacity over a flat surface - A truck speed of 32K/hr will be used for line segments that are between -3% and 3%
Empty over a flat surface - A truck speed of 45 K/hr will be used for line segments that are between -3% and 3%
4% capacity uphill - A truck speed of 28 K/hr will be used for line segments that are between 3% and 5%
4% capacity downhill - A truck speed of 28 K/hr will be used for line segments that are between 3% and 5%.
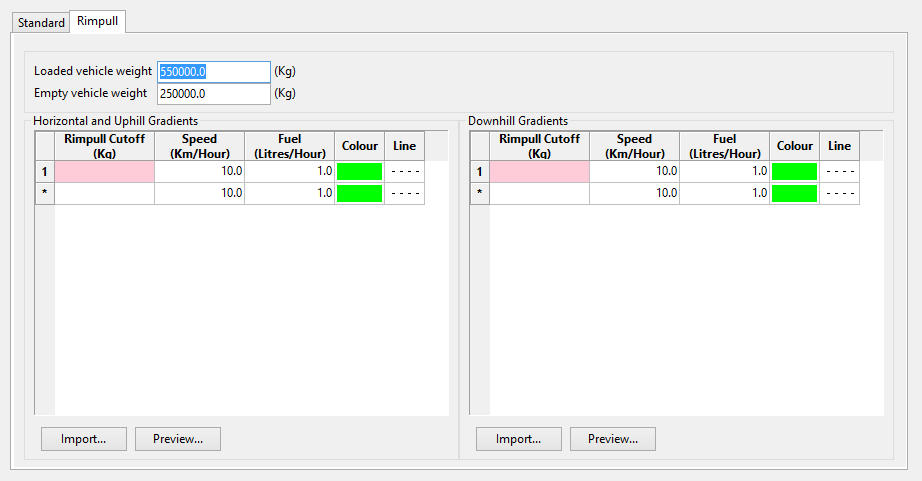
Truck Definition - Performance - Rimpull panel
The Rimpull tab allows you to calculate cycle times and fuel usage from Rimpull curves as an alternative to speed curves. The Rimpull curve is calculated from the following calculation:
Rimpull = Weight Truck [kgs] x (gradient [%] + rolling resistance [%]/100
Loaded/Empty
This section to specify the truck's speed when going uphill or downhill. A colour and line type can be defined for each cutoff. These attributes will be used in the Route Cycle Estimation option.
Import
Select Import to use existing data from a.csv,.dat, or txt file.
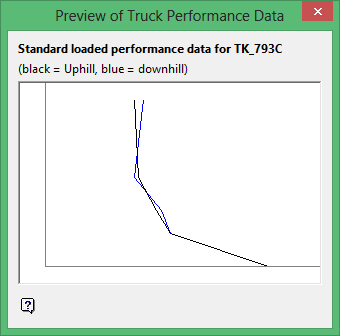
Preview
Select Preview to view a preview of Truck Performance Data, an example of which is shown below. The diagram displays the truck's rimpull curve.
Rimpull Curve Preview
Note Ensure that all cutoff grades, which are entered as a percentage, are in ascending order -- lowest to highest.
Warning Make sure to cap the speeds for the uphill and downhill speeds for the truck requirements may be underestimated.
Route Delays
Use this option to input distances or sections where the truck speed is slower, for example when it starts up or turns a corner.

Delays at Truck Start
Enter a set of distances from the beginning of the route where the truck is still accelerating up to normal speed and its fuel consumption is therefore higher. For each increment in the distance enter the truck's predicted speed and fuel consumption.
Also apply startup delays to return trip
Apply the parameters entered in Delays at Truck Start to the calculations of the return trip.
Delays at Based on Radius of Curvature
For Radius enter a distance from the turning point of a corner on the route. This distance is used to calculate delays on all corners on the route. For each increment in distance from the turning point enter the predicted truck speed and fuel consumption.

