Block
Create Mining Blocks from Mid-benches
The Block option to create 3D blocks from 2D polygons. The 2D polygons are created from strings through the Design > Polygon Edit > Build option. We recommend that you do not use the Polygon option (under the Design > Create submenu) to create the polygons as the result will be more than double the number of polygons. This will slow you down when, for example, moving points.
The polygons must be displayed on the screen. They represent the midbench, crest or toe extent of each mining block. The Block option gives each polygon a thickness (or bench height) and stores the resulting 3D strings in a nominated layer.
Note: It is best if you name the polygons before using this option. That way you can pick the required polygon by picking its name instead of a polygon string that may belong to another polygon.
Instructions
On the Open Pit menu, point to Increment Design, and then click Block option
The following panel displays.
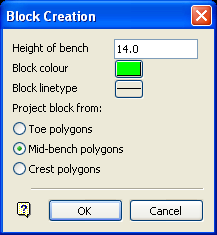
Height of bench
Enter the thickness of the mining blocks.
Block colour
Select the colour for the mining blocks.
Block line type
Select the line type for the mining blocks.
Select the direction of block projection. Blocks can be projected from toe polygons (that is,, upwards), crest polygons (that is,, downwards), or mid bench polygons (that is, halfway up, halfway down).
Select OK.
The following panel is then displayed.
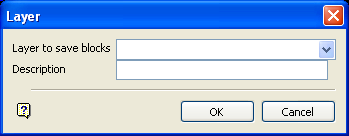
Layer to save blocks
Select the layer that will be used to store the resulting mining blocks.
Layer name
Select a layer from the drop-down list, or enter a name for a new layer. The name of the new layer:
-
may contain up to 40 characters,
-
must begin with an alphanumeric character [0-9] or [a-z],
-
cannot include spaces,
-
can include hyphens [ - ], plus signs [ + ], underscores [ _ ], periods/dots [. ],
-
can include the special characters of ÁÂÃÀÇÉÊÍÓÔÕÚÜÑ that are used in the Spanish and Portuguese languages.
Description
Enter a description to further describe the contents of this layer. The description can be up to 80 alphanumeric characters and may include spaces. If a description is not entered, then a default description will be used instead. If the chosen layer already has an assigned description, the description displays when the layer is selected. Existing layer descriptions can be overwritten.
Select OK.
The Multiple Selection box is then displayed. From this box, select your method of selecting the polygons and select the polygons. Once selected, the first generated polygon in the specified category is highlighted and a dialog box displays. This box is redisplayed for each polygon in the category unless All is selected.
Yes
Select this option to turn the highlighted object (polygon) into a mining block.
No
Select this option if you do not want to turn the highlighted object (polygon) into a mining block. This is useful when you are selecting by object. As selecting by object does not require confirmation, you may have selected the wrong polygon by picking on a string instead of a name.
All
Select this option to turn the highlighted polygon and all subsequent polygons in the specified category into mining blocks. The confirmation box above does not reappear thus selections cannot be undone!
Note: Use the Rotate icons on the Graphics toolbar to view the created mining blocks.

