Reserves
Calculate Reserves
The Reserves option to calculate the reserves for selected mining blocks or increments. This option also to optionally save the calculated reserves to a nominated reserves report file ( <proj><name>.rrf ). The reserves report displays in the Report Window of Vulcan. An example of reserve report file is given in Appendix A.
Note: Mining blocks or increments must exist before using this option.
Instructions
On the Open Pit menu, point to Increment Design, and then click Reserves option
The Multiple Selection box displays. This to select blocks by category. Use the object category for individual blocks/increments; the group category for blocks/increments on the same RL; and the layer category for the entire pit.
Cancel when all required blocks have been selected. The following panel is then displayed.
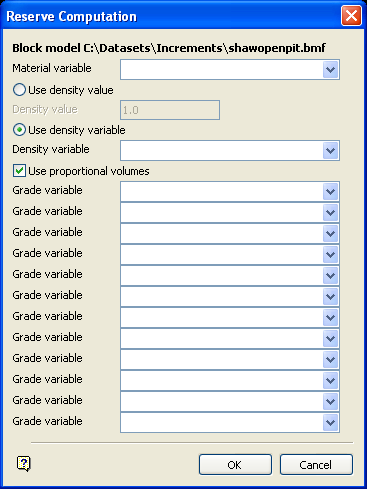
Reserves Computation panel
Material variable
Enter, or select from the drop-down list, the material variable (a 'non-grade' variable) that will be used to break down the reserves report by the material or geology codes stored in the block model.
The density used for calculations can be specified directly ( Density value ), or derived from a field in the block model ( Density variable ).
Use proportional volumes
Check this check box to ensure that block model cells, which are only partly inside the scheduling block, have their volumes reduced by that proportion. If this check box is not checked, then the full volumes are incorporated into the calculations.
Grade variable
Enter, or select from the drop-down list, the fields in the block model that contain the grade information (For example,, fe, au, zn). Up to 12 grade variables can be specified.
Select OK.
If the grade values are equal to a default grade after grade estimation, then the following panel displays.
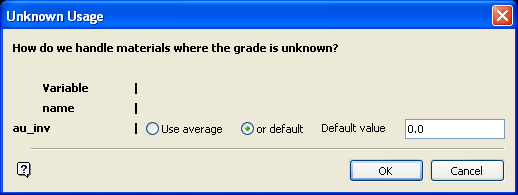
Unknown Usage panel
This panel will list the variables involved, as well as the actions to take. You can choose to Use Average or to Use Default values (you will need to enter a value for the default).
Select OK to process the blocks.
A progress message will then be displayed. The process can be stopped at any time by pressing [Esc].
The following panel is then displayed.

Reserves Reporting panel
Save to report file
Check this check box to save the reserves report to a file. You will need to enter the name of the report file ( <proj><name>.rrf ). The project code and file extension will be automatically added upon completion of this panel. The maximum size of the name is 40 alphanumeric characters. The resulting report will be stored in your current working directory.
Enter reserves heading
Enter the report heading that displays at the top of the resulting reserves report. The maximum size is 40 alphanumeric characters.
Select material types for grade display
Check the check boxes preceding the material type that require grades to be represented. The materials displayed are derived from the block model.
Select OK.
The reserves report is then displayed in the Report Window and, if applicable, saved to the specified reserves report file.

