Select Data
Load Monitors
The Select Data option to load monitors onto the screen for reporting, manipulating or plotting purposes. They are put into a temporary layer named
DIG$MONITR
. If you are planning to select the monitors by limiting polygon, then the polygon needs to be displayed on the screen.
Instructions
- Select Open Pit menu
- Select Monitoring submenu
- Select Data option
The following panel displays.
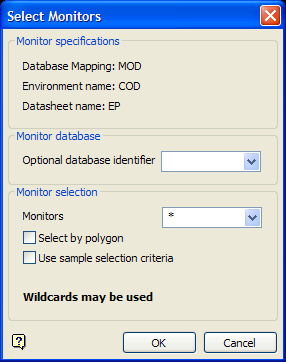
Monitor database
Optional database identifier
Select the optional database identifier (
<odi>
) for when there are two or more prism databases with the same datasheet, For example,
proj200.mon
and
proj2001.mon
. This field is only applicable if more than one database was created from the design (datasheet).
Monitor selection
Monitors
Select the monitors that you want to load onto the screen. Wildcards (* multi-character wildcard and % single character wildcard) may be used to limit your selection. For example, entering '
C-1*
' will allow you to only load monitors that begin with '
C-1
'.
Select by polygon
Select this checkbox if you only want to load the monitors that fall in a nominated polygon. The limiting polygon needs to be displayed onscreen prior to running the Select Data option.
Use sample selection criteria
Select this checkbox if you only want to load the monitors that match specific selection criteria, For example, only load monitors that fall in a defined numeric range. The sample selection criteria will need to be specified through the Monitor Sample Selection panel, which is displayed after completing the Select Monitors panel.
Select OK .
If you chose to use a limiting polygon, that is, you checked the Select by polygon checkbox, then you will need to select a polygon from the screen before the monitors are loaded. If you checked the Use sample selection criteria checkbox, then the Monitor Sample Selection panel displays before the monitors are loaded.
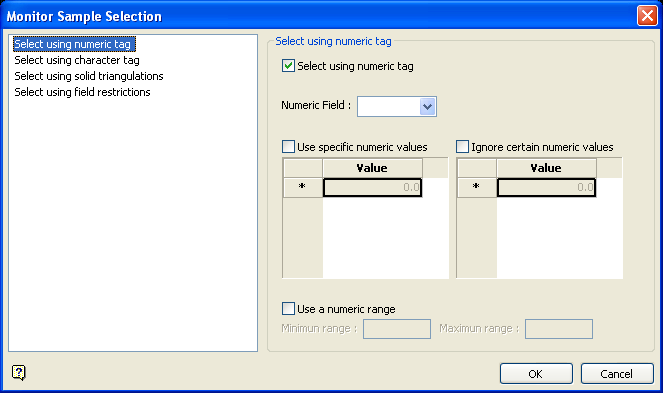
Monitor Sample Selection panel
The Monitor Sample Selection panel consists of the following sections;
Select using numeric tag
Select using character tag
Select using solid triangulations
Select using field restrictions
![]() Note
Note
The selection methods accumulate, that is, if more than one method is chosen, then the samples must satisfy each selected method before being included. Within a method, however, selection is based on the OR selection criterion except for field restrictions, which allows AND/OR selection criteria.
Select using a numeric tag
Select this checkbox to limit the samples to a specific numeric field. Once the numeric field has been specified, it is then possible to nominate whether to include or ignore those entries that contain specific numeric values.
For example: You may have a database field named '
BOUND
' and the entries in this field are '
1
', '
2
' and '
3
', representing, respectively, ore, waste and internal waste. To use only value '
1
' you would need to check the Use specific numeric values checkbox and specify '
1
' as the specific value. The value can be entered through the Value column.
To ignore specific values enable the Ignore certain numeric values checkbox. The specification of the value(s) to be ignored can be entered through the Value column.
Check the Use a numeric range checkbox to ignore a whole range of values, For example, '
0 to 9999
' to ignore all negative values. It can also be used to ensure any rounding errors are caught. You will need to enter the minimum and maximum for the range.

Select using a character tag
Select this checkbox to limit the samples to a specific character field. Once the character field has been specified, it is then possible to nominate whether to include or ignore those entries that contain specific character strings.
For example: You may have a database field named '
BOUND
' and the entries in this field are '
ore
', '
waste
' and '
internal waste
'.
To use only the character string '
Ore
' you would need to check the Use specific character values checkbox and specify '
Ore
' as the specific string. The strings to use are specified through the Value column, which is enabled once the Use specific character values checkbox has been checked.
Enable the Ignore certain character values checkbox if you want to ignore specific character strings. The strings to exclude are specified through the Value column, which displays below the Ignore certain character values checkbox.

Select using solid triangulation
Select this checkbox to limit the samples by triangulation, that is, only the samples that fall in the nominated triangulations will be included. You will need to enable this checkbox in order to add the necessary triangulations.
Adding triangulations to the Triangulations list
Use the Screen Pick option to use a triangulation that is currently loaded onscreen. Once the Screen Pick option has been selected, you will be prompted to select the necessary triangulations.
Click Browse to display the Open panel and select the triangulations you want to load.
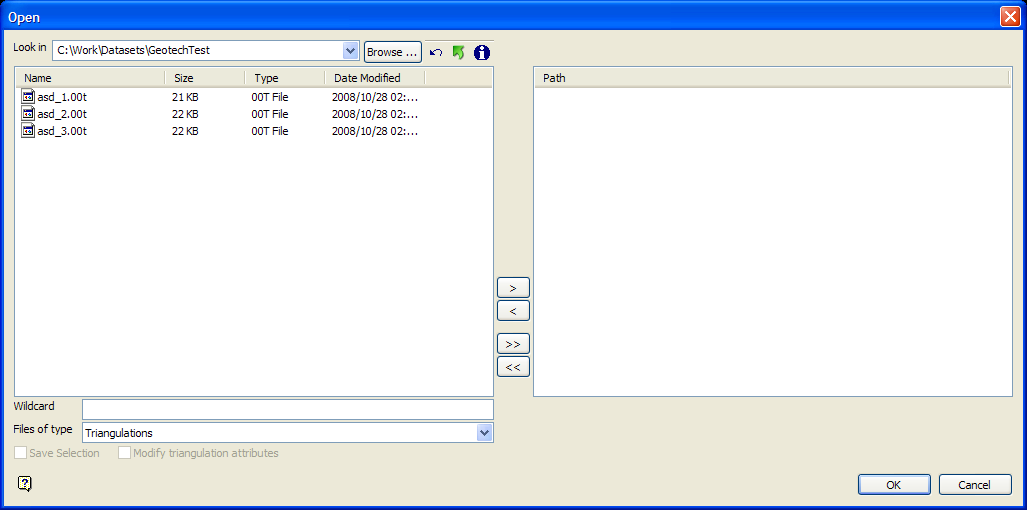
Select the required triangulation files and add them to the selection list on the right side of the panel.
-
Click on the name of the file(s) you want to select.
- To select a triangulation file from another location, click Browse.
- To highlight multiple files that are adjacent to each other in the list, hold down the Shift key and click the first and last file names in that section of the list.
- To highlight multiple non-adjacent files, hold down the CTRL key while you click the file names.
-
Move the files to the selection list on the right side of the panel.
- Click the -> button to move the highlighted files to the selection list on the right.
- Click the >> button to move all the files to the selection list on the right.
- Click the <- button to remove a highlighted file from the selection list.
- Click the << button to remove all files from the selection list.
Click OK to add the triangulation to the Triangulations list.
Removing triangulations from the Triangulations list
To remove a triangulation from Triangulations list, highlight the triangulation name and click the Clear option. To remove a group of triangulations, use the left mouse option in combination with the [Shift] key to highlight the triangulations (this is for triangulations that are adjacent in the list, for non-adjacent triangulations use the [CTRL] key and the left mouse option) and select Clear.
To remove all of the triangulations, select the Clear All option.
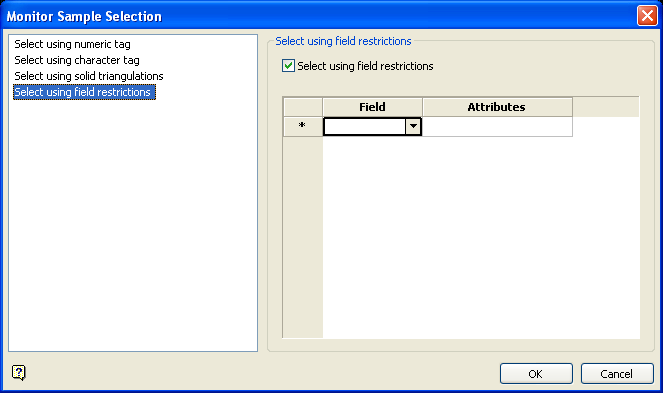
Select using field restriction
Select this checkbox to limit the samples to those with fields that match certain selection criteria. Select a Field from the drop-down list and enter applicable selection criteria in the Attributes column.
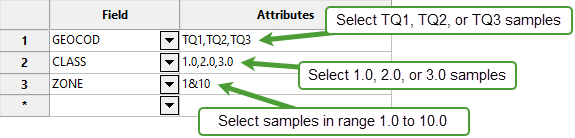
Include spaces in the entries in the Attributes column only if spaces are included in the desired field values.
When entering a range, always enter the smallest number specified before the largest number.
Example: -792&-720 since -792 is smaller than -720. This range is evaluated as -792.0 ≤ VALUE < -720.0.

