Annotate
Annotate Monitors
Use the Annotate option to display information about a nominated monitor in the Report Window. The difference between this option and the Identify option, is that the Annotate option stores the information into a layer and posts it onto the screen, as a text object, so it can be plotted.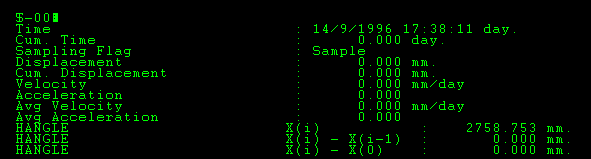
Diagram 1 - Monitor Annotation
Instructions
On the Open Pit menu, point to Monitoring, and then click Annotate.
Select the monitor to identify. Once selected, the Monitor Identify panel displays.
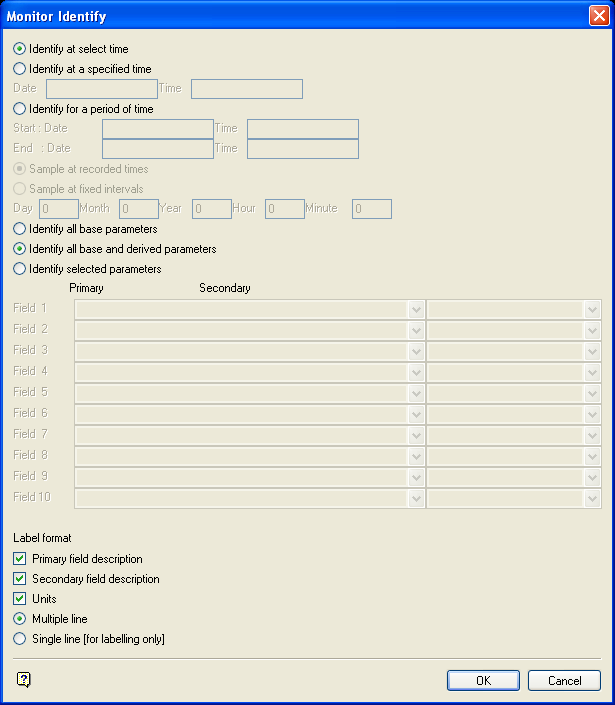
Monitor information that was collected at a selected time, over a period of time, or at a specified time can be displayed:
Identify at select time
This will give you information on the part of the monitor you selected before the panel was displayed. Hence, you can only use Identify at select time when you have monitors loaded on the screen.
Identify at a specified time
This will give you information on the monitor at a time entered by you. The date and time can be entered following any of the supported formats . If the specified time is not a sample or recorded time, the information will be extrapolated and displayed showing the value of 'Interp' in the Sampling Flag variable.
Identify for a period of time
This will give you information on the monitor between a start and end date/time. With this option, the information can be displayed either at recorded times or at fixed time intervals. If you have chosen to display at fixed intervals, then you will be required to enter the interval period (at least a day and hour interval value).
For example, you may require monitor information between the dates of 18/9/2001 14:00:00 hours and 18/10/2001 14:00:00 hours. Enter the dates and the times required, in the same format as the data in the database, then select Sample at fixed intervals and enter 1 Day and 1 Hour. The information will be extrapolated on an hourly and daily basis, for the period of one month (between 18/9/2001 and 18/10/2001) and displayed in the Report Window. The value of 'Interp' will be shown in the Sampling Flag variable.
The information to be displayed can consist of all base parameters (that is, base parameters and extra parameters, but excluding secondary parameters); base parameters and derived parameters (that is, base parameters, extra parameters and secondary parameters); and selected parameters (which will require you to select the parameters from the list provided).
Label format
Enable the appropriate check box to include the Primary and Secondary field descriptions. Check the Units check box to display the units of each variable. The label will be printed on multiple lines (single line applicable only to annotation).
Click OK
The following panel is then displayed.
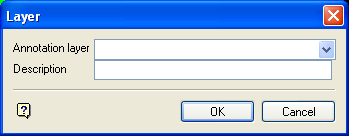
This panel to specify the layer name into which the information is to be stored.
Annotation layer
Enter the name of the layer that will be used to store the annotations. The maximum size of the layer name is 40 alphanumeric characters (spaces are not allowed).
Description
Enter a description to further describe the contents of this layer. The description can be up to 80 alphanumeric characters and may include spaces. If a description is not entered, then a default description will be used instead. If the chosen layer already has an assigned description, the description displays when the layer is selected. Existing layer descriptions can be overwritten.
Click OK.
The selected monitor is annotated and the displayed annotation is saved into the nominated layer. The information displays onto the screen as one text object, next to the monitor header. The Text Edit options (under Design ) can be used to move the object to another position, rotate it, change its colour etc.

