Compliance
Compliance is a tool to reconcile the mining plan with the actual topography. The tool is divided into two working methods: using planned and actual topographies, and using planned solids with topography. Compliance generates delay and advance solids for the plan. Also, an Excel report is generated.
Instructions
On the Open Pit menu, point to Open Cut Design, and then click Compliance.
Specification file
Use the drop-down list to select the specification file if it is in the current working directory, or browse for it in another location by clicking the Browse button. You may also create a new file by typing the name of the new file in the textbox.
|
|
Browse |
|
|
New |
|
|
Save as |
|
|
Save |
Compliance Method
Select the method to use in compliance:
-
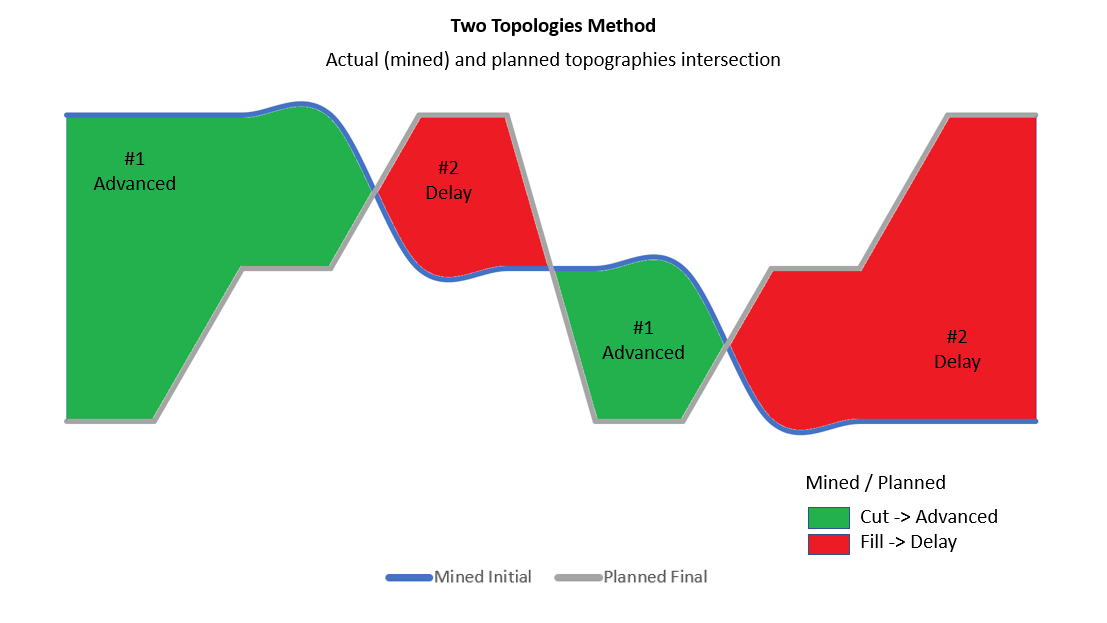
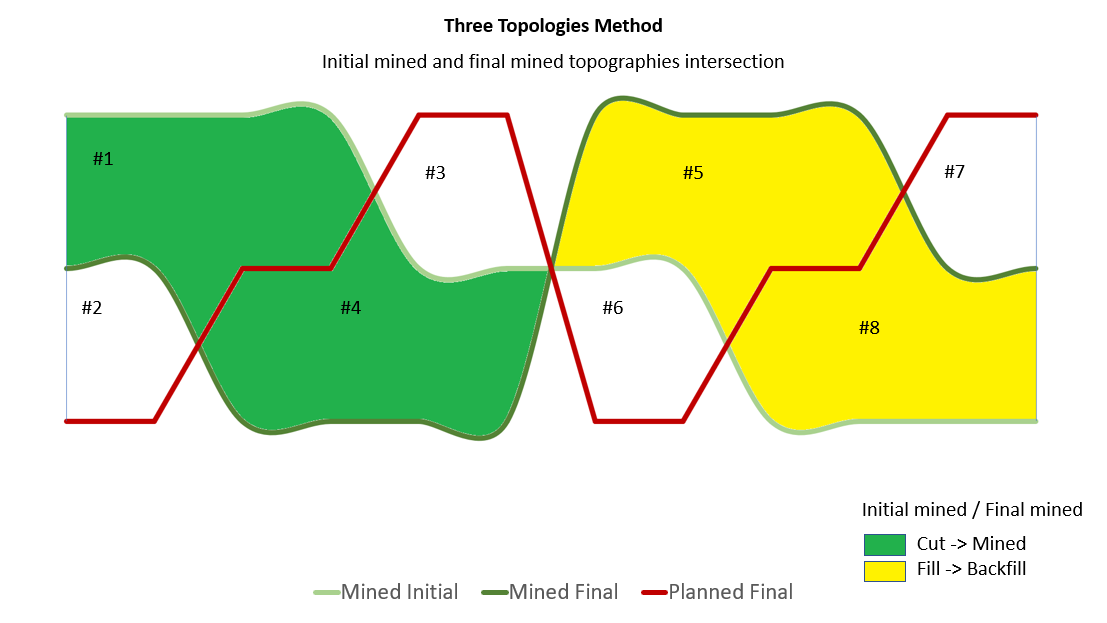
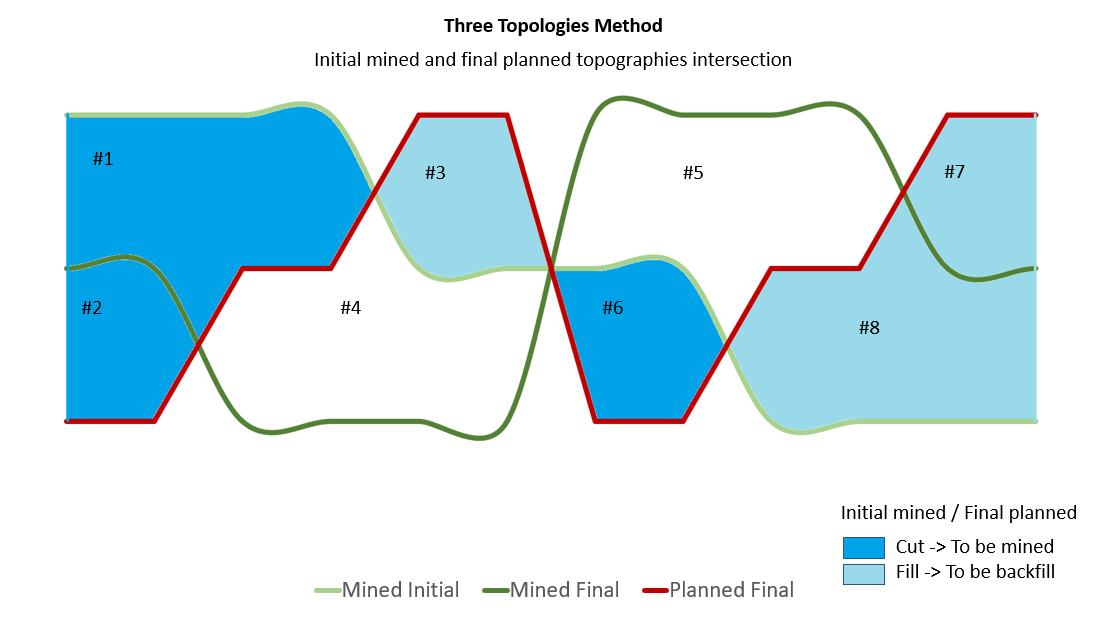
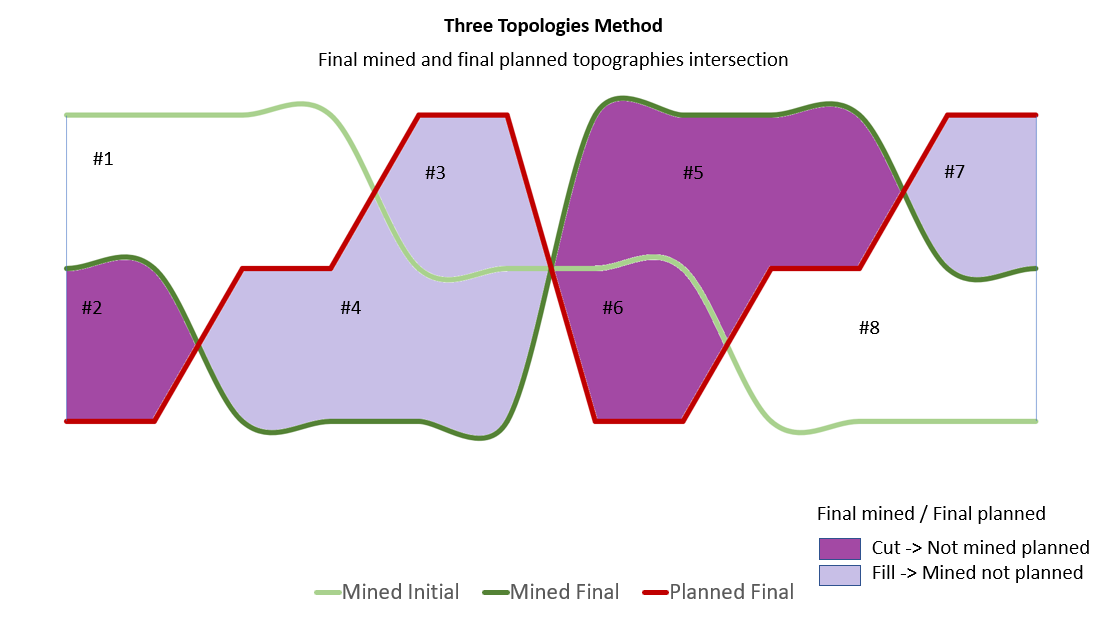
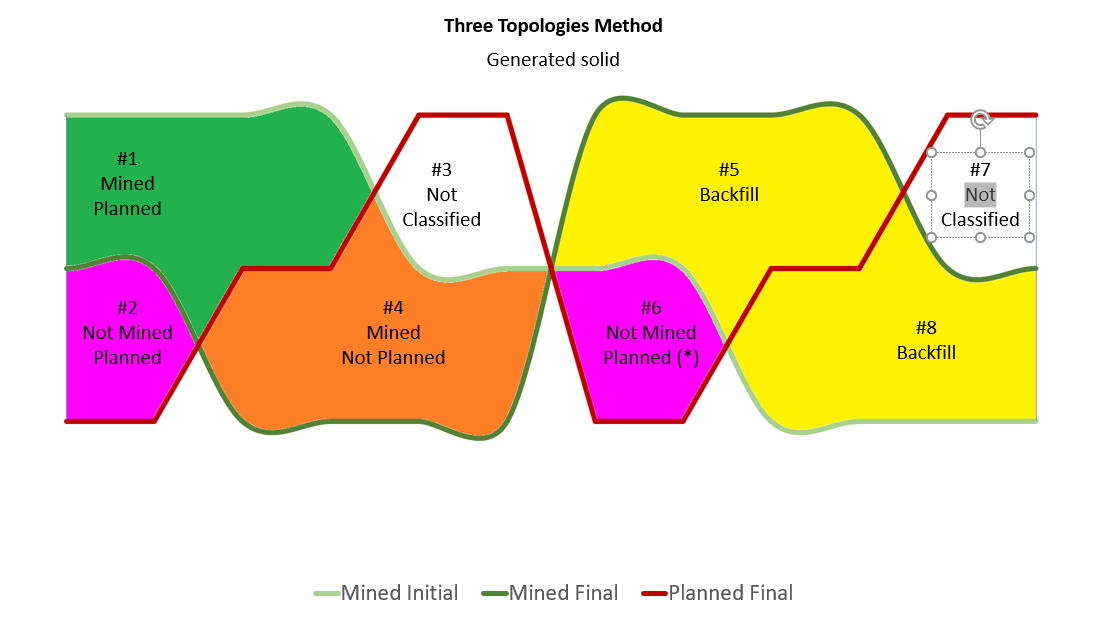
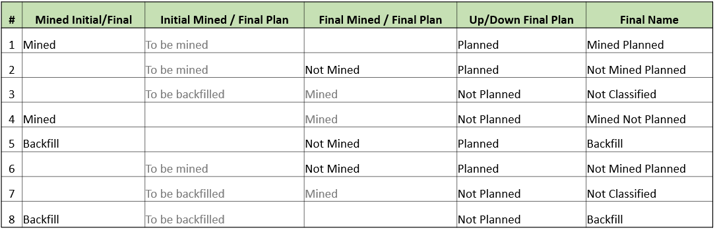
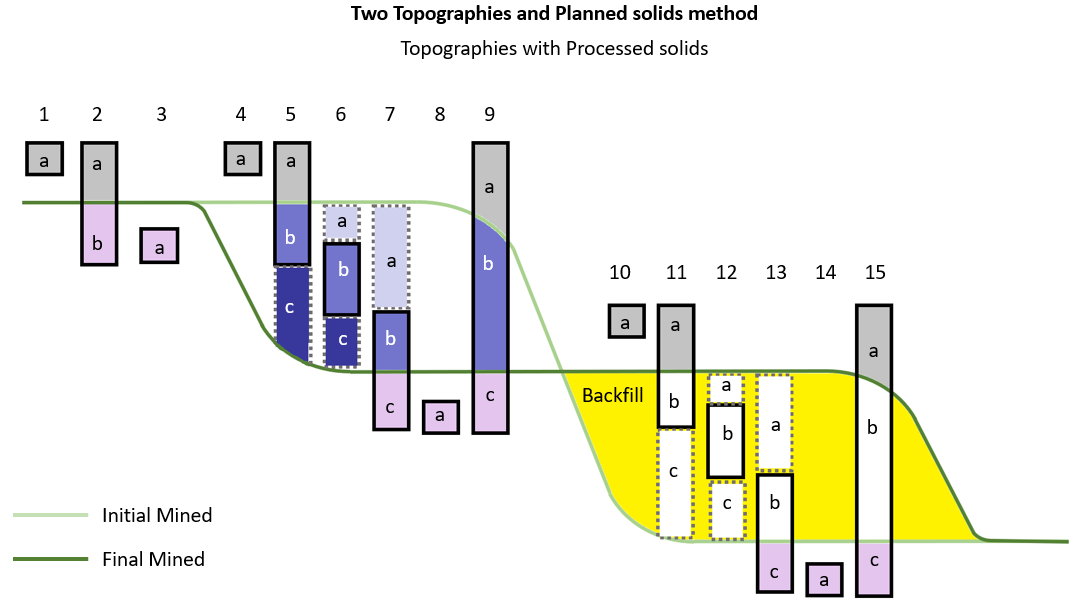
Use topographies - Two, three, or four topography surface triangulations.
-
Use planned solids - Planned solid with one or two topographies.
Note: Depending on the method selected, the next sections of the panel will show different input parameters, as shown below.
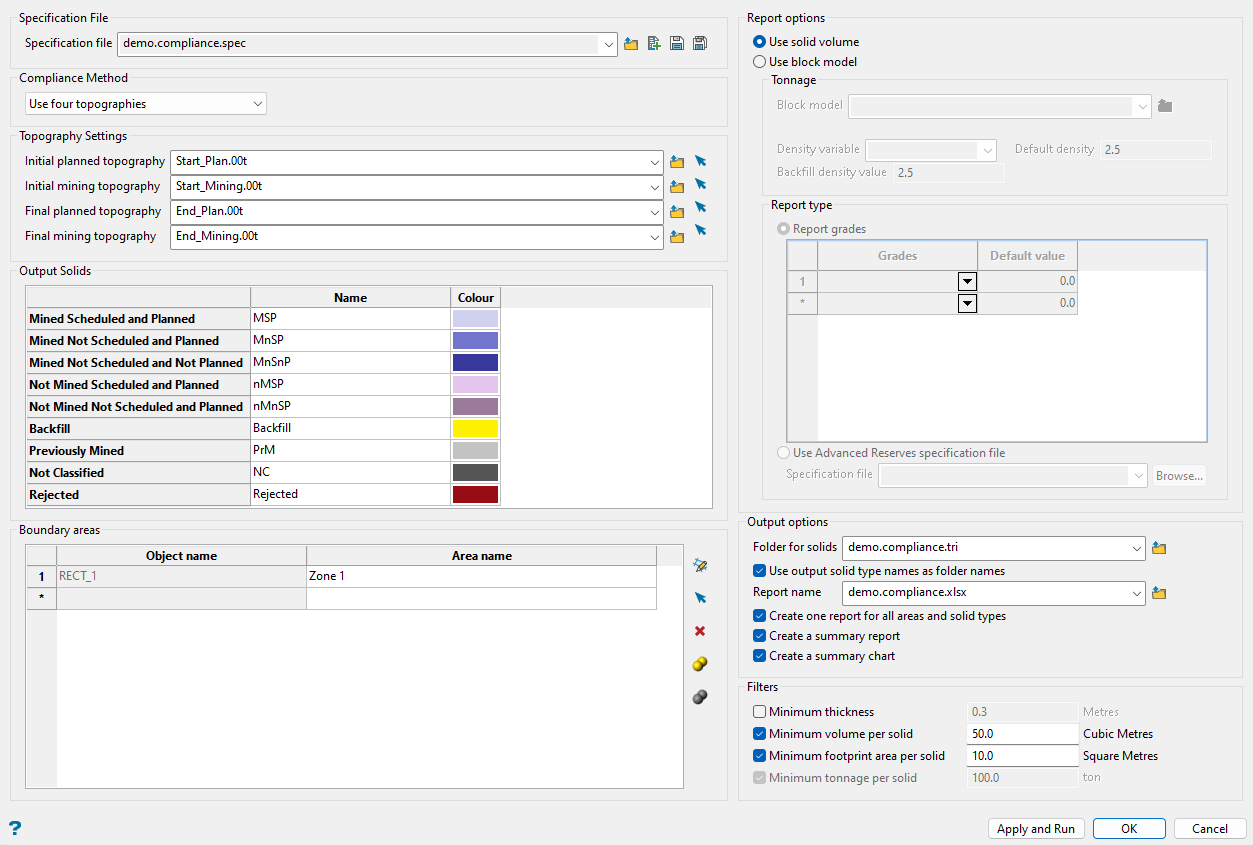
Topography Settings
Screen pick, browse, or select from the drop-down lists the applicable topography files based on your selected Compliance Method.
Output Solids
Use this section to define the name and colours of the generated solids.
Compliance generates a variety of output child folders for triangulation results. The number of solids and folders depends on the method selected. However, the folders for Filtered and Rejected solids will be common to all runs.
Filtered: Any solids that do not meet the filtering settings defined in the bottom-right section of the panel.
Rejected: Any invalid solids (i.e., does not pass check tests such as closure, crossing, etc.)
Fixed column
This describes the classification name of the solid.
Name column
This will be used as a prefix for the resulting solids.
Colour column
Use this to define the colour of the resulting solids.
Boundary areas
This section defines the areas of interest to be analysed.
Note: Areas can be digitised in Vulcan, or selected from within existing areas on the Vulcan workspace.
Digitize or select the bounding polygon to limit the area being analysed.
Object name
This is the name of the digitised layer used to delineate the boundary (polygon, rectangle, or digitised).
Area name (optional)
Use this field to provide a unique name for the area that will be used in the reports and the output folders.
Planned solids
Populate this list with applicable triangulations for the planned solids.
Note: These options are only available when the Compliance Method includes planned solids.
Browse button
Click to select triangulations from the dialog that displays a list of all available triangulations in the current working directory, or navigate to another folder location.
Screen Pick button
Click to select the triangulations from those already loaded on the screen.
Clear button
Clear the highlighted triangulations from the list.
Note: Select multiple triangulations by holding the CTRL key down while selecting the desired triangulations.
Clear All button
Clear all triangulations from the list.
Report options
Use this section to define whether the reports will display volume or reserves (tonnages and grades).
Select whether you want to Use solid volume (triangulations solids) or Use block model to report reserve data.
Tonnage
Define the parameters to calculate the tonnage by using a block model, a density variable, and its default value.
If present, backfill will use its own fixed density.
Report type
Report grades / Use Advanced Reserves specification file
The report values can be calculated using internal grade calculations or using an Advanced Reserves definition file as a template for the calculations.
Note: The Advanced Reserves file template will keep all the definitions for products, grades, etc. However, it will use the block model, the density variable, and the default density value defined in the panel.
Output options
The options in this section define how the output will be presented.
Folder for solids
Select the output folder for solid results. This folder will contain the generated solids.
Use output solid type names as folder names
Select this option to use the names defined in the Name column of the Output Solids section as folder names instead of the internal names displayed in the fixed columns of the Output Solids section.
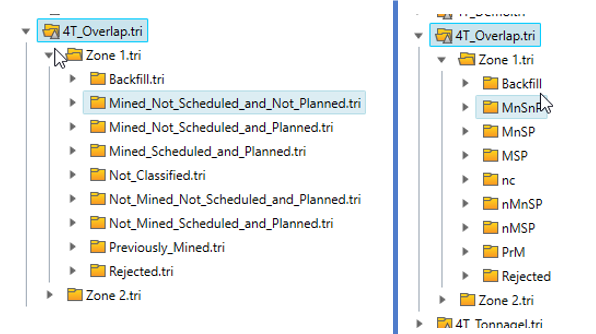
Figure 1 : By default, the output tree uses the text in the first (fixed) column of the Output Solids section (left), if the user check the option the folders will be created using the Name column (right).
Report name
Select or browse the Excel report file name.
Create one report for all areas and solid types
Select this option to create only one sheet in the Excel report.
Create a summary report
Select this option to create a report that summarises the reserve data in a concise format.
Create a summary chart
Select this option to create a summary chart using the summary data.
Excel file
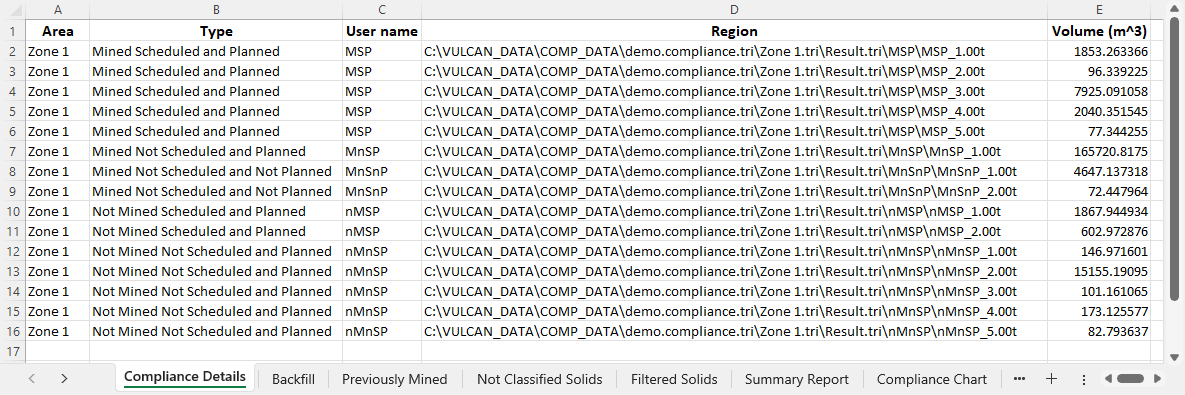
The Excel file could contain the following sheets:
Compliance Details
Only present if the user selects Create one report for all areas and solid types.
Note: If you did not select Create one report for all areas and solid types, multiples sheets will be created for each area and solid type
Backfill
Always present in its own sheet. Available in the 3 & 4 topography methods.
Previously Mined
Always present in its own sheet. Available in the 4 topography method.
Not Classified Solids
Always present in its own sheet. Available in the 3 & 4 topography methods.
Filtered Solids
Only present if one or more solids did not pass the filters.
Summary Report
Only present if the user selects Create a summary report.
Compliance Chart
Only present if the user selects Create a summary chart.
Filters
Use this section to discard any unwanted solids. The filtered solids are stored in the Filtered folder for each area and they are reported in the Filtered Solids sheet of the Excel report.
Note: The Filtered Solids sheet includes a Rejected by column that indicates which filter removed the solid.
Compliance has four user filters and one internal filter.
Validation Filter (internal)
This filter validates the solid integrity by checking the closure, consistency, and self intersection. This filter is automatic and cannot be disabled.
Thickness Filter
To use this filter, enter the Minimum thickness of solid areas to include. This filter will remove whole and/or parts (flaps) of solids below the specified thickness from the result. Up to one decimal place of precision is allowed for this value.
Note: If using the thickness filter, it is recommended to execute Compliance twice, once with and once without the filter enabled in order to observe the difference in volume or tonnage that is removed by the thickness filter in the generated reports. Unlike other filters, the thickness filter does not save removed solids to the Filtered output folder or the Filtered Solids sheet of the Excel report.
Volume Filter
To use this filter, enter the Minimum volume per solid. Solids below the specified volume will be filtered out of the results and saved to the Filtered output folder. Up to one decimal place of precision is allowed for this value.
Area Filter
To use this filter, enter the Minimum footprint area per solid. Solids below the specified footprint area will be filtered out of the results and saved to the Filtered output folder. Up to one decimal place of precision is allowed for this value.
Tonnage Filter
To use this filter, enter the Minimum tonnage per solid. This filter is available only if the Use block model option is selected under the Report options section. Solids below the specified tonnage will be filtered out of the results and saved to the Filtered output folder. Up to one decimal place of precision is allowed for this value.
Buttons
Apply and Run
Click this button to save edits to the specification file and run the application.
OK
Click this button to save edits to the specification file and exit the application without running.
Cancel
Click this button to exit the panel without saving any edits.
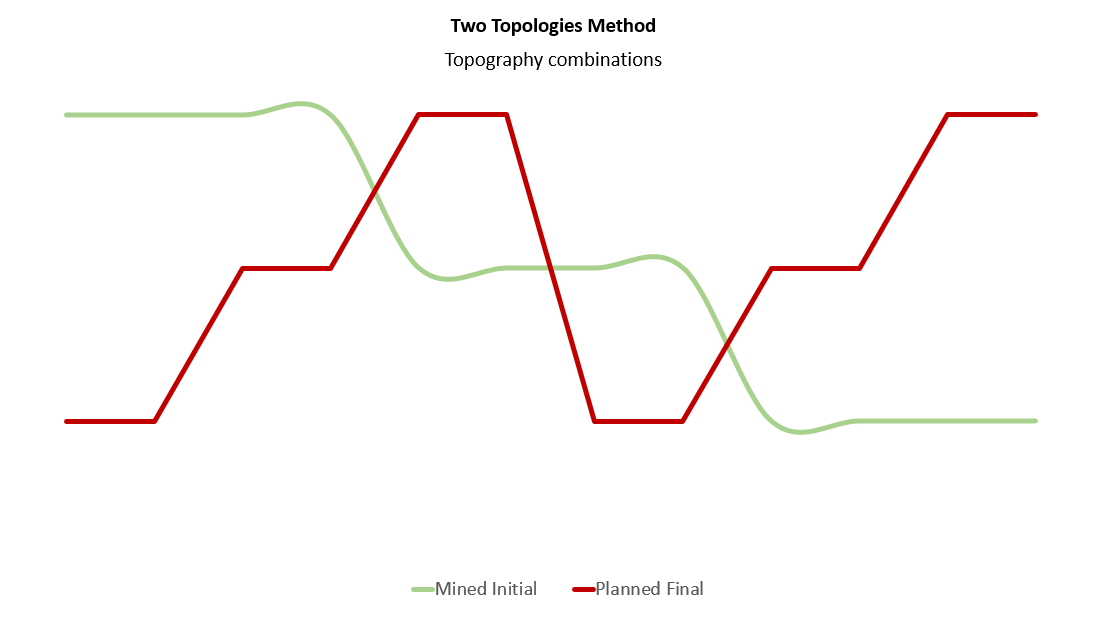
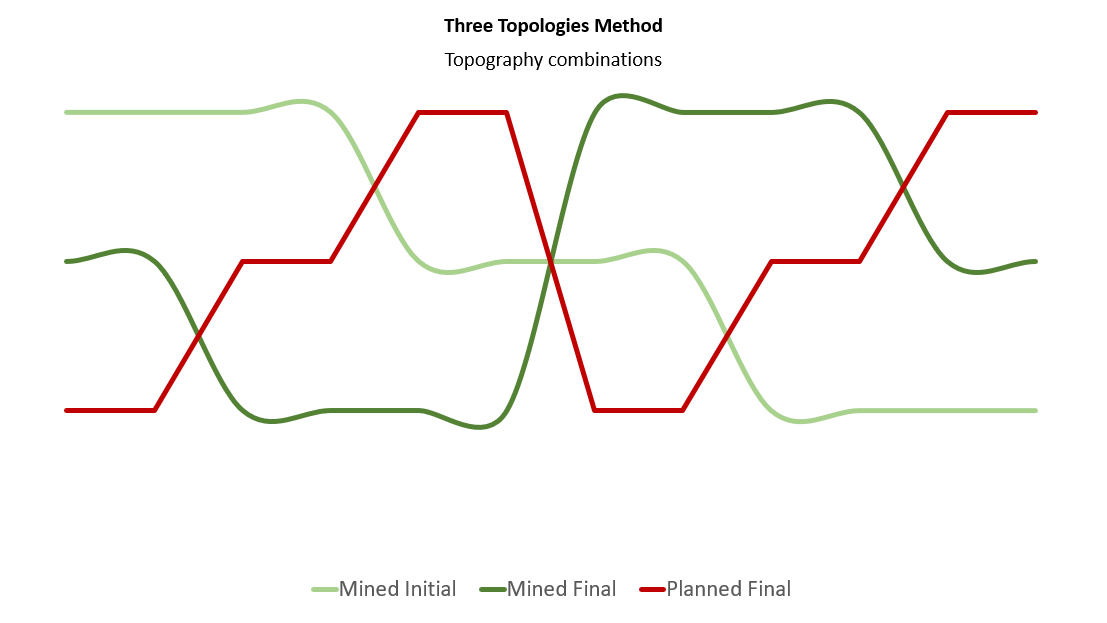

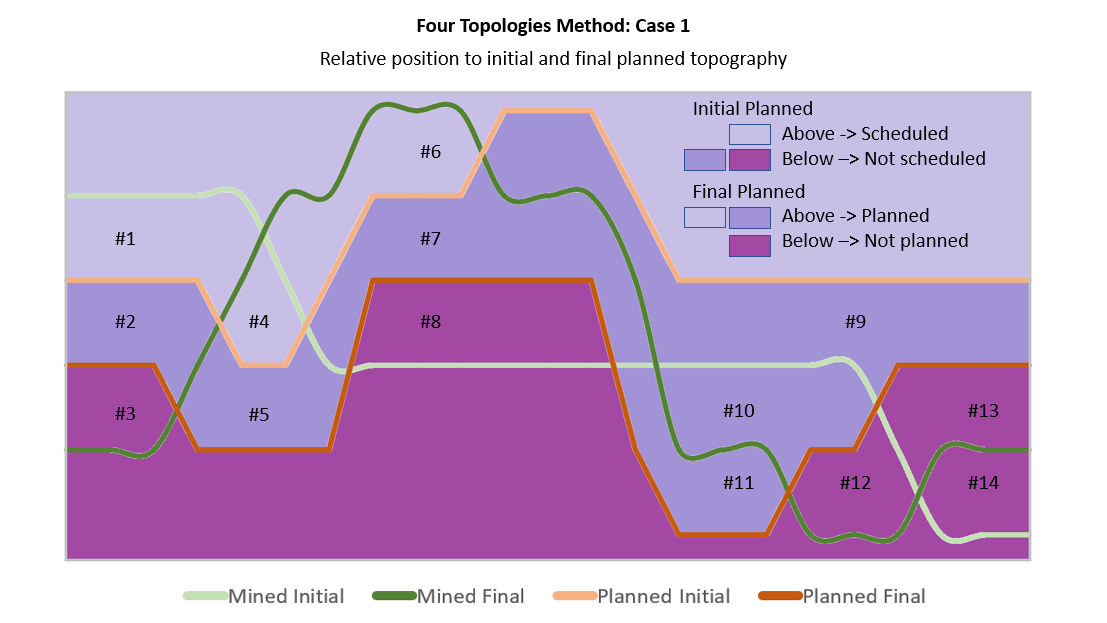
The examples of the four topography method is divided in two sections:
-
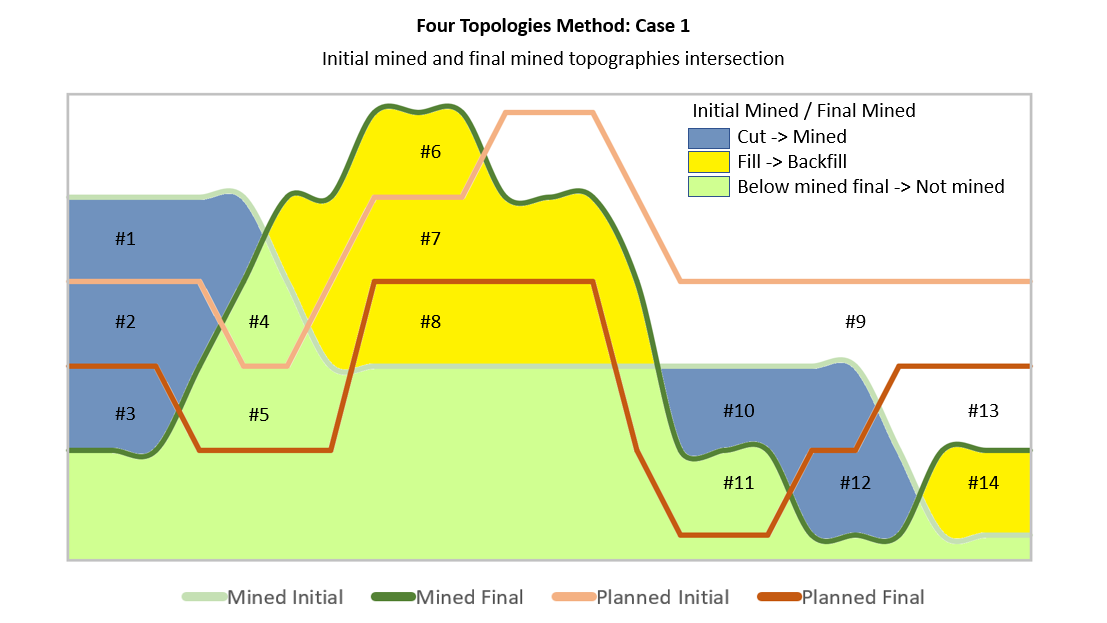
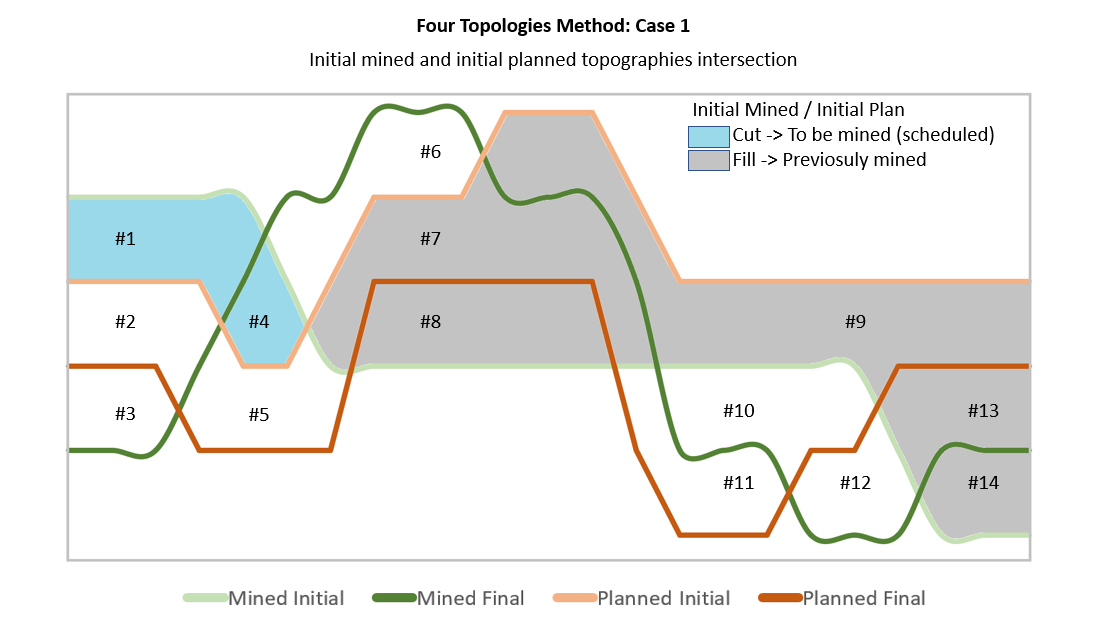
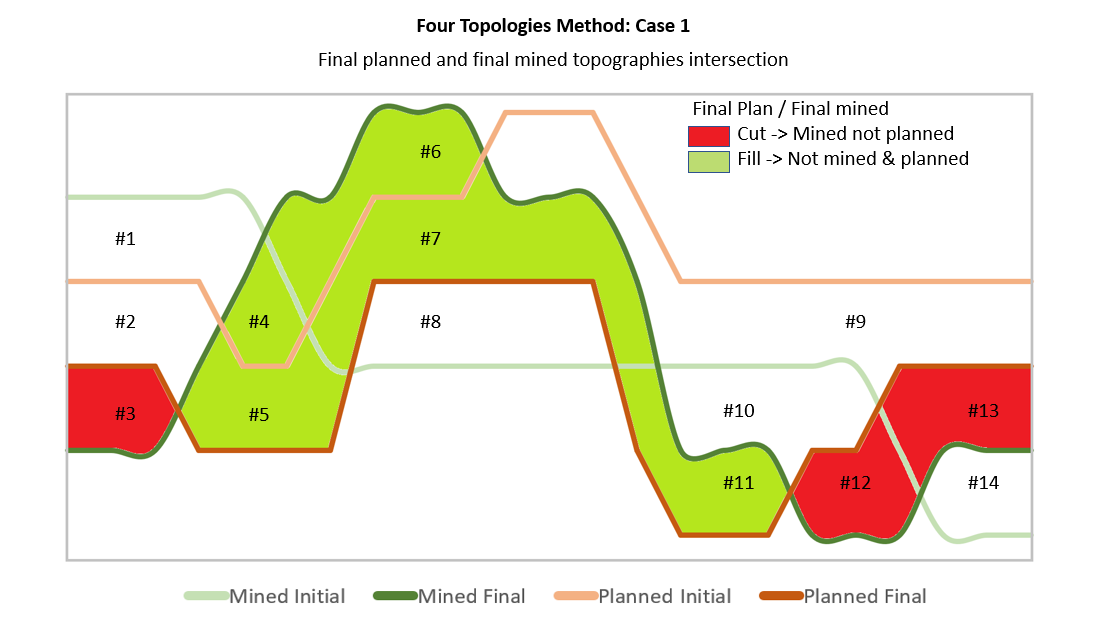
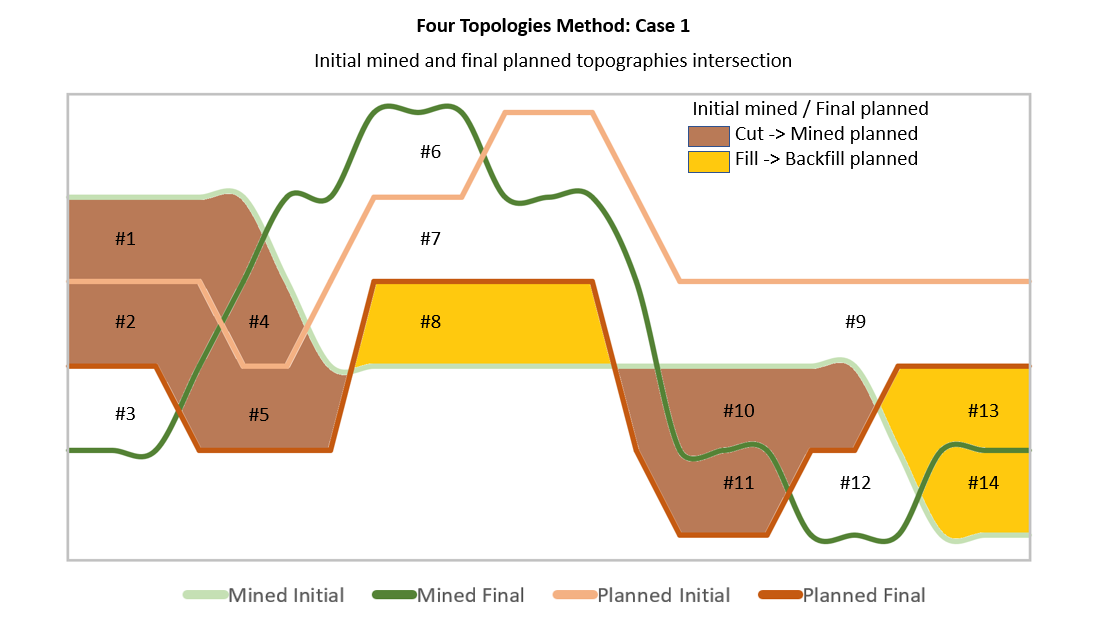
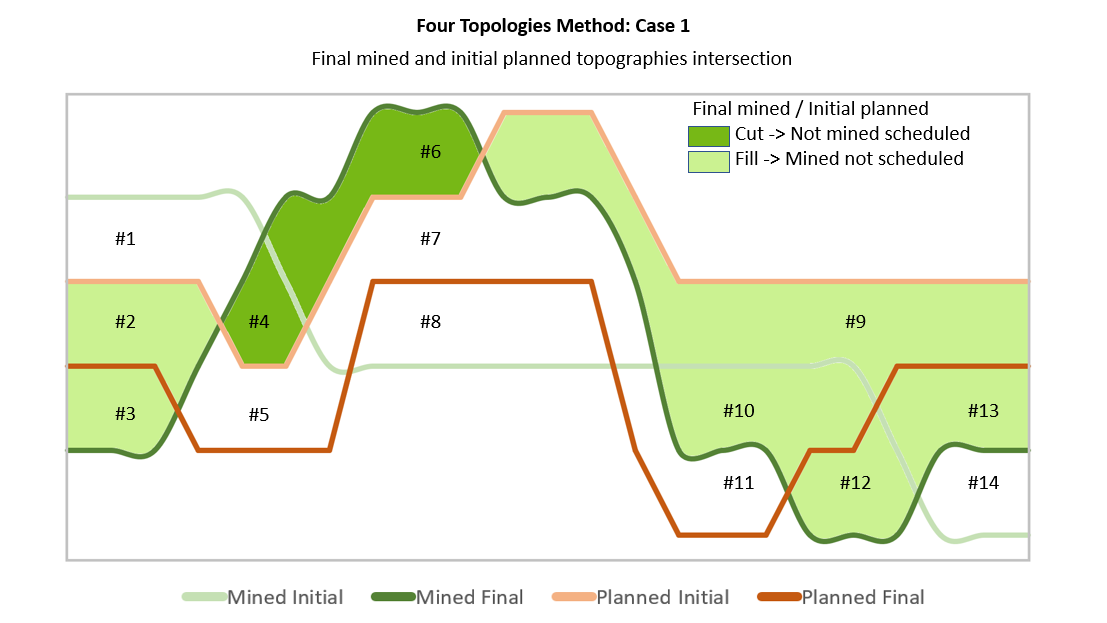
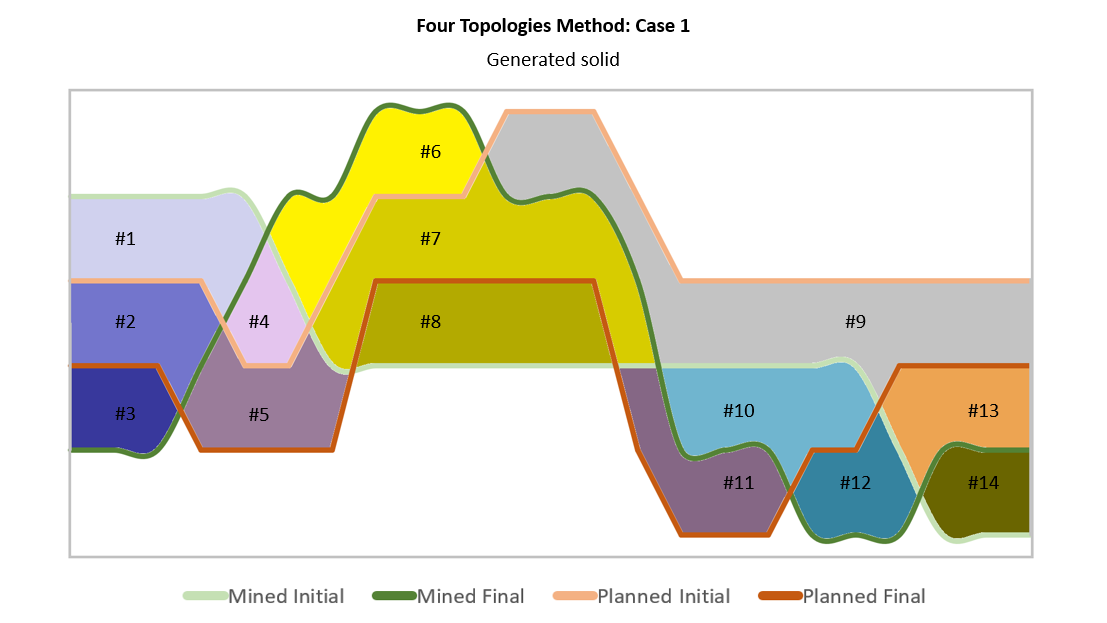
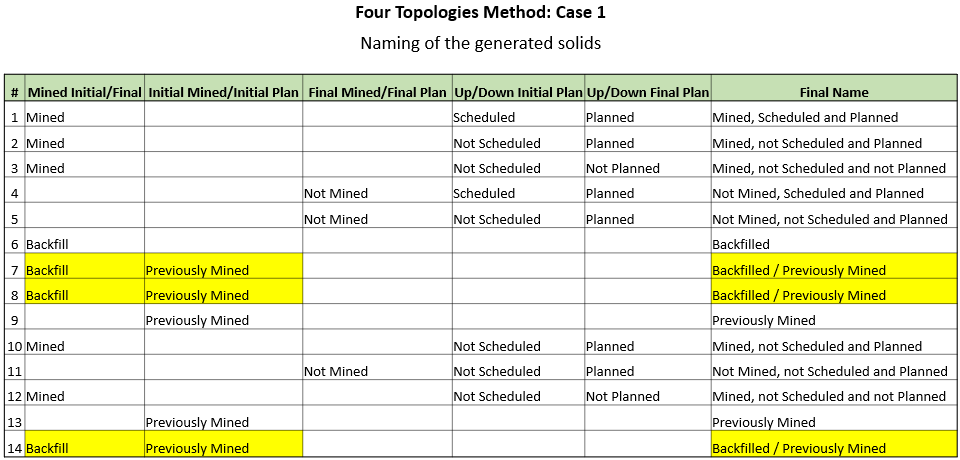
Case 1: Final planned topography is below the initial planned topography.
-
Case 2: Final planned topography is above the initial planned topography.
Case 1: Final planned topography is below the initial planned topography.
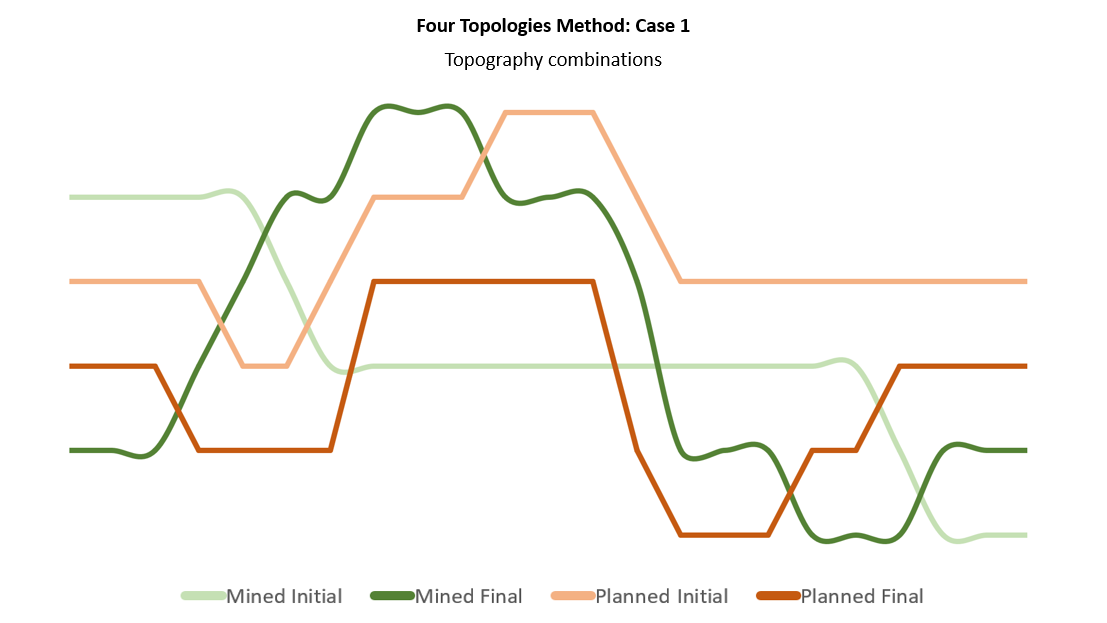
Case 2: Final planned topography is above the initial planned topography.
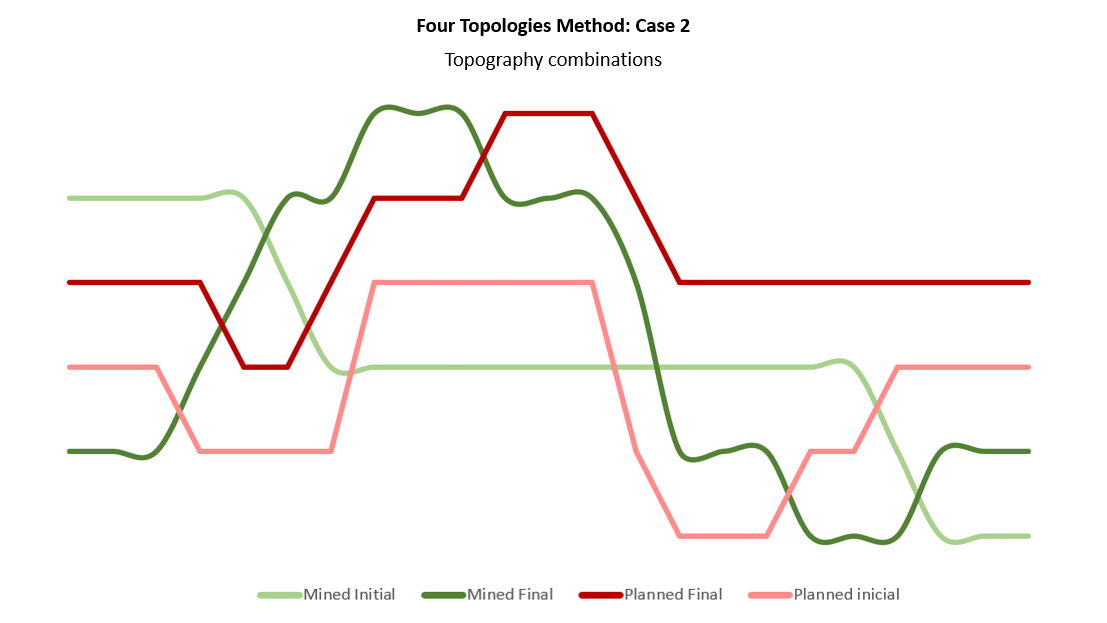
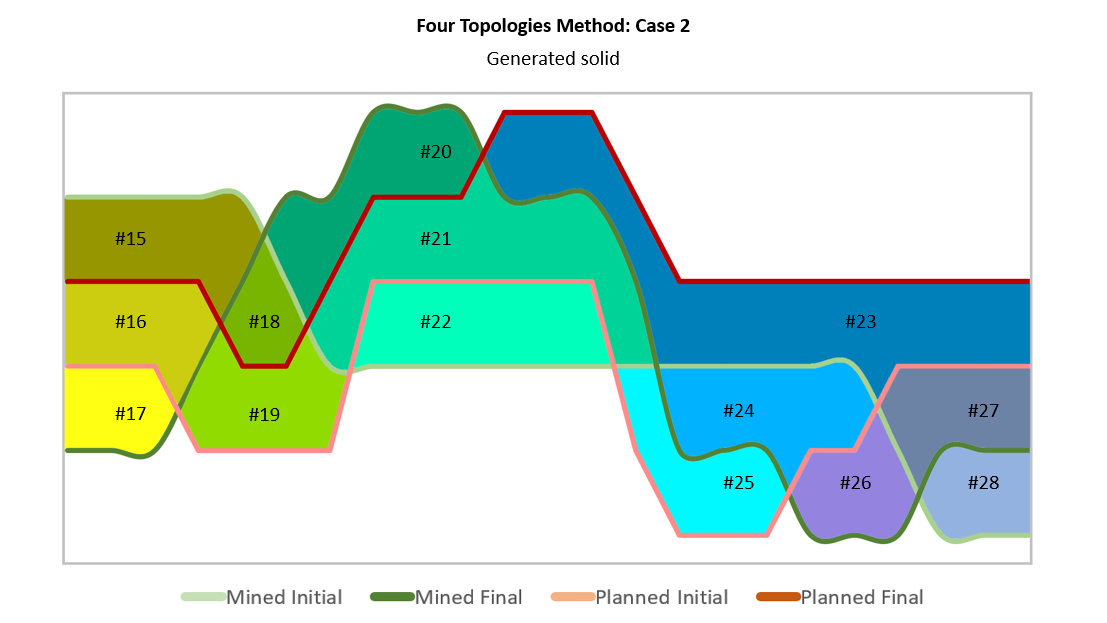
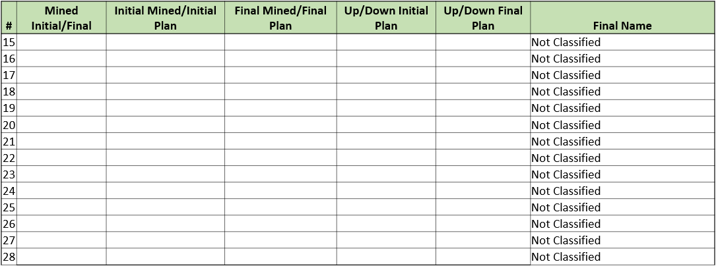
For the second case (Final planned above Initial Planned topography), all solids will be considered as not classified.


In the four topography method, Compliance will work exclusively with the case 1 (i.e. the final planned topography is always below the initial planned topography).
Backfill and Previously Mined solids are generated at different mining times than the rest of the solids, so they will be reported separately.
Backfill and Previously Mined solids could be overlapped, so it is advised that you don't use these solids to accumulate values with other solids classifications.
Compliance will always warn in the following cases:
-
If a part (or whole) of the final planned topography is above the initial planned topography.
-
If Backfill and/or Previously Mined is present.
-
If Backfill and Previously Mined are overlapped.
-
If two or more defined areas are overlapped.

