Pit Difference/Union

Creating a union and difference pit from two pit designs
The Pit Difference/Union option to create a union and difference pit from two pit designs that were created through the Design Pit/Dump option (under the Open Pit > Ramps submenu).
The Pit Difference/Union option can also be accessed by selecting the
![]() Pit Difference/Union button from the Phase Design toolbar.
Pit Difference/Union button from the Phase Design toolbar.
Instructions
- Select Open Pit menu
- Select Phase Design submenu
- Select Pit Difference/Union option
Select the first designed pit layer, followed by the second designed pit layer.
The following panel is then displayed.
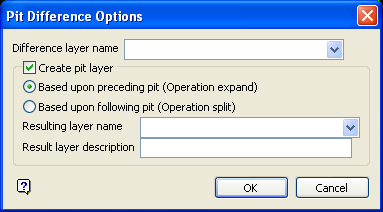
Pit Difference Options panel
Difference layer name
Enter the name of the layer for the difference pit.
The drop-down list contains the names of all currently loaded layers. If you select an existing layer, then the resulting data will be appended to the nominated layer. If you enter the name of an existing layer that is not currently loaded, then you will need to confirm whether you want to load the layer or replace it, i.e. overwrite its contents.
Create pit layer
Select this check box to create an expanded or split pit. The resulting pit can be saved in a nominated layer.
Enter a description to further describe the contents of this layer. The description can be up to 80 alphanumeric characters and may include spaces. If a description is not entered, then a default description will be used instead. If the chosen layer already has an assigned description, the description displays when the layer is selected. Existing layer descriptions can be overwritten.
The drop-down list contains the names of all currently loaded layers. If you select an existing layer, then the resulting data will be appended to the nominated layer. If you enter the name of an existing layer that is not currently loaded, then you will need to confirm whether you want to load the layer or replace it, i.e. overwrite its contents.
Select OK.
Confirm that you have selected the correct object. Use the File > Save option, or select the
![]() Save button on the Standard toolbar, to save the layers.
Save button on the Standard toolbar, to save the layers.

