Split
Use this option to split one strip into two separate strips.
Instructions
On the Open Pit menu, point to Pit Layout, then click Split.
The following panel displays.

The string can be split by the line, by points or by point and angle.
Set split direction by line
This method to define the cut direction using the existing line.
Set split direction by points
This method to define the cut direction through using two indicated points.

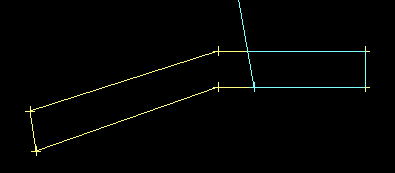
Diagram 1 - Cutting a Strip by Points
Select the starting point of the cut line, followed by the end point of the cut line. You can use  Indicate mode for an approximate location of the line, or a snap mode for precise positioning of the points. Refer to the Digitise toolbar for details on the available snap modes.
Note: The two points do not have to define a line that intersects the strip. If need be, then the line is extended through the object.
Once selected, the strip is split into two possible polygons. Both of these polygons will be highlighted in different colours. One section will be highlighted in the highlight colour and the other in the label colour - these colours are set through the Graphics : Colours section of the Tools > Preferences option. You can alter the way these highlight colours are applied by reversing the direction of the cutting line.
You will then be prompted to retain or reject the polygon division. Retain keeps the position of the cut line, Reject returns you to the select polygon prompt.
If you have selected Retain, then the Polygon selection dialog box displays.
OK
Select this option to remove the polygon section that is highlighted in the highlight colour. You will then be prompted to select another polygon. Right-click to exit the option.
Other one
Select this option to remove the polygon section that is highlighted in the label colour. You will then be prompted to select another polygon. Right-click to exit the option.
Cancel
Select this option to exit the option.
Use the  Undo button on the Standard toolbar to undo the deletion.
Set cut direction by point and angle
This method to select a start point for the cut and then angle along which to project the cut.
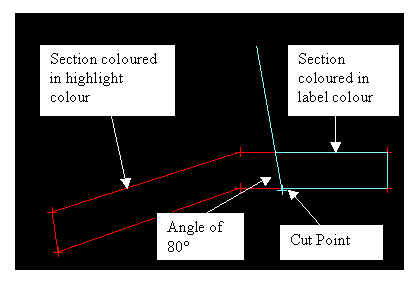
Diagram 2 - Cutting a Strip by Point and Angle
Select the pit to cut, followed by the line segment to cut. The angle of the cut direction is measured from this line segment.
You will then need to indicate the cut point along the line. You can use Indicate mode for an approximate location of the point, or a snap mode for precise positioning of the points. Refer to the Digitise toolbar for details on the available snap modes.
Once selected, the strip is split into two possible polygons. Both of these polygons will be highlighted in different colours. One section will be highlighted in the highlight colour and the other in the label colour - these colours are set through the Graphics : Colours section of the Tools > Preferences option. You can alter the way these highlight colours are applied by reversing the direction of the cutting line. The cutting line will also be displayed.
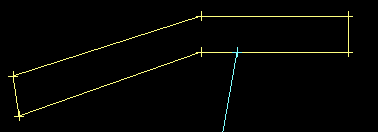
You will then be prompted to confirm the cut direction. Select OK to retain the cutting line and other direction to change the direction of the cutting line.
Diagram 3 - Cutting line at 80°
Diagram 4 - Cutting line at 80° after Other direction has been selected
You are prompted to retain or reject the polygon division. Retain keeps the position of the cut line, Reject returns you to the select polygon prompt.
If you have selected Retain, then the Polygon selection dialog box displays.
OK
Select this option to remove the polygon section that is highlighted in the highlight colour. You will then be prompted to select another polygon. Right-click to exit the option.
Other one
Select this option to remove the polygon section that is highlighted in the label colour. You will then be prompted to select another polygon. Right-click to exit the option.
Cancel
Select this option to exit the option.
Use the Undo button on the Standard toolbar to undo the deletion.

